
Multimodal Large Model Deployment
Multimodal large models support deployment through the graphical interface in the AIO Admin Console. Select one of the following access methods based on your requirements.
| Deployment Method | AIO Admin Console Option | Description |
|---|---|---|
| Officially Supported Large Model | Deploy Built-in LLM | Download the installation package for the officially supported large model and add an LLM Node to the cluster. The platform deploys and manages the model service. |
| Customer-Provided Large Model | Connect Your Own LLM Service | Connect another large model provided by the customer. The model service API must comply with the OpenAI standard protocol. After entering the service URL and configuration, run a connection test to verify connectivity and model availability. |
Feature Support
The following features are available after deploying an officially supported large model or configuring access to a customer-provided large model.
| Feature | Officially Supported Large Model | Customer-Provided Large Model |
|---|---|---|
| Smart Search | Supported | Supported |
| Change Detection Pro | Supported | Supported |
| Multimodal Object Detection and Recognition | Supported | Supported |
| Copilot Assistant - Remote Control | Supported | Supported |
| Copilot Assistant - Flight Route Editing | Supported | Supported |
| Copilot Assistant - Automated Workflows | Currently not supported | Currently not supported |
| Copilot Assistant - Flight Report Generation | Currently not supported | Currently not supported |
AI Map Packages are used for the "Copilot - Flight Route Editing" feature in DJI FlightHub 2. To use this feature, download the map package for the corresponding region, then import and activate it after configuring the model service.
Prerequisites
Server Requirements for the Officially Supported Large Model
| Configuration Item | Minimum Configuration Requirements |
|---|---|
| Server Architecture | Only x86 is supported. |
| CPU | 16 physical cores or more |
| Memory | 128 GB |
| Disk | 1 TB NVMe SSD |
| Video Memory (VRAM) | 48 GB |
| Operating System | Ubuntu Server 22.04 LTS or 24.04 LTS (64-bit) |
| CUDA and NVIDIA Driver Recommendations | CUDA 12.8.1: NVIDIA driver ≥ 570.124.06 CUDA 12.9.1: NVIDIA driver ≥ 575.57.08 CUDA 13.3: NVIDIA driver ≥ 610.43.02 |
The minimum configuration provides a good experience for requests from a single user. For concurrent requests from 2 users, 96 GB of VRAM and 256 GB of memory are recommended.
Deployment Limitations:
- Only one LLM Node can be added, and this node supports only a single graphics card.
- At most 2 users can submit concurrent requests. Additional requests that exceed this limit return an error.
⚠️ Note
The officially supported large model has high graphics card requirements. The current DJI FlightHub 2 all-in-one appliance does not meet these requirements, so the officially supported large model cannot be deployed on the appliance or an appliance node. Use a server node that meets the configuration requirements above for deployment.
Before adding a node, prepare the target server's IP address, SSH port, and a login account with sudo/root privileges and its authentication information. Ensure that the server hosting the AIO Admin Console can access the target server over SSH.
Access Requirements for a Customer-Provided Large Model
A customer-provided large model is another large model that the customer connects independently. Its service API must comply with the OpenAI standard protocol.
| Preparation Item | Description |
|---|---|
| Server Configuration | Refer to the recommended configuration on the selected large model's official website to confirm CPU, memory, video memory, storage, and other requirements. Prepare the model server accordingly. |
| Service Information | Prepare the Base URL, Model Name, and API Key (if authentication is required) for the language model (LLM) and vision model (VLM). Ensure that FlightHub 2 On-Premises can access the model service URLs. |
| Model Availability | Run a connection test during access configuration to verify both service connectivity and model availability. For detailed steps, see "Connecting a Customer-Provided Large Model" below. |
This method does not deploy the model in the DJI FlightHub 2 cluster or use cluster GPU nodes.
Recommended Third-Party Model: Qwen3.8-27B has passed feasibility validation. Follow the server configuration recommended on the model's official website. When connecting the model, you must still run a connection test to confirm connectivity and model availability for the current service.
Download Preparation
Prepare your FlightHub 2 On-Premises license ID for verification and resource downloads on the developer website. To deploy the officially supported large model, download the large model installation package. To use the "Copilot - Flight Route Editing" feature in DJI FlightHub 2, both access methods require downloading the AI Map Package for the corresponding region.
Deploying the Officially Supported Large Model
1. Download the installation package for the officially supported large model and the AI Map Package.
Log in to the developer website, go to "FlightHub 2 On-Premises Service" → "Download LLM Images", enter the license ID, and click "Verify".
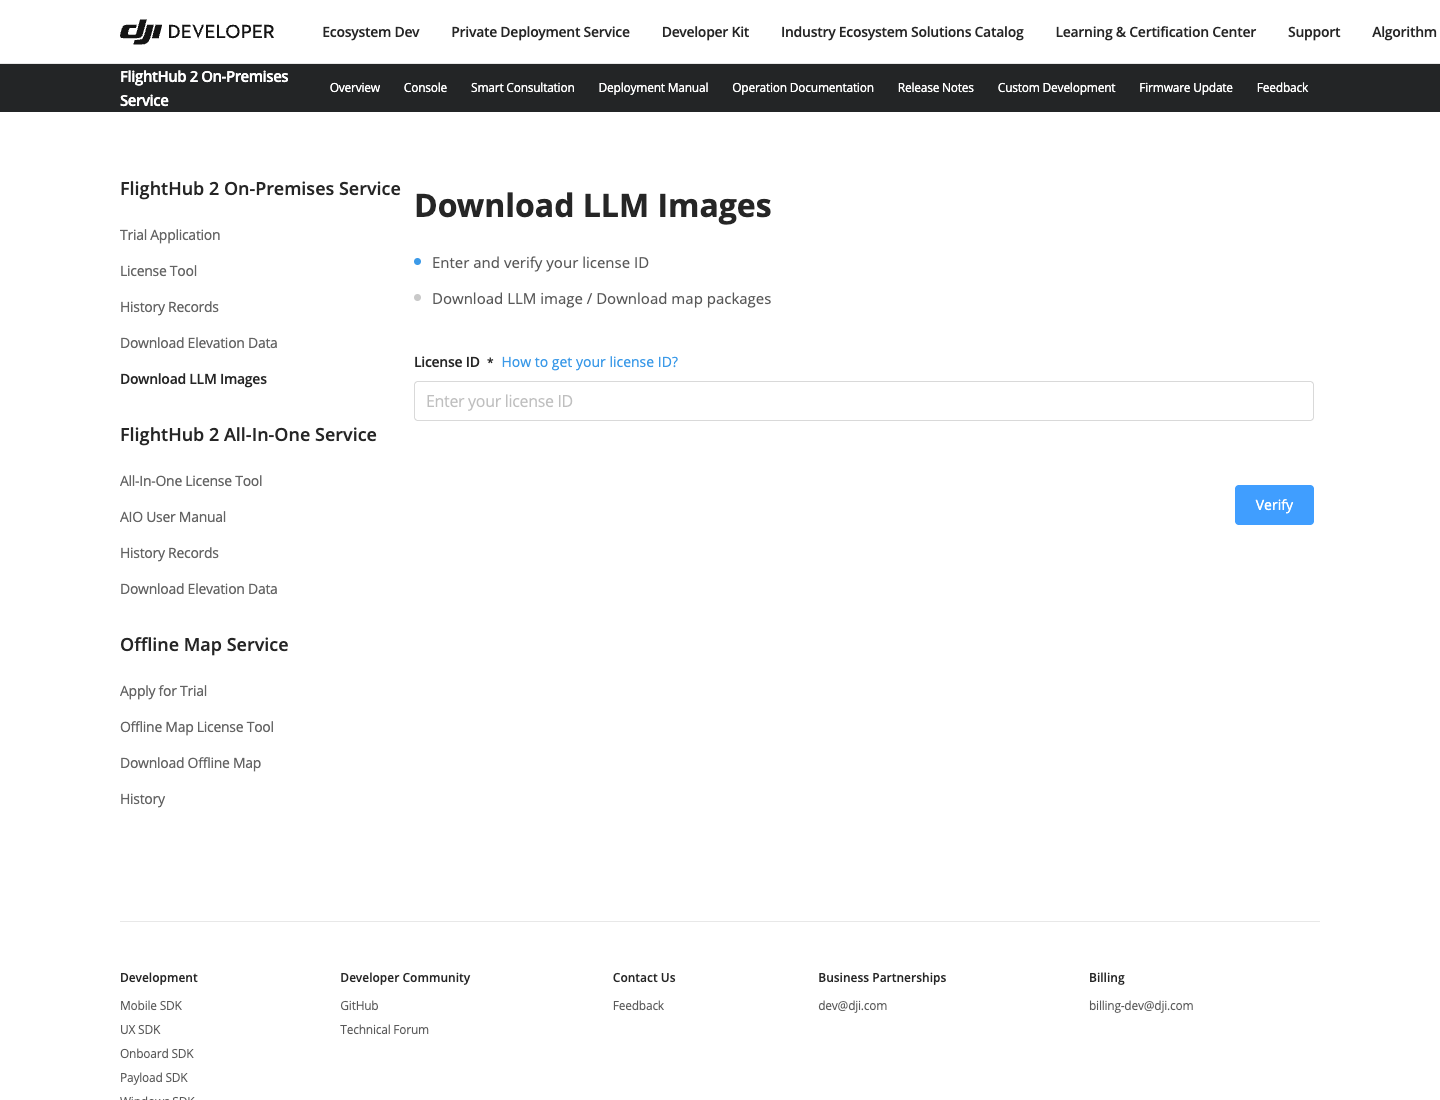
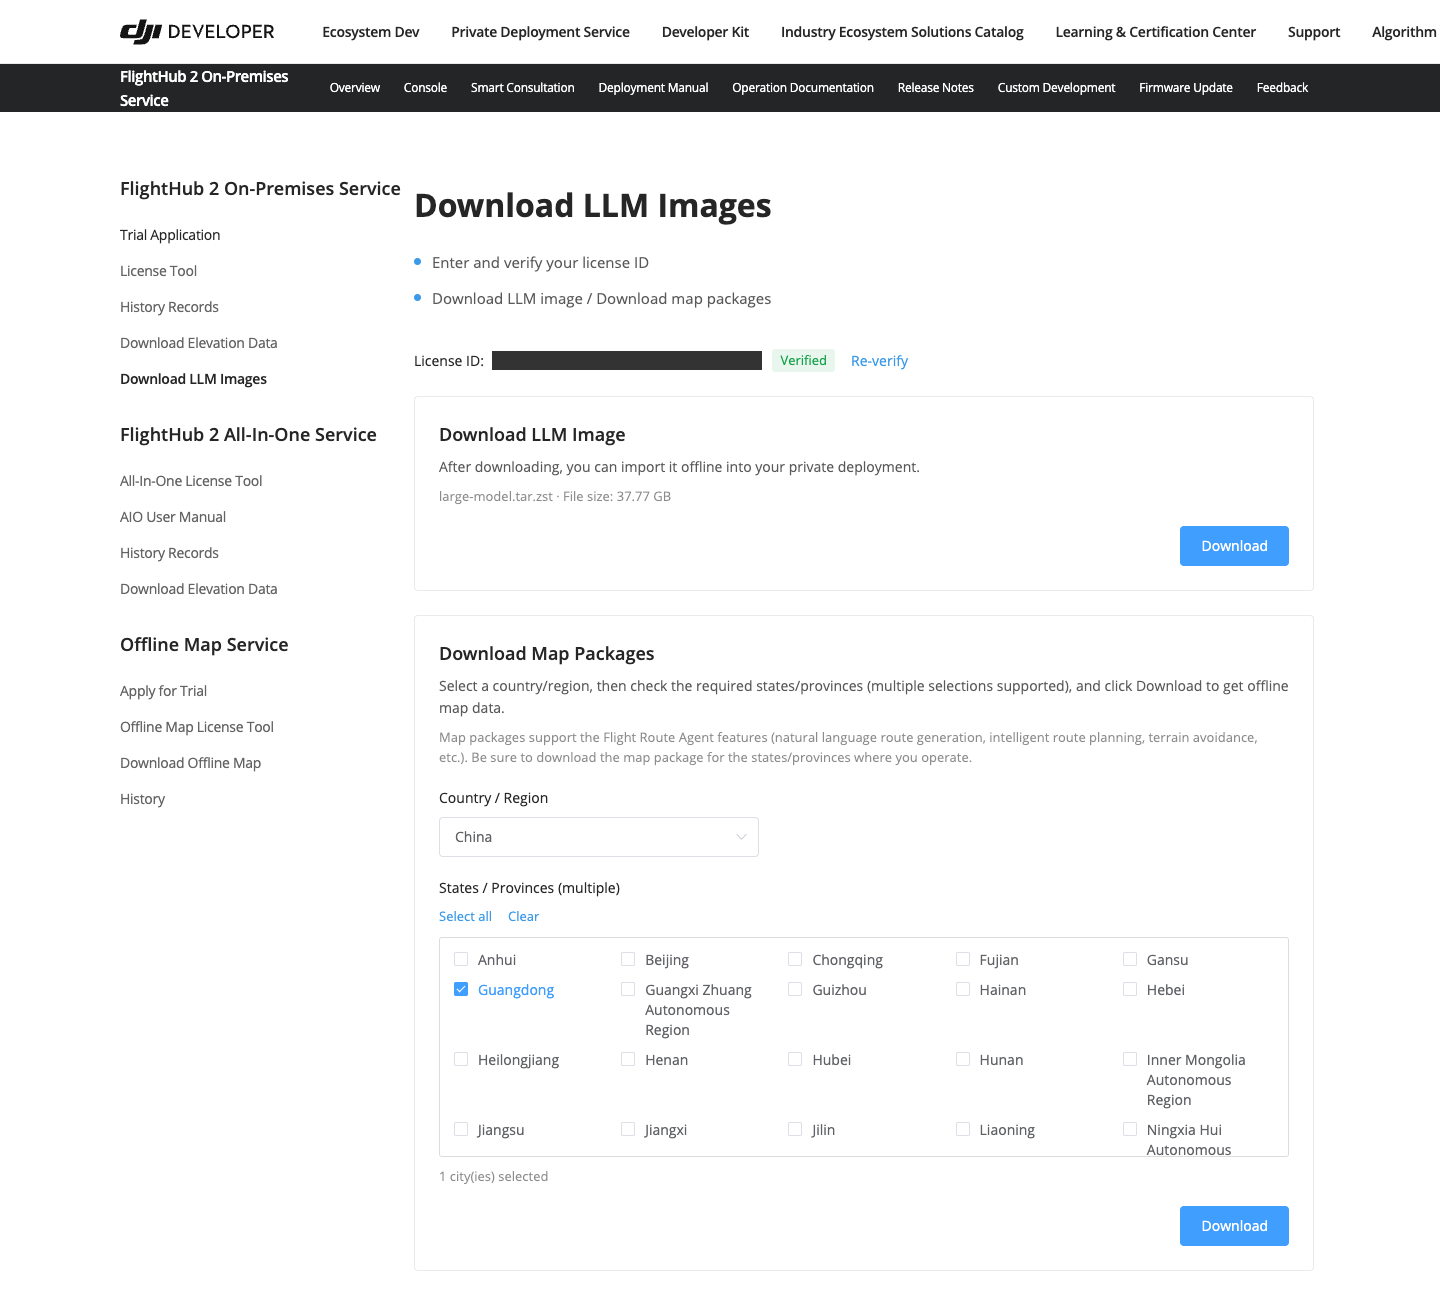
After verification succeeds, download the installation package under "Download LLM Images". Under "Download Map Packages", select the country/region where your operation area is located, select the required states/provinces (multiple selections are supported), and click "Download".
AI Map Packages are used for the "Copilot - Flight Route Editing" feature in DJI FlightHub 2. Download the map package for the corresponding operation region.
2. Add an LLM Node under "Cluster Management" in the AIO Admin Console.
Go to "Cluster Management" → "Cluster Topology" and click "Add Server". Enter the server connection information, select "LLM Node" for "Node Type", click "Start Adding", and wait for the server to join the cluster.
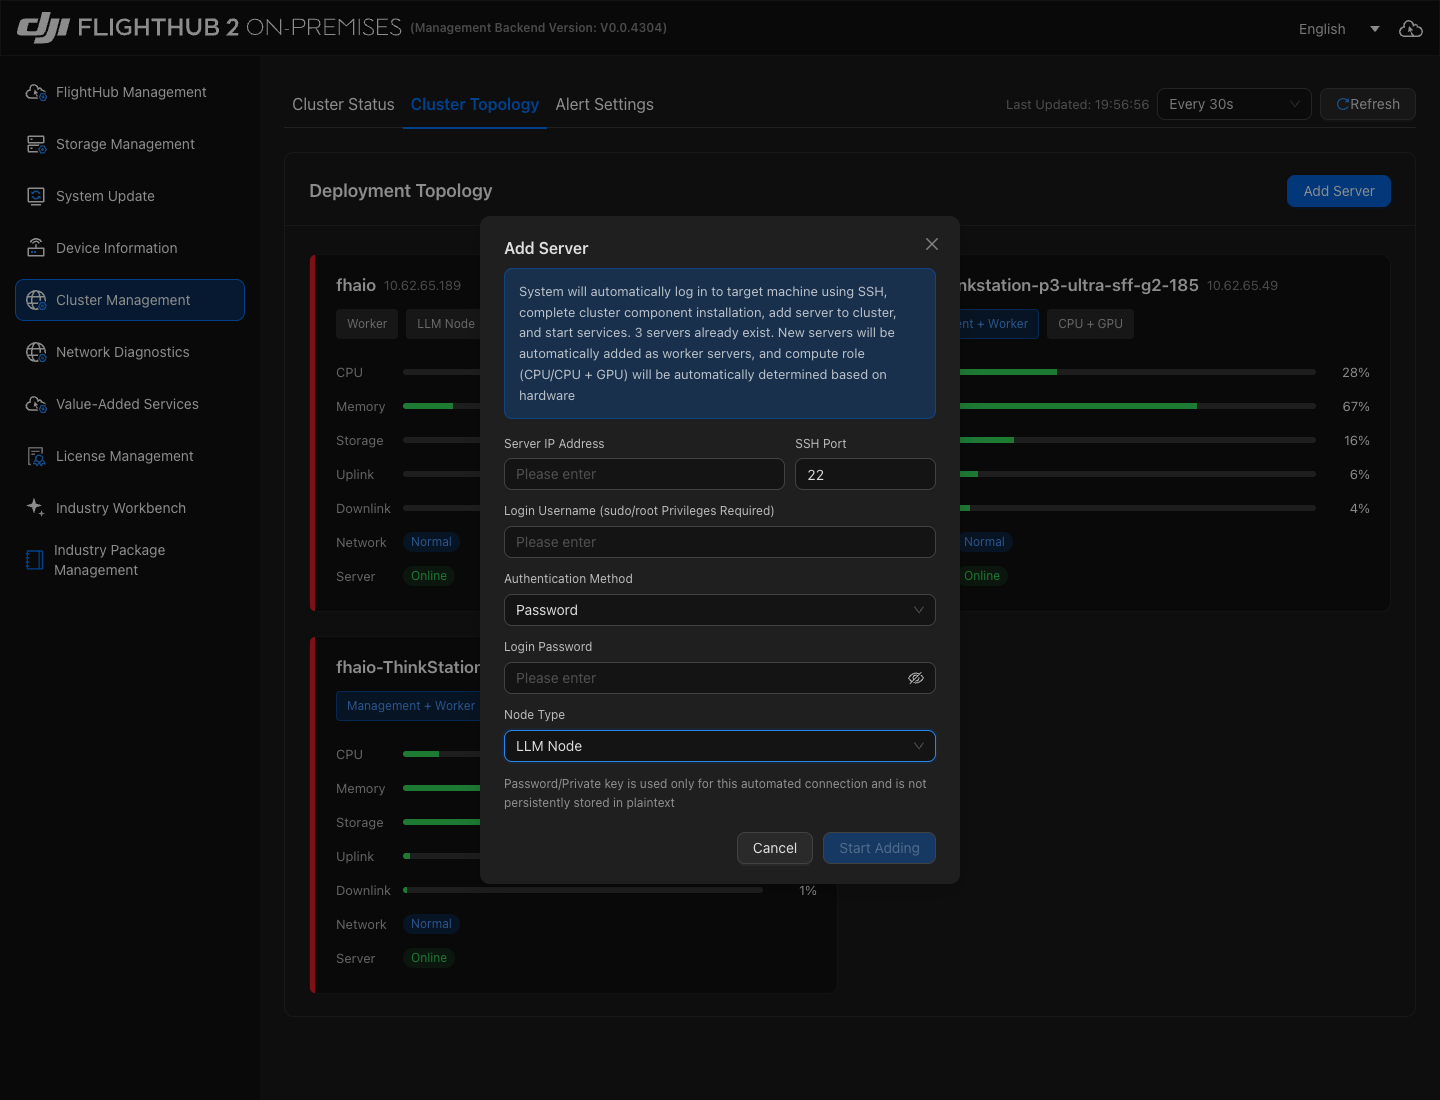
| Parameter | Description |
|---|---|
| Server IP | IP address of the large model server to be added. |
| SSH Port | SSH port actually used by the target server. |
| Login Username | Account with sudo/root privileges. |
| Authentication Method | Select an authentication method on the page and enter the corresponding password or private key. |
| Node Type | Select "LLM Node". |
3. Enable the large model service under "Value-Added Services".
Go to "Value-Added Services" in the AIO Admin Console and click "Enable Service" on the "LLM" card.
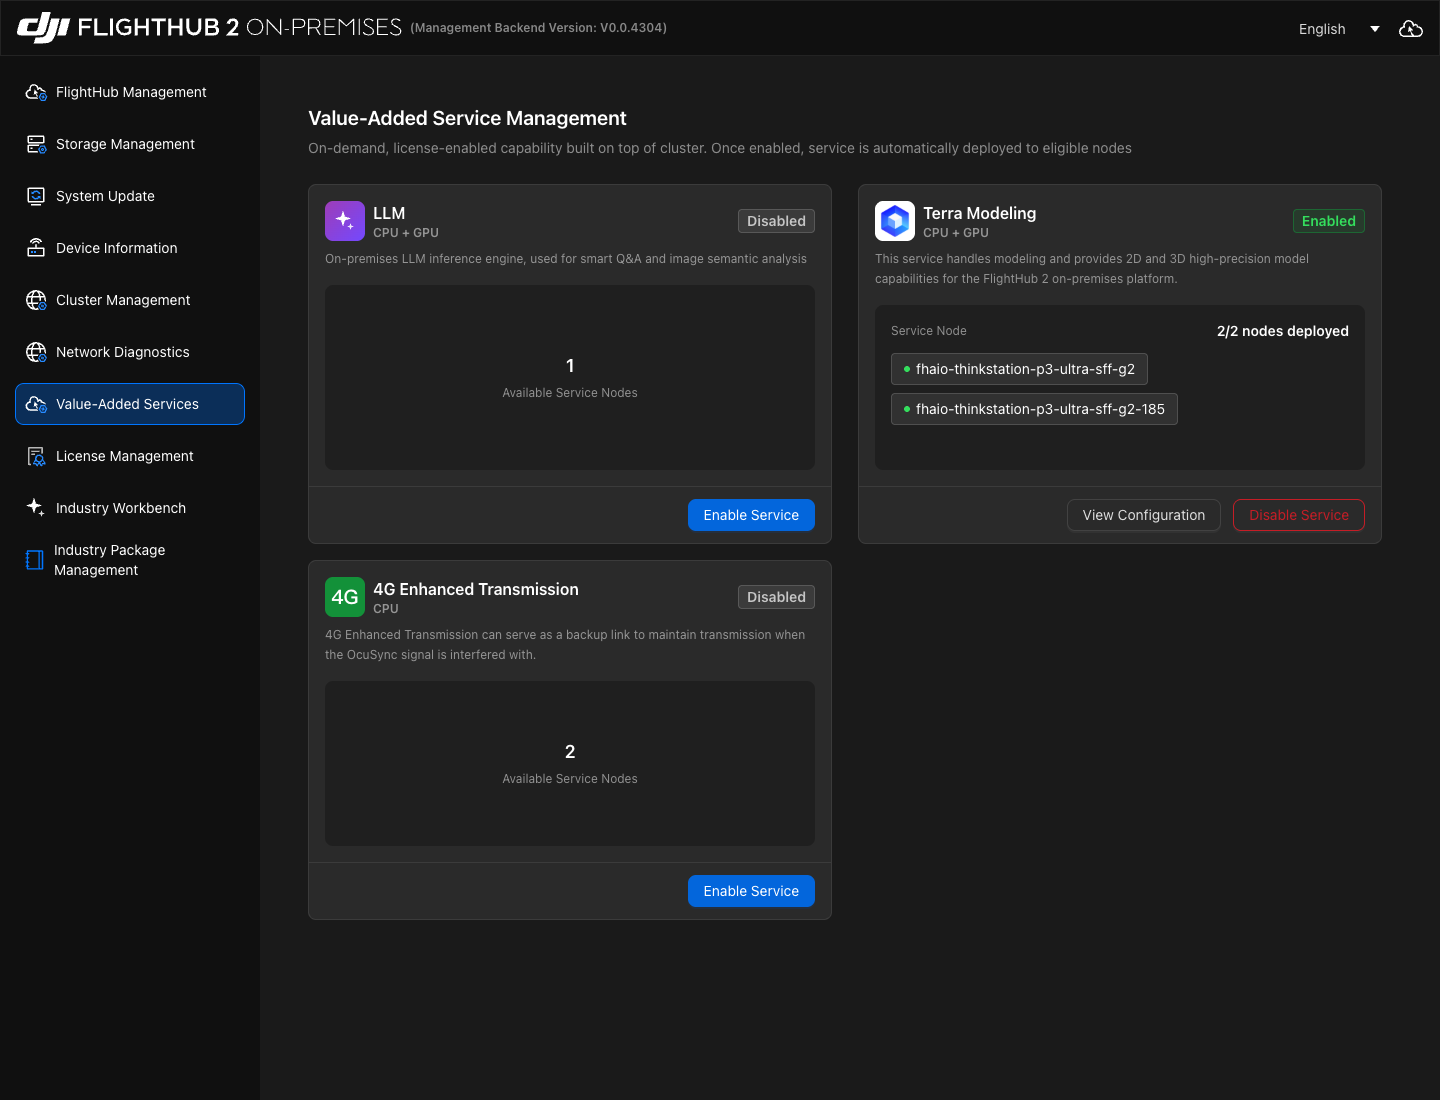
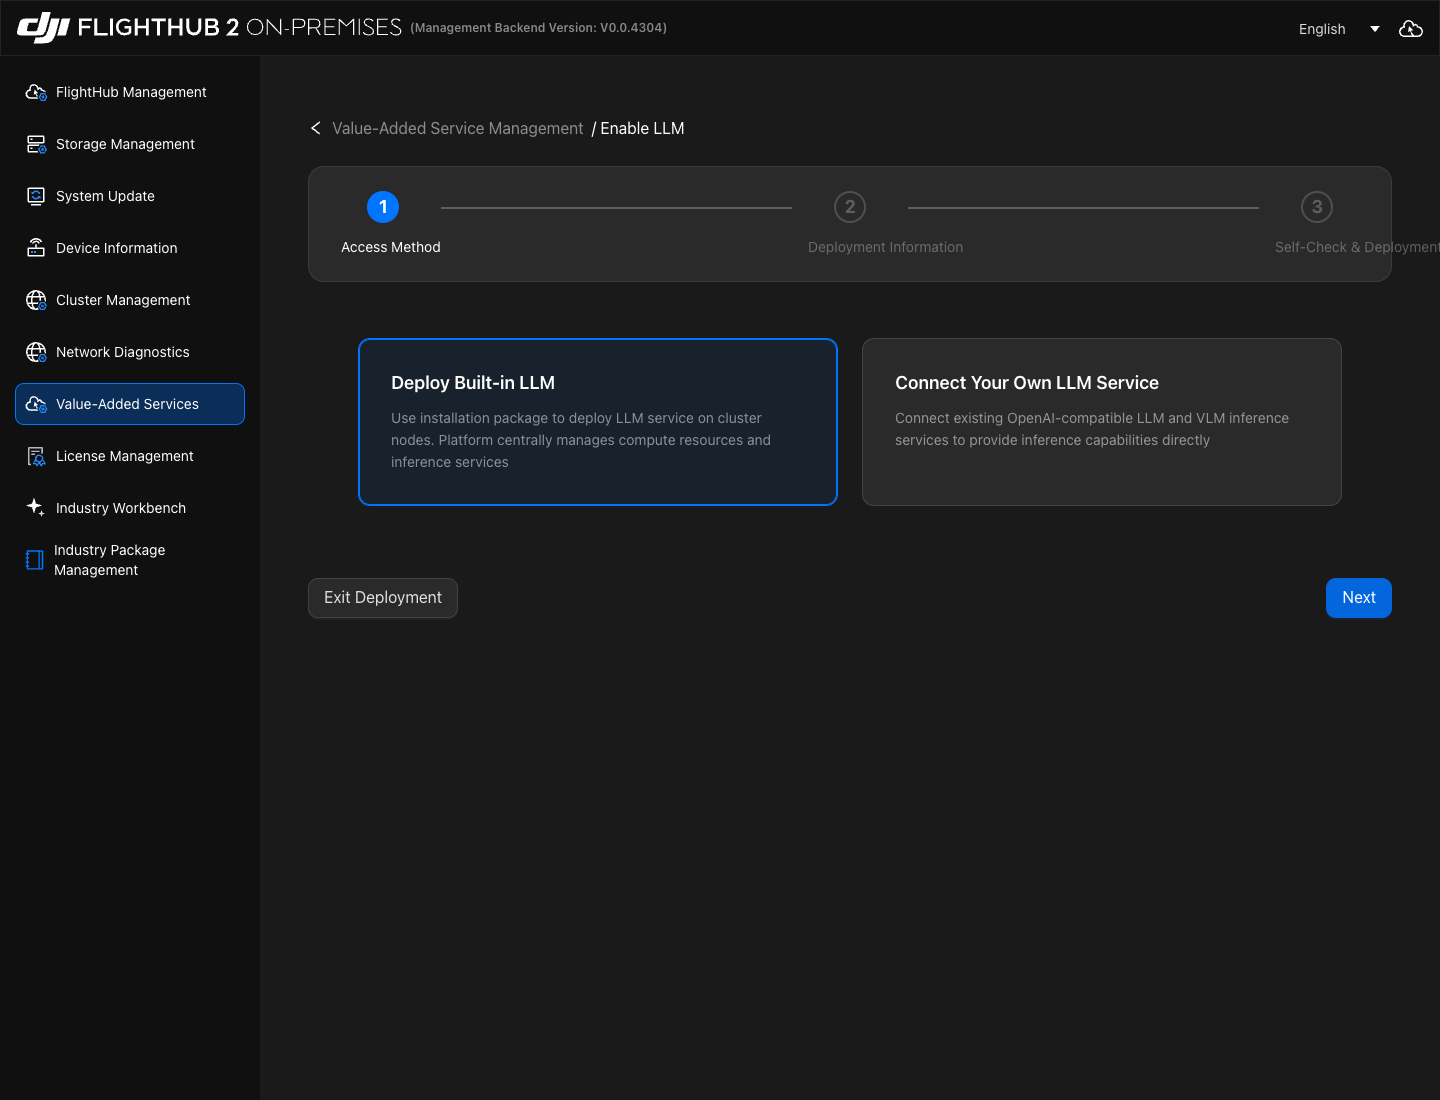
Under "Access Method", select "Deploy Built-in LLM" and click "Next".
4. Select the LLM Node and import the installation package.
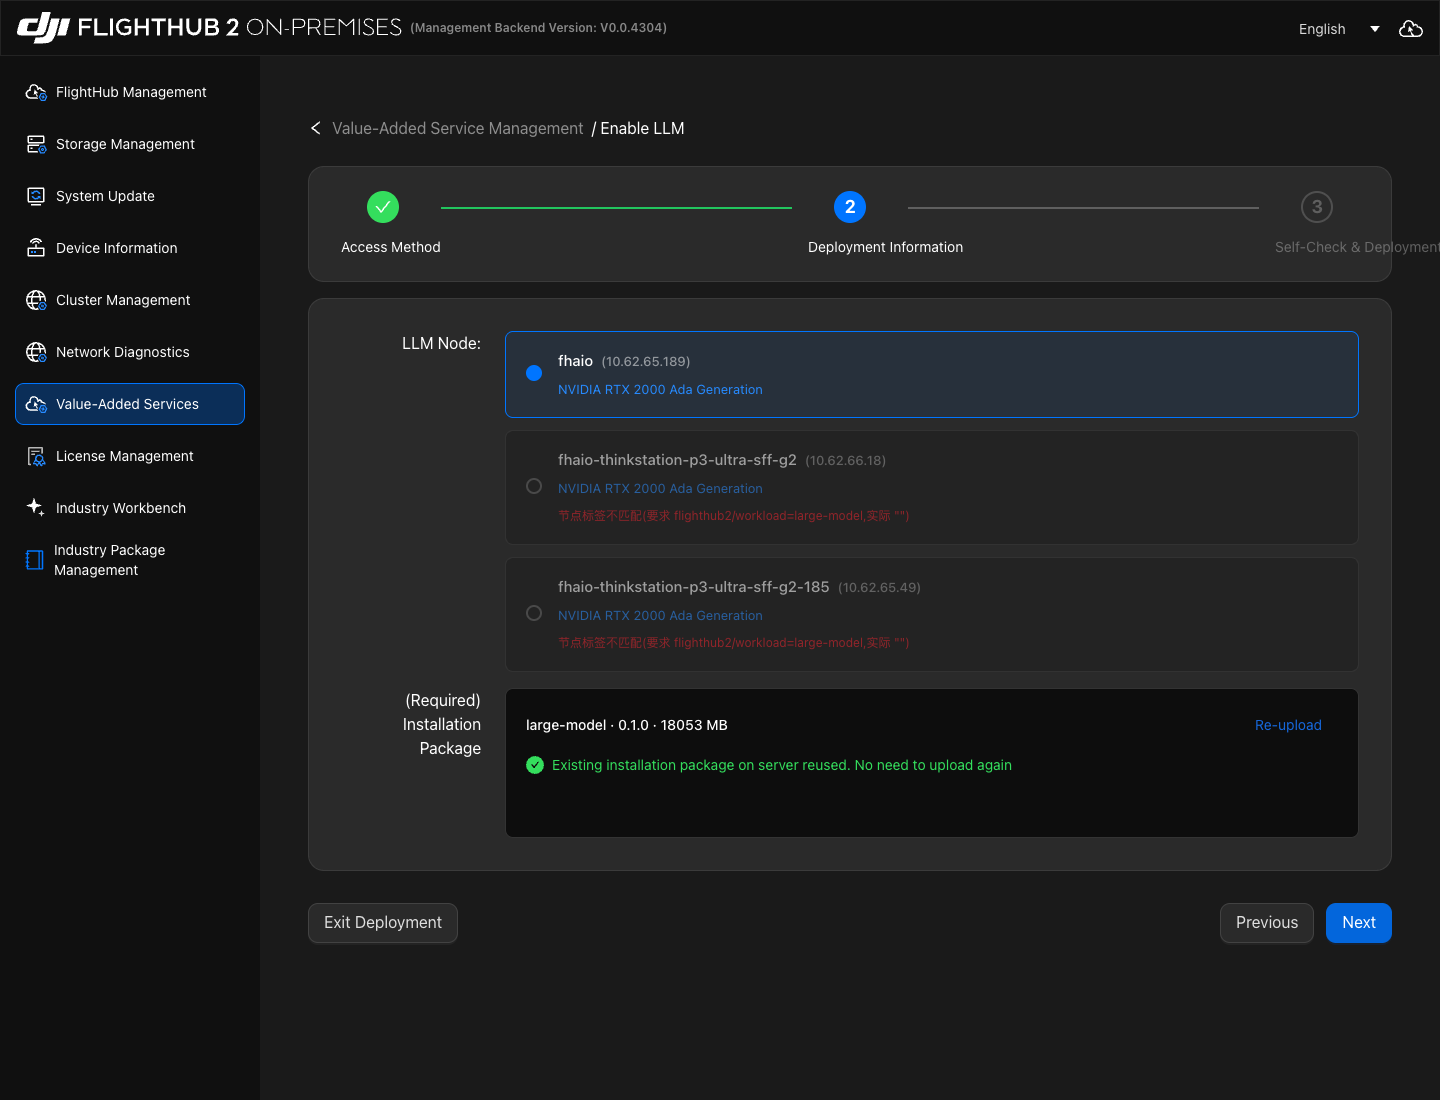
Under "Deployment Information", select the LLM Node you added and upload the installation package for the officially supported large model downloaded from the developer website. If the page indicates that a server-side installation package has been reused, verify the package information. To replace it, click "Re-upload". When finished, click "Next".
5. Follow the on-screen instructions to complete the environment check and deployment.
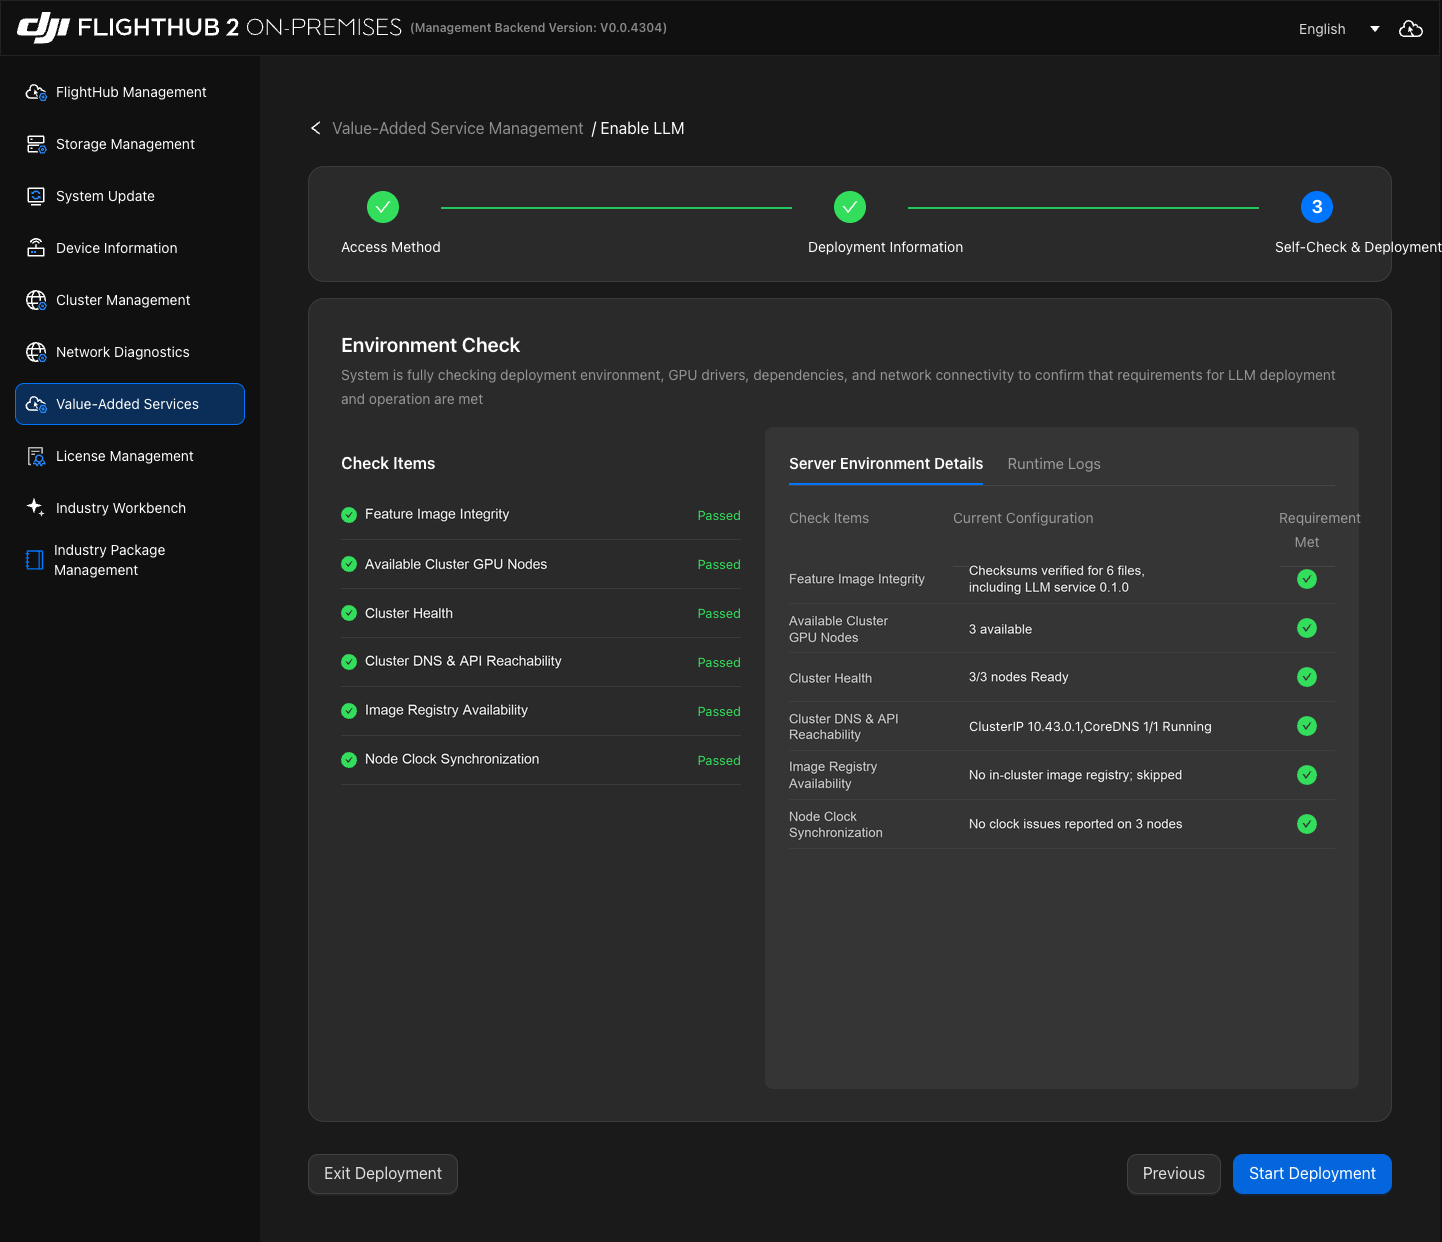
Under "Self-Check & Deployment", wait for the environment check to finish. View the check results through "Server Environment Details" and "Runtime Logs". If any checks fail, resolve the issues as instructed on the page and run the check again.
After the check passes, click "Start Deployment" and follow the on-screen instructions while waiting for deployment to finish.
6. Import and activate the AI Map Package.
To use the "Copilot - Flight Route Editing" feature in DJI FlightHub 2, complete the map configuration for the corresponding region as described in "AI Map Package Import and Activation" below.
Connecting a Customer-Provided Large Model
1. Enable the large model service under "Value-Added Services" in the AIO Admin Console.
Go to "Value-Added Services" and click "Enable Service" on the "LLM" card. Under "Access Method", select "Connect Your Own LLM Service" and click "Next".
2. Enter the LLM and VLM service configurations.
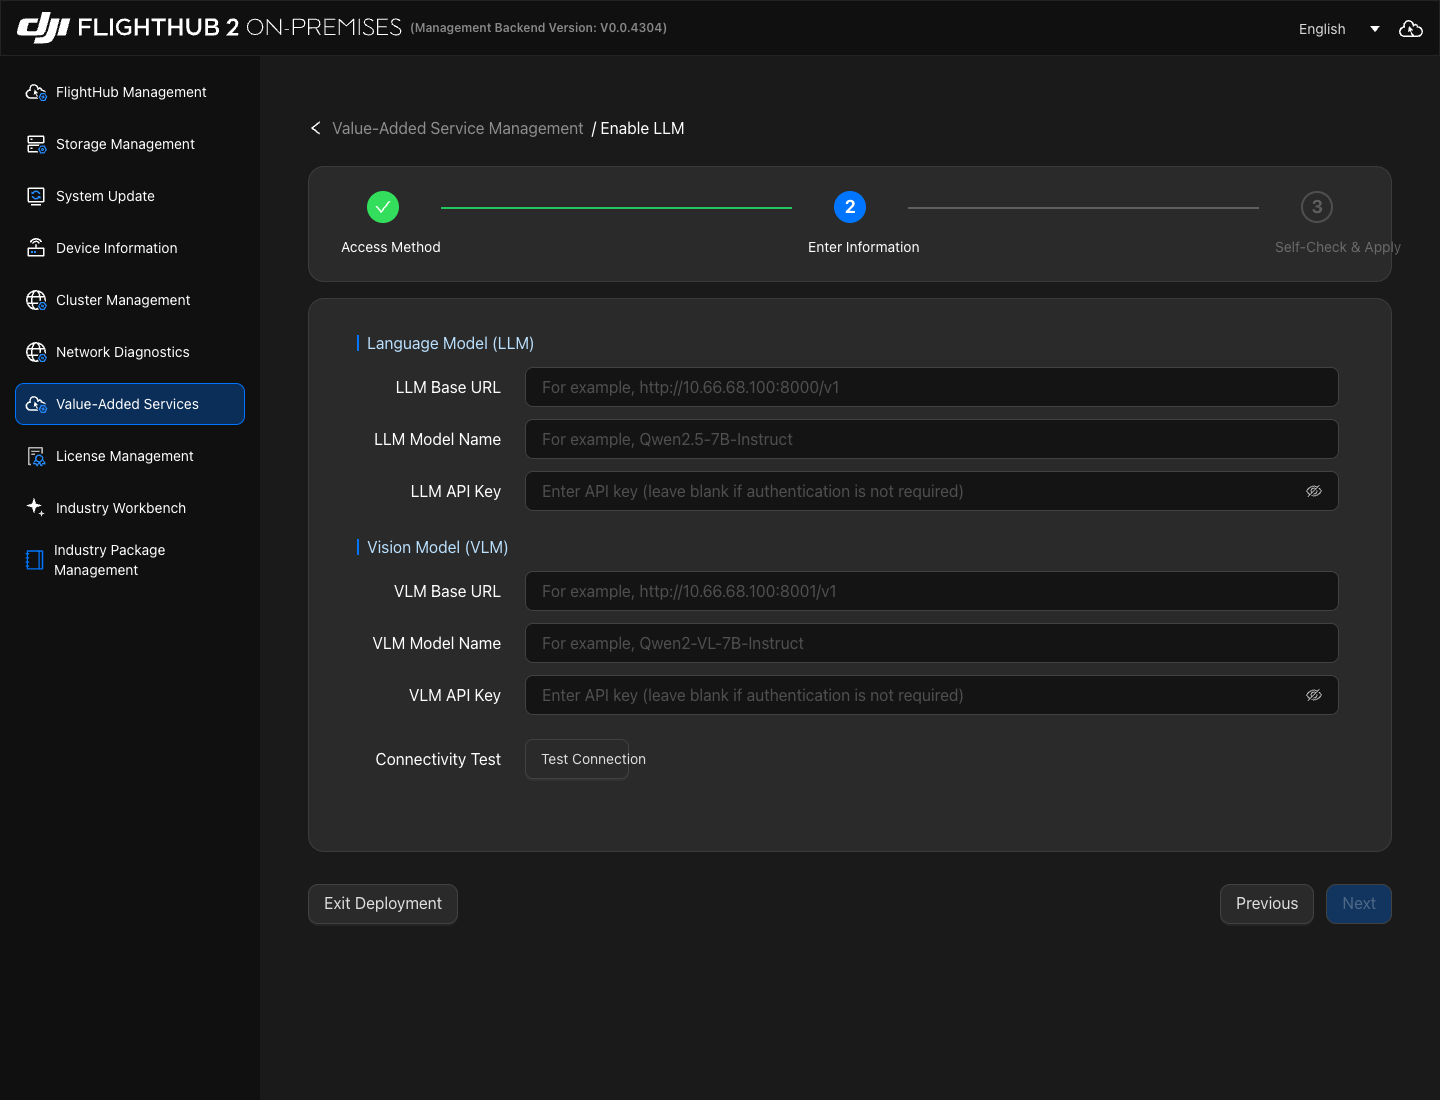
Under "Enter Information", enter the service information for the language model (LLM) and vision model (VLM) separately.
If the same customer-provided large model supports both LLM and VLM, enter the same Base URL, Model Name, and API Key in both configurations. If authentication is not required, both API Key fields can be left blank.
| Parameter | Description |
|---|---|
| LLM Base URL | API base URL of the language model. Enter it according to the information provided by the model service, for example, http://<模型服务器 IP>:<端口>/v1. |
| LLM Model Name | Name or identifier of the language model. It must match the name provided by the model service. |
| LLM API Key | Authentication key for the language model service. Leave it blank if authentication is not required. |
| VLM Base URL | API base URL of the vision model. Enter it according to the information provided by the model service. |
| VLM Model Name | Name or identifier of the vision model. It must match the name provided by the model service. |
| VLM API Key | Authentication key for the vision model service. Leave it blank if authentication is not required. |
3. Verify service connectivity and model availability.
Click "Test Connection". This test verifies both service connectivity and model availability: the system checks network connectivity and key authentication for the LLM and VLM, then makes model calls. The VLM availability check sends a test image.
After confirming that the connection test succeeds, click "Next". If the test fails, check the model service status, network connection, and configuration you entered. Correct any issues and run the test again.
4. Follow the on-screen instructions to apply the configuration.
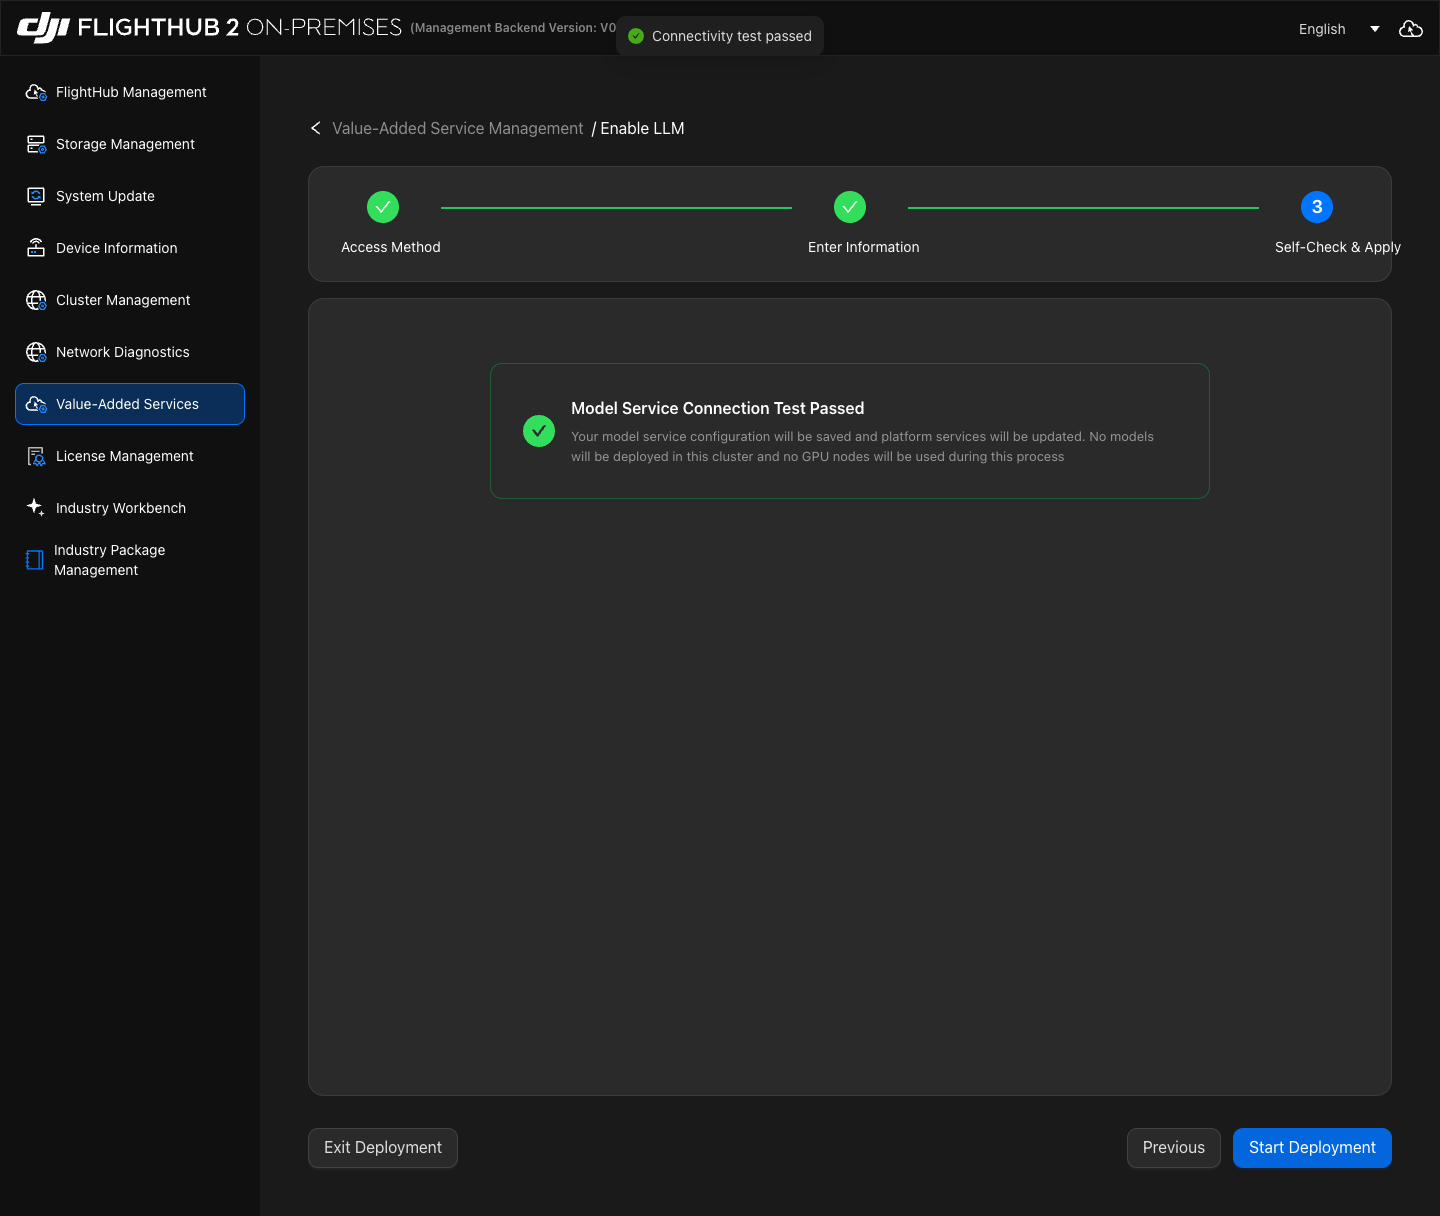
Under "Self-Check & Apply", confirm that the page displays "Model Service Connection Test Passed" and click "Start Deployment". The system saves the customer-provided model service configuration and updates the platform services. Follow the on-screen instructions while waiting for completion.
5. Download the AI Map Package.
To use the "Copilot - Flight Route Editing" feature in DJI FlightHub 2, download the AI Map Package for the corresponding region. Log in to the developer website, go to "FlightHub 2 On-Premises Service" → "Download LLM Images", and enter and verify the license ID. Under "Download Map Packages", select the country/region and the state/province where your operation area is located, then click "Download".
6. Import and activate the AI Map Package.
To use the "Copilot - Flight Route Editing" feature in DJI FlightHub 2, complete the map configuration for the corresponding region as described in "AI Map Package Import and Activation" below.
AI Map Package Import and Activation
AI Map Packages are used for the "Copilot - Flight Route Editing" feature in DJI FlightHub 2. Whether using an officially supported large model or a customer-provided large model, you must import and activate the map package for the corresponding region to use this feature.
1. Open the map data management console.
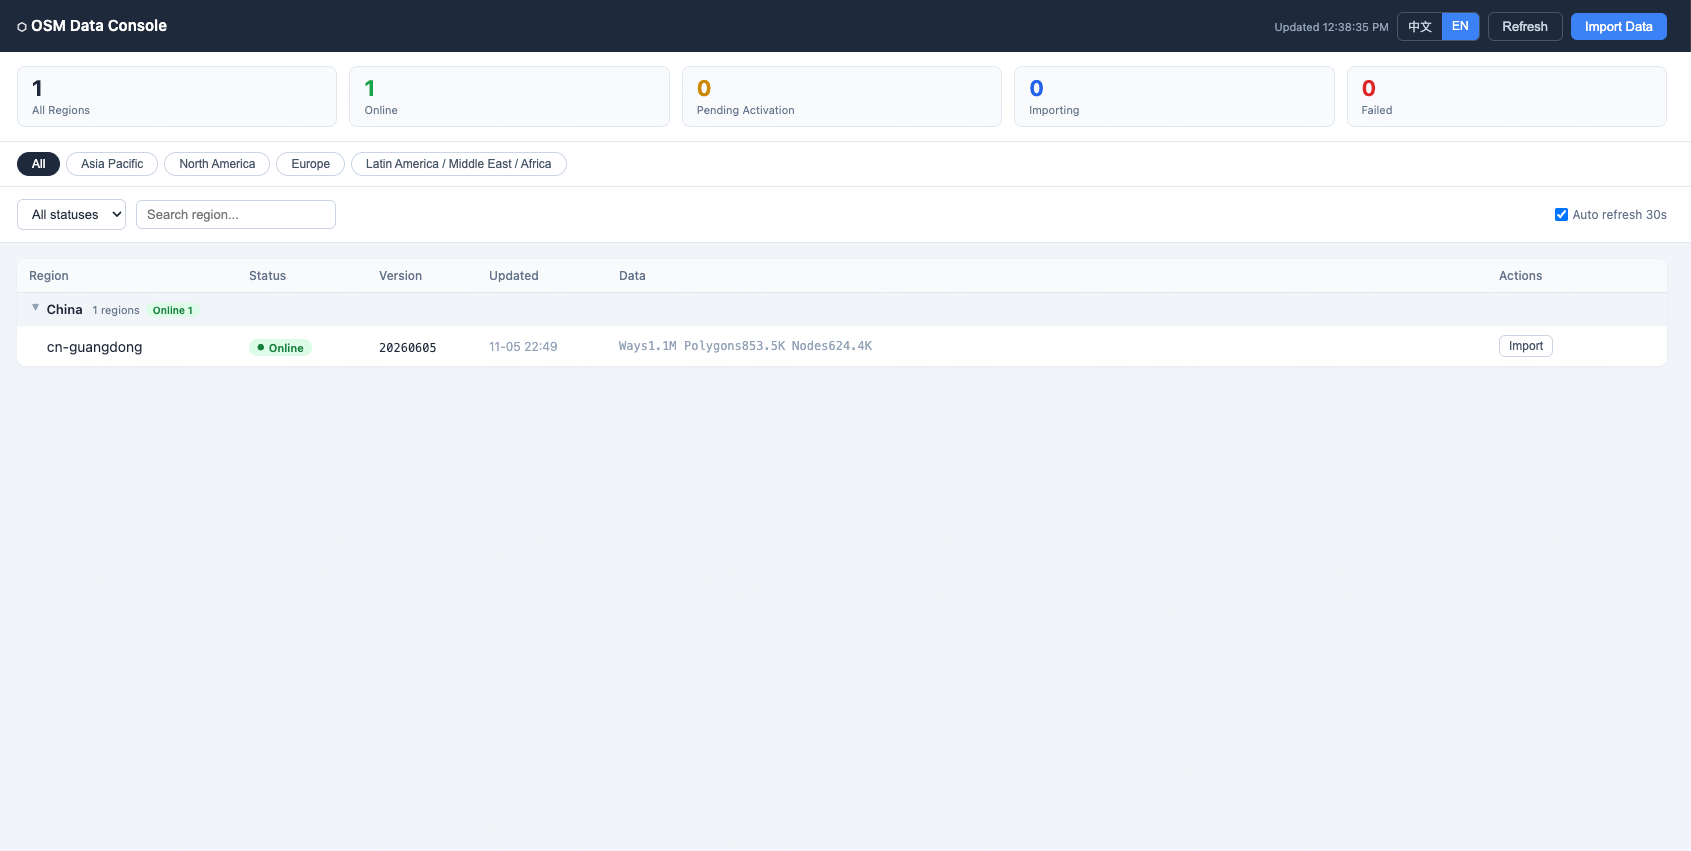
Open http://<司空外部 IP 地址>:30812/openstreetmap/api/v1/console in a browser to access the "OSM Data Console". Replace the placeholder with the actual configured external IP address of DJI FlightHub 2.
2. Import the AI Map Package.
Click "Import Data", select "Local File Upload" under "Import OSM Data", and select the downloaded PBF map file. The page automatically extracts the region and version from the filename. Verify them and click "Upload and Import". If you have map files for multiple regions, import them separately.
| Parameter | Description |
|---|---|
| PBF File | Map data file for the operation area downloaded from the developer website. |
| Region | Region code corresponding to the map file, for example, cn-guangdong. Verify the automatically extracted value. If it cannot be extracted, enter the actual region. |
| Version Number | Version number of the map data. It must match the downloaded file. |
| Remarks | Optional. Enter as needed. |
3. Activate the map data.
Wait for the map data import to finish and the status to change to ready (pending activation). Click "Activate" in the actions column for the corresponding region or version. Verify the region and version, then confirm.
Refresh the list and confirm that the target version's status changes to online (online). This completes the import and activation of the AI Map Package for that region.