DJI Simulator Tutorial
If you come across any mistakes or bugs in this tutorial, please let us know by sending emails to dev@dji.com. Please feel free to send us Github pull request and help us fix any issues.
In this tutorial, you will learn how to use the DJISimulator in your Xcode project using DJI Mobile SDK. With the help of Virtual Stick control, you can input Virtual Stick flight control data and check the changes of simulator state in real time.
You can download the tutorial's final sample project from this Github Page.
We use Mavic Pro as an example to make this demo.
Let's get started!
Introduction
DJISimulator is used to control the aircraft in a simulated environment based on the virtual stick input. The simulated aircraft state information will also be displayed on the screen.
You can use the DJISimulator class in DJIFlightController to control the simulation. It allows both manual and automated flights to be simulated without actually flying the aircraft.
Additionally, simulator initialization, monitoring and termination can be controlled directly through the SDK allowing for application development in continuous integration environments.
Application Activation and Aircraft Binding in China
For DJI SDK mobile application used in China, it's required to activate the application and bind the aircraft to the user's DJI account.
If an application is not activated, the aircraft not bound (if required), or a legacy version of the SDK (< 4.1) is being used, all camera live streams will be disabled, and flight will be limited to a zone of 100m diameter and 30m height to ensure the aircraft stays within line of sight.
To learn how to implement this feature, please check this tutorial Application Activation and Aircraft Binding.
Implementing the UI of the Application
Importing SDK and Register Application
Now, let's create a new project in Xcode, choose Single View Application template for your project and press "Next", then enter "DJISimulatorDemo" in the Product Name field and keep the other default settings.
Once the project is created, let's delete the ViewController.h and ViewController.m files, which were created by Xcode when you create the project. Then create a UIView Controller named RootViewController and set the class of original ViewController object in storyboard to "RootViewController".
Next, let's import the DJISDK.framework to the project and implement the registration process in the RootViewController. If you are not familiar with the process of importing and activating DJI SDK, please check this tutorial: Importing and Activating DJI SDK in Xcode Project for details.
Working on the UI of Application
Creating the UI of RootViewController
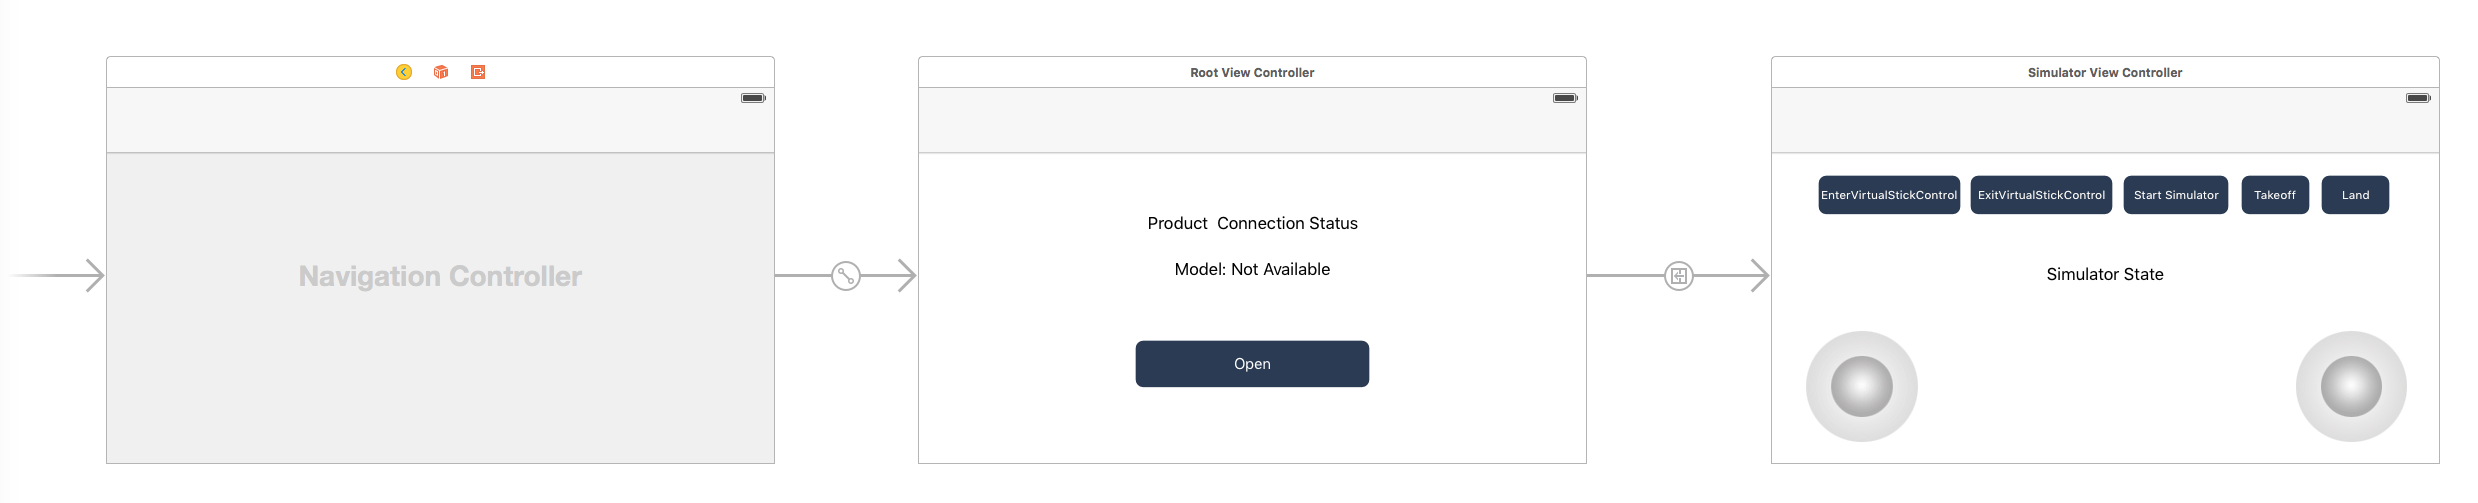
Let's open the "Main.storyboard" and make the RootViewController embed in a Navigation Controller and set it as the Storyboard Entry Point. Next, drag and drop two UILabel objects to the RootViewController and named them as "Product Connection Status" and "Model: Not Available". Moreover, drag and drop a UIButton object and place under the two UILabels, named it as "Open", then set its background image as "btn.png" file, which you can get it from the tutorial's Github Sample Project. Lastly, setup the UI elements' auto layout to support multiple device screen size.
Creating the UI of DJISimulatorViewController
Drag and drop another ViewController object from the Object Library to the right of RootViewController in the storyboard. Then create another UIViewController class file in the navigator and named it as "DJISimulatorViewController", then set the class name in storyboard too.
Furthermore, drag and drop 5 UIButton objects and place them on top, named them from the left to right as "EnterVirtualStickControl", "ExitVirtualStickControl", "Start Simulator", "Takeoff" and "Land". Make sure they are place inside a UIView object as subviews. Next, drag and drop a UILabel and place it under the 5 UIButton objects, named it as "Simulator State".
Lastly, place two UIImageView objects inside a UIView (Label it as "VirtualStick Left") as subviews, and set their images as "stick_base.png" and "stick_normal.png", which you can get them from the tutorial's Github sample project. Now, the left joystick's UI has setuped. Similiarly, let's make the right joystick's UI in the same way.
For more detail configurations of storyboard, please check the tutorial's Github sample project. If everything goes well, you should see the following screenshot:
Working on RootViewController
Let's open RootViewController.m file and create IBOutlets properties to link the UI elements in storyboard. Then add the following method to update the two UILabel objects' content when product connection update:
-(void) updateStatusBasedOn:(DJIBaseProduct* )newConnectedProduct { |
Next, invoke the above method at the end of both the viewDidAppear method and productConnected: method as shown below:
- (void)viewDidAppear:(BOOL)animated |
- (void)productConnected:(DJIBaseProduct *)product |
For more details of the implementation of RootViewController, please check the tutorial's Github sample project.
Implementing VirtualStickView
In order to input some simulated data, like pitch, roll, yaw and verticalThrottle, you will need a virtual stick control. In our previous step, we have finished the UI of the virtual stick, let's work on the implementation.
We implement the virtual stick control base on an open source Github project joystick_ios, now create a new UIView class and named it as VirtualStickView. You can check the same class files in the tutorial's Github Sample Project for implementation details, here we just explain the notification logic.
The following method will be invoked in touchEvent:, touchesEnded:withEvent:, touchesCancelled:withEvent: and onUpdateTimerTicked: methods in VirtualStickView.m file:
- (void)notifyDir:(CGPoint)dir |
When you touch on the virtual stick image and drag it around inside the VirtualStickView, the NSNotificationCenter will post a notification with the name of "StickChanged" and the location of the current virtual stick, which uses a CGPoint to represent it.
Implementing DJISimulatorViewController
Once you finished implementing the VirtualStickView, let's continue to implement the last DJISimulatorViewController. Open the DJISimulatorViewController.m file and import the following header files and create related IBOutlet properties and IBAction methods:
|
Here, we first implement the DJISimulatorDelegate protocol in the interface. Then create IBOutlet properties for the left and right VirtualStickView, and the simulatorButton, simulatorStateLabel. The isSimulatorOn bool property is used to store the start state of DJISimulator. mXVelocity, mYVelocity, mYaw and mThrottle properties are used to store the DJIVirtualStickFlightControlData struct data of DJIFlightController.
For the remaining five IBAction methods, they are related to the five UIButtons on top. We can use them to enter or exit virtual stick, take off or auto land the aircraft and start or stop simulator.
Before we continue to implement the DJISimulatorViewController, let's create the DemoUtility class (Inherited from NSObject) to define some common methods:
- DemoUtility.h
|
- DemoUtlity.m
|
For the fetchProduct, fetchAircraft and fetchFlightController methods, they are used to get the latest DJIBaseProduct, DJIAircraft and DJIFlightController object. For the showAlertViewWithTitle:message: cancelAlertAction:defaultAlertAction:viewController: method, it's used to show an alertView for our developers.
Working on the Virtual Stick Control feature
Now, let's come back to the "DJISimulatorViewController.m" file and implement the virtual stick feature. First, we create an NSNotificationCenter variable and invoke the addObserver:selector:name:object: method to observe the "StickChanged" notification, which is post from the VirtualStickView. When the notification is post, a selector method onStickChanged: will be invoked to send virtual stick flight control data as shown below:
- (void)viewDidLoad |
Next, implement the onStickChanged: select method and setThrottle:andYaw:, setXVelocity:andYVelocity: methods as shown below:
- (void)onStickChanged:(NSNotification*)notification |
In the code above, we implement the following features:
1. In the onStickChanged: method, we get the CGPoint object of the moving virtual stick's position, cast the notification object to get the VirtualStickView object. Then we invoke the setThrottle:andYaw and setXVelocity:andYVelocity: methods based on the current controlling virtual stick.
2. The range of VirtualStickView's movement is [-1, 1], up and down, left and right. Please check the follow diagram for details:
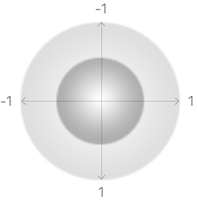
So the range of x and y value of dir variable is [-1, 1]. In the setThrottle:andYaw: method, we multiply y by -2 to change the range to [-2, 2] from bottom to top. Then multiply x by 30 to change the range to [-30, 30]. These range are tested by us to achieve a better control experience, you can take them for example. Moreover, you can learn the max and min values of control velocity for throttle and yaw in virtual stick control from the following const variables in DJIFlightController:
- Yaw control
/** |
- Throttle Control
/** |
Lastly, invoke the updateVirtualStick method to send the virtual stick control data.
3. In the setXVelocity:andYVelocity: method, we multiply the x and y variables with DJIVirtualStickRollPitchControlMaxVelocity to change the range to [-15, 15] for pitch and roll axises velocity control, you can learn the max and min values of control velocity for roll and pitch in virtual stick control from the following const variables in DJIFlightController:
/** |
Then invoke the updateVirtualStick method to send the virtual stick control data.
4. In the updateVirtualStick method, we first create and initialize a DJIVirtualStickFlightControlData variable and assign its pitch, roll, yaw and verticalThrottle values with self.mYVelocity, self.mXVelocity, self.mYaw and self.mThrottle. Then invoke the sendVirtualStickFlightControlData:withCompletion: method of DJIFlightController to send the simulated virtual stick control data to the aircraft.
Once you finished the above step, let's implement the Enable Virtual Stick and Exit Virtual Stick IBAction methods:
-(IBAction) onEnterVirtualStickControlButtonClicked:(id)sender |
-(IBAction) onExitVirtualStickControlButtonClicked:(id)sender |
In the onEnterVirtualStickControlButtonClicked: IBAction method, we first assign the yawControlMode and rollPitchControlMode properties of DJIFlightController to DJIVirtualStickYawControlModeAngularVelocity and DJIVirtualStickRollPitchControlModeVelocity. Then invoke the setVirtualStickModeEnabled:withCompletion: method of DJIFlightController to enable the virtual stick control.
Similiarly, in the onExitVirtualStickControlButtonClicked: IBAction method, we invoke the setVirtualStickModeEnabled:withCompletion: method of DJIFlightController to disable virtual stick control.
Implementing DJISimulator
Before we implement the DJISimulator feature, we may need to update the simulatorButton's title and hidden state first. Let's override the viewWillAppear: and viewWillDisappear: methods as shown below:
-(void)viewWillAppear:(BOOL)animated { |
In the viewWillAppear: method, we first fetch the DJIFlightController object and update the isSimulatorOn variable, then invoke the updateSimulatorUI method to update the simulatorButton label. Furthermore, we use KVO here to observe the changes of isSimulatorActive variable value of DJISimulator. Then set the delegate of the DJIFlightController's DJISimulator to self(DJISimulatorViewController).
Next in the viewWillDisappear: method, we fetch the latest DJIFlightController object, then remove the observer of isSimulatorActive, and set the delegate of DJISimulator to nil.
Moreover, in the NSKeyValueObserving method, we fetch and update the latest isSimulatorOn property and invoke the updateSimulatorUI method to update the simulatorButton.
Now, let's implement the onSimulatorButtonClicked: IBAction method as shown below:
- (IBAction)onSimulatorButtonClicked:(id)sender { |
In the code above, we first check if the simulator is started, if not, then create an initial aircraft location with CLLocationCoordinate2DMake(22, 113). Next invoke the startWithLocation:updateFrequency:GPSSatellitesNumber:withCompletion: method of DJISimulator with the frequency of 20 and GPS satellite number of 10 to start the simulator. For more details of this method, please check the following method's inline documentations:
/** |
if the simulator has already started, we can invoke the stopWithCompletion: method of DJISimulator to stop the simulator.
Lastly, let's implement the DJI Simulator delegate method as shown below:
- (void)simulator:(DJISimulator *_Nonnull)simulator didUpdateState:(DJISimulatorState *_Nonnull)state |
This delegate method will be invoked when the simulator state is updated. We can update the simulatorStateLabel's hidden state and its text content here.
Working on Takeoff and AutoLanding features
In order to simulate the aircraft's flight behaviour in a simulated environment, we will implement the take off and auto landing features here in the following two IBAction methods:
-(IBAction) onTakeoffButtonClicked:(id)sender |
In the onTakeoffButtonClicked: IBAction method, we invoke the startTakeoffWithCompletion: method of DJIFlightController to send the take off command to the aircraft. Similiarly, in the onLandButtonClicked: IBAction method, we invoke the startLandingWithCompletion: method to send the auto landing command. It's just that simple and easy.
We have gone through a long way so far, now, let's build and run the project, connect the demo application to your Mavic Pro (Please check the Run Application for more details) and check all the features we have implemented so far.
If everything goes well, you should see something similiar to the following gif animation:
- If the demo application is connected with Mavic Pro successfully, you should see the
connectButtonbutton is available to press and theconnectStatusLabelandmodelNameLabelshow the correct infos. - Press Open and enter the simulator demo page, press EnterVirtualStickControl button to enable virtual stick control, then press "Start Simulator" to start the simulator.
- Moreover, press the Takeoff button to send take off command to the aircraft, if the command executes successfully, you should see the PosZ value start to change, means that the aircraft is rising.
- Now you can drag the left and right virtual stick controls to simulate the flight behavious.
- Lastly, press the "Land" button to make the aircraft start auto landing, once it finish, you may notice the PosZ value become "0.00". Press the "Stop Simulator" button to stop the simulator and then press "ExitVirtualStickControl" to disable the virtual stick control.
Summary
In this tutorial, you've learned how to use the DJISimulator feature to simulate aircraft's flight behaviour in a simulated environment based on the virtual stick control input and show the changes of simulator state(Yaw,Pitch,Roll,PosX,PosY and PosZ) in real time. Also you've learned how to use Virtual Stick control to send virtual stick flight control data to the aircraft.
This demo is a simple demonstration of using DJISimulator, to have a better user experience, you can create a 3D simulated environment using 3D game engine like Unity3D or Cocos3D to show the simulated data and aircraft flight behavious inside your mobile application (Like the Flight Simulator in DJI Go app)!
Furthermore, the DJISimulator allows for automated testing in continous integration environment(Like Jenkins ), it would help your DJI-SDK based application testing process. Good luck, and hope you enjoyed this tutorial!