Creating a MapView and Waypoint Application
If you come across any mistakes or bugs in this tutorial, please let us know by sending emails to dev@dji.com. Please feel free to send us Github pull request and help us fix any issues.
In this tutorial, you will learn how to implement the DJIWaypoint Mission feature and get familiar with the usages of MissionControl.
Also you will know how to test the Waypoint Mission API with DJI Assistant 2 Simulator too. So let's get started!
You can download the tutorial's final sample project from this Github Page.
Note: In this tutorial, we will use Mavic Pro for testing, use Android Studio 3.0 for developing the demo application, and use the Google Map API for navigating.
Preparation
Download the SDK
You can download the latest Android SDK from here: https://developer.dji.com/mobile-sdk/downloads.
Setup Android Development Environment
Throughout this tutorial we will be using Android Studio 3.0, which you can download from here: http://developer.android.com/sdk/index.html.
Application Activation and Aircraft Binding in China
For DJI SDK mobile application used in China, it's required to activate the application and bind the aircraft to the user's DJI account.
If an application is not activated, the aircraft not bound (if required), or a legacy version of the SDK (< 4.1) is being used, all camera live streams will be disabled, and flight will be limited to a zone of 100m diameter and 30m height to ensure the aircraft stays within line of sight.
To learn how to implement this feature, please check this tutorial Application Activation and Aircraft Binding.
Implementing the UI of Application
We can use the map view to display waypoints and show the flight route of the aircraft when waypoint mission is being executed. Here, we take Google Map for an example.
Configurating Google Maps Android API
1. Create the project
Open Android Studio and select File -> New -> New Project to create a new project, named "GSDemo". Enter the company domain and package name (Here we use "com.dji.GSDemo.GoogleMap") you want and press Next. Set the mimimum SDK version as API 19: Android 4.4 (KitKat) for "Phone and Tablet" and press Next. Then select "Empty Activity" and press Next. Lastly, leave the Activity Name as "MainActivity", and the Layout Name as "activity_main", Press "Finish" to create the project.
2. Setting Up Google Play Services
You can learn to install and set up the Google Play services SDK by referring to the setup guide presented in: https://developers.google.com/android/guides/setup.
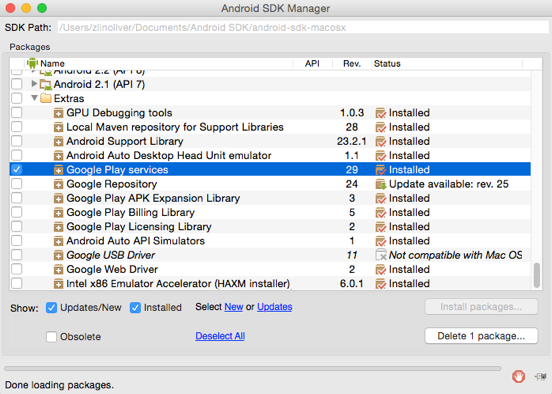
The Google Maps Android API is included in the Google Play Services Package. You can install the Google Play services SDK by using Android SDK Manager as shown below:
After Google Play Services Package is installed. Open AndroidManifest.xml file of your app and add the following element as a child of the <application> element:
<meta-data android:name="com.google.android.gms.version" |
You can now start using the Google Maps Android APIs to develop your app.
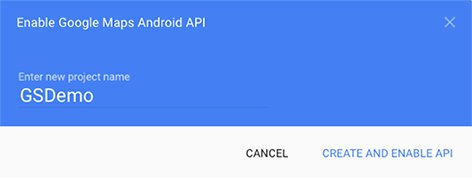
3. Applying for an Google API Key
Now, let's go to Google's Quick guide to getting a key to apply for a Google API Key. Login with your Google account and press the GET A Key button and create a project named "GSDemo"(You can use another name here). You will see the following screenshot like this:
Then press the CREATE AND ENABLE API button to create and enable the Google Maps Android API of this project, wait for a few seconds, you may see the following screenshot:
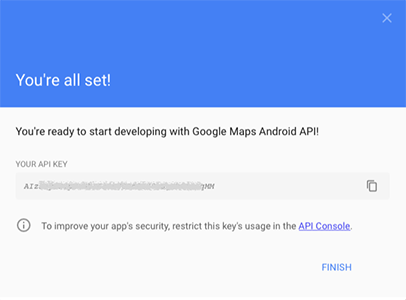
Now, you get your API Key, copy it and we will use it in the next section.
4. Adding Google API Key
Open the AndroidManifest.xml file, add the following element as child of
<meta-data |
The first element sets the key "com.google.android.geo.API_KEY" to the value of your Google API key. The second one set the google play services version number.
For more details of getting Google API Key, please refer to https://developers.google.com/maps/documentation/android-api/signup
Moreover, specify the permissions of your application needs, by adding <uses-permission> elements as children of the <manifest> element in the "AndroidManifest.xml" file.
<uses-permission android:name="android.permission.BLUETOOTH" /> |
Finally, we need to specify requirement for OpenGL ES version 2 by adding the following element inside the <manifest> element:
<uses-feature |
For more details of description on the permissions, refer to https://developers.google.com/maps/documentation/android/config.
5. Adding Multidex Support with Gradle
In order to use Google Play Service in our project, we need to add Multidex support to avoid the 64K limit with Gradle.
Modify the module-level build.gradle file configuration to include the support library and enable multidex output in both defaultConfig and dependencies parts, as shown in the following code snippet:
android { |
In the code above, we declare the "compileSdkVersion", "buildToolsVersion", "minSdkVersion" and "targetSdkVersion". Furthermore, we add the compile 'com.google.android.gms:play-services:9.2.0' to the "dependencies" to support google play service.
Then select Tools->Android->Sync Project with Gradle Files to sync the gradle files.
For more details about configuring your App for Multidex with Gradle, please check this link: http://developer.android.com/tools/building/multidex.html.
Importing the Maven Dependency
You can check the Integrate SDK into Application tutorial to learn how to import the Android SDK Maven Dependency.
Building the Layouts of MainActivity
1. Working on the MApplication, DJIDemoApplication and ConnectionActivity
Please check the Creating an Camera Application tutorial and the sample project of this tutorial for the detailed implementations of MApplication and DJIDemoApplication.
To improve the user experience, we had better create an activity to show the connection status between the DJI Product and the SDK, once it's connected, the user can press the OPEN button to enter the MainActivity. You can also check the Creating an Camera Application tutorial to learn how to implement the ConnectionActivity Class and Layout in this project.
2. Implementing the MainActivity Layout
Open the activity_main.xml layout file and replace the code with the following:
<LinearLayout xmlns:android="http://schemas.android.com/apk/res/android" |
In the xml file, we implement the following UIs:
-
Create a LinearLayout to show a TextView with "GSDemo" title and put it on the top.
-
Create two lines of Buttons: "LOCATE", "ADD", "CLEAR", "CONFIG", "UPLOAD", "START" and "STOP", place them horizontally.
-
Lastly, we create a map view fragment and place it at the bottom.
Next, copy the "aircraft.png" and "ic_launcher.png" image files from this Github sample project to the drawable folders inside the res folder.
Furthermore, open the AndroidManifest.xml file and update the ".MainActivity" activity element with several attributes as shown below:
<activity |
Moreover, open the "strings.xml" file in values folder and add the following string content:
<string name="title_activity_demo">GSDemoActivity</string> |
Please enter your "Google APP ID" in the "Google_ App_ ID_String" value part.
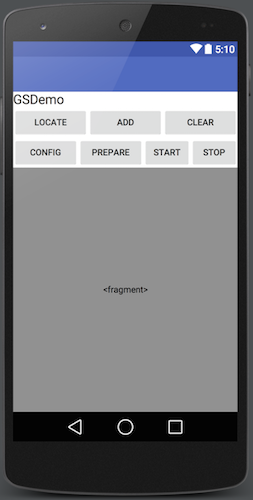
Now, if you check the "activity_main.xml" file, you should see the preview screenshot of MainActivity as shown below:
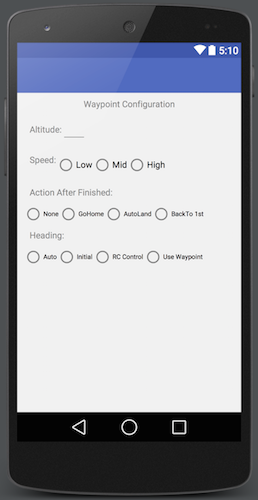
Lastly, let's create a new xml file named "dialog_waypointsetting.xml" in the layout folder by right-clicking on the "layout" folder and select New->XML->Layout XML File. Then replace the code with the same file in Github Sample Project, since the content is too much, we don't show them all here.
This xml file will help to setup a textView to enter "Altitude" and create three RadioButton Groups for selecting Speed, Action After Finished and Heading.
Now, if you check the dialog_waypointsetting.xml file, you can see the preview screenshot of Waypoint Configuration Dialog as shown below:
3. Working on the MainActivity Class
Let's come back to the MainActivity.java class, and replace the code with the following, remember to import the related classes as Android Studio suggested:
public class MainActivity extends FragmentActivity implements View.OnClickListener, GoogleMap.OnMapClickListener, OnMapReadyCallback { |
In the code shown above, we implement the following features:
1. Create a GoogleMap variable and 7 Button member variables for the UI. Then create the initUI() method to init the 7 Button variables and implement their setOnClickListener method and pass "this" as parameter.
2. In the onCreate() method, we request several permissions at runtime to ensure the SDK works well when the compile and target SDK version is higher than 22(Like Android Marshmallow 6.0 device and API 23).
3. Then invoke initUI() method and create "SupportMapFragment" variable to call the OnMapReady() method asynchronously.
4. Implement the showSettingDialog method to show the Waypoint Configuration alert dialog and override the onClick() method to show the configuration dialog when press the Config button.
5. Lastly, we override the onMapReady() method to initialize the gMap and invoke setUpMap() method to implement the setOnMapClickListener() method of gMap variable. Then add a marker of Shenzhen, China here for example. So when the Google map is loaded, you will see a red pin tag on Shenzhen, China.
For more details, please check the tutorial's Github Sample Project. If you are not familiar with adding a Google map to your application, please follow this guide.
Registering your Application
1. Modifying AndroidManifest file
After you finish the above steps, let's register our application with the App Key you apply from DJI Developer Website. If you are not familiar with the App Key, please check the Get Started.
Let's open the AndroidManifest.xml file and add the following elements to it:
<uses-feature |
Here, because not all Android-powered devices are guaranteed to support the USB accessory and host APIs, include two
Then add the following elements above the activity element:
<!-- DJI SDK --> |
In the code above, we enter the App Key of the application in the value part of android:name="com.dji.sdk.API_KEY" attribute. For more details of the "AndroidManifest.xml" file, please check the Github source code of the demo project.
2. Implementing Registration in DJIDemoApplication and ConnectionActivity
Since we have implemented the registration logics in the "DJIDemoApplication.java" and "ConnectionActivity.java" files previously, we don't explain the details here.
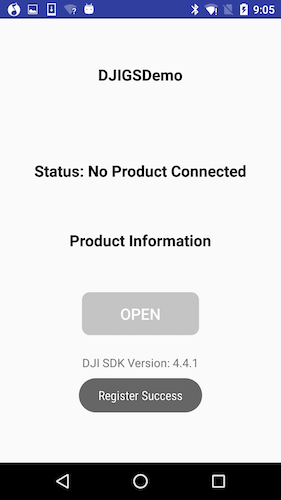
Now let's build and run the project and install it to your Android device. If everything goes well, you should see the "Register Success" textView like the following screenshot when you register the app successfully.
Now let's build and run the project and install it to your Android device. If everything goes well, you should see the "Register Success" textView like the following screenshot when you register the app successfully.
Implementing the Waypoint Mission
Locating Aircraft on Google Map
Before we implementing the waypoint mission feature, we should show the aircraft's location on Google Map and try to zoom in automatically to view the surrounding area of the aircraft.
Let's open MainActivity.java file and declare the following variables first:
private double droneLocationLat = 181, droneLocationLng = 181; |
Then, since we need to detect the product connection status, we should register a BroadcastReceiver in the onCreate() method and override the onReceive() method of it as shown below:
|
The onReceive() method will be invoked when the DJI Product connection status change, we can use it to update our aircraft's location.
Next, let's implement the initFlightController() method and invoke it inside the onProductConnectionChange() method:
private void onProductConnectionChange() |
In the code above, we firstly check the product connection status with the help of isConnected() method of DJIBaseProduct. Then initialize mFlightController variable and override the onUpdate() method to invoke updateDroneLocation method. By using the onUpdate() method, you can get the flight controller current state from the parameter.
Furthermore, let's implement the updateDroneLocation() method and invoke it in onClick() method's locate button click action:
public static boolean checkGpsCoordination(double latitude, double longitude) { |
In the updateDroneLocation() method, we add the drone location marker on Google map.
Finally, let's implement the camearUpdate() method to move camera and zoom in Google Map to the drone's location:
private void cameraUpdate(){ |
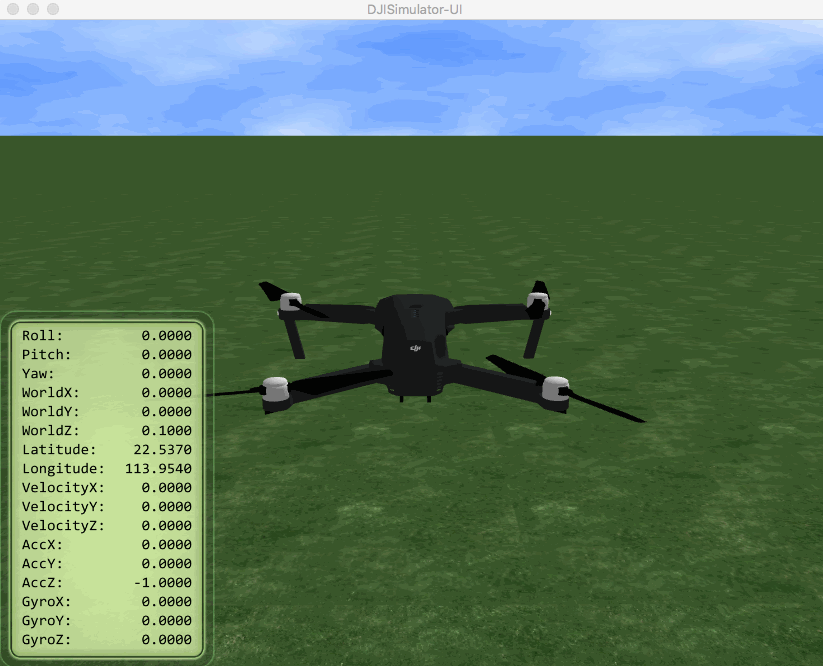
Before going forward, you can check the Using DJI Assistant 2 Simulator for its basic usage.
Now, let's connect the aircraft to your PC or Mac running DJI Assistant 2 via a Micro USB cable, and then power on the aircraft and the remote controller. Press the Simulator button in the DJI Assistant 2 and feel free to type in your current location's latitude and longitude data into the simulator.
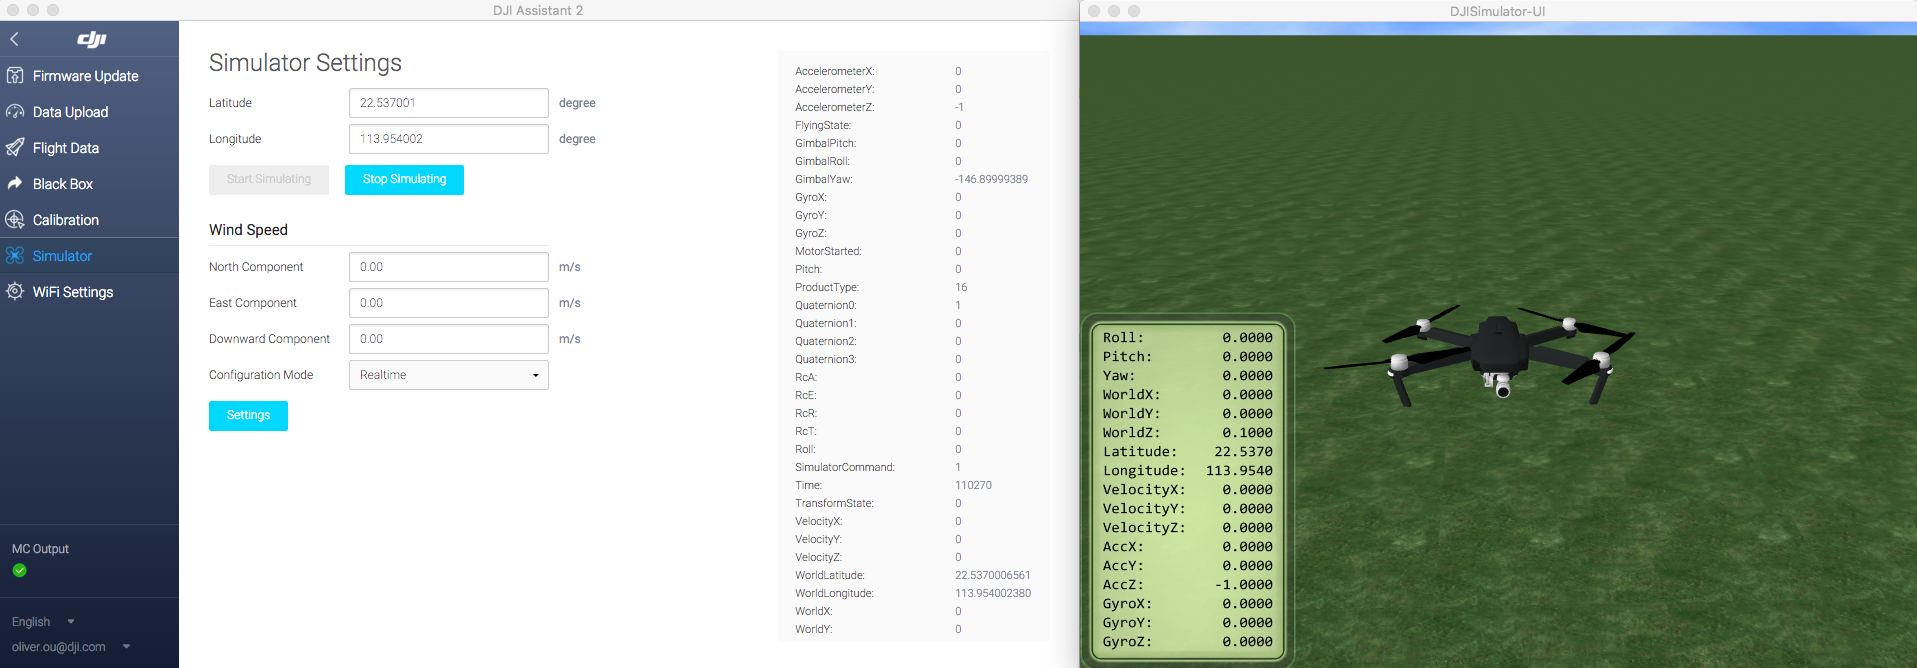
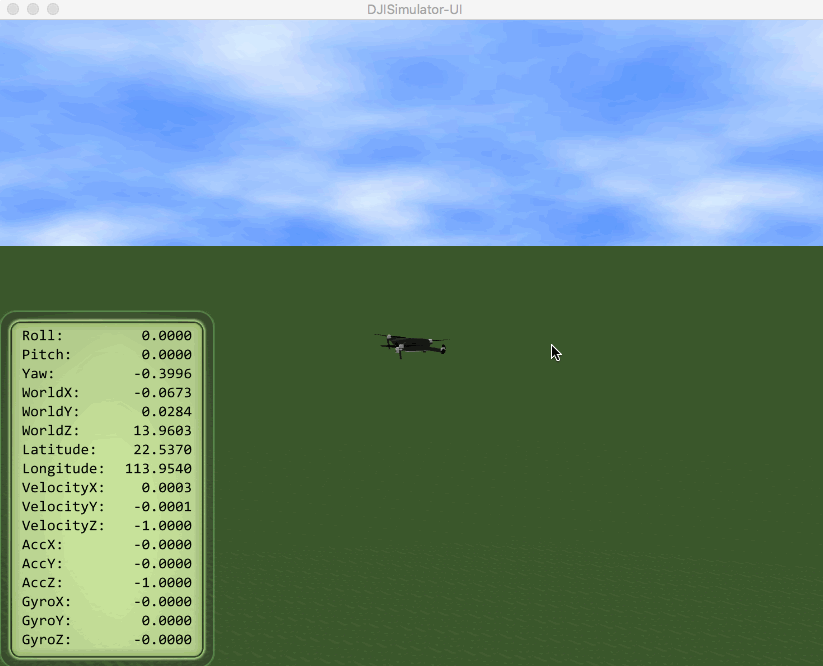
Next, build and run the project and install it in your Android device and connect it to the remote controller using USB cable.
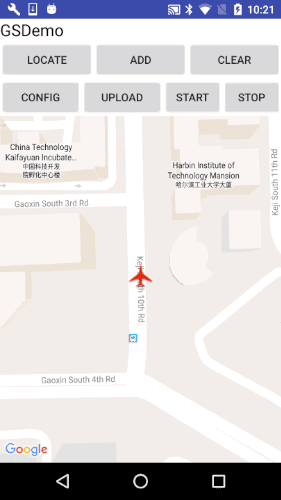
Press the Start Simulating button. If you check the application now, a tiny red aircraft will be shown on the map. If you cannot find the aircraft, press the "LOCATE" button to zoom in to the center of the aircraft on the Map. Here is a gif animation for you to check:
Adding Waypoint Markers
Since you can see the aircraft clearly on the Google map now, you can add Marker on the map to show the waypoints of the Waypoint Mission. Let's continue to declare the mMarkers variable first:
private boolean isAdd = false; |
Then, implement the onMapClick() and markWaypoint() methods as shown below:
private void setResultToToast(final String string){ |
Here, the onMapClick() method will be invoked when user tap on the Map View. When user tap on different position of the Map View, we will create a MarkerOptions object and assign the "LatLng" object to it, then invoke "gMap"'s addMarker() method by passing the markerOptions parameter to add the waypoint markers on the Google map.
Finally, let's implement the onClick() and enableDisableAdd() methods to implement the ADD and CLEAR actions as shown below:
|
Now, let's try to build and run your application on an Android device and try to add waypoints on the Google map. If everything goes well, you should see the following gif animation:
Implementing Waypoint Missions
Configurating Waypoint Mission
Before we upload a Waypoint Mission, we should provide a way for user to configure it, like setting the flying altitude, speed, heading, etc. So let's declare several variables as shown below firstly:
private float altitude = 100.0f; |
Here we declare the altitude, mSpeed, mFinishedAction and mHeadingMode variable and intialize them with default value. Also, we declare the WaypointMission.Builder and WaypointMissionOperator variables for setting up missions.
Next, replace the code of showSettingDialog() method with the followings:
private void showSettingDialog(){ |
Here, we implement the setOnCheckedChangeListener() method of "RadioGroup" class and pass different values to the mSpeed, mFinishedAction and mHeadingMode variables based on the item user select.
For the finished action of DJIWaypointMission, we provide several enum values here:
-
AUTO_LAND
The aircraft will land automatically at the last waypoint.
-
CONTINUE_UNTIL_END
If the user attempts to pull the aircraft back along the flight path as the mission is being executed, the aircarft will move towards the previous waypoint and will continue to do so until there are no more waypoint to move back to or the user has stopped attempting to move the aircraft back.
-
GO_FIRST_WAYPOINT
The aircraft will go back to its first waypoint and hover in position.
-
GO_HOME
The aicraft will go home when the mission is complete.
-
NO_ACTION
No further action will be taken on completion of mission.
For the heading mode of DJIWaypointMission, we provide these enum values here:
-
AUTO
Aircraft's heading will always be in the direction of flight.
-
CONTROL_BY_REMOTE_CONTROLLER
Aircraft's heading will be controlled by the remote controller.
-
TOWARD_POINT_OF_INTEREST
Aircraft's heading will always toward point of interest.
-
USING_INITIAL_DIRECTION
Aircraft's heading will be set to the initial take-off heading.
-
USING_WAYPOINT_HEADING
Aircraft's heading will be set to the previous waypoint's heading while travelling between waypoints.
Now, let's continue to implement the getWaypointMissionOperator() and configWayPointMission() methods as shown below:
public WaypointMissionOperator getWaypointMissionOperator() { |
In the code above, we firstly get the WaypointMissionOperator instance in the getWaypointMissionOperator() method, then in the configWayPointMission() method, we check if waypointMissionBuilder is null and set its finishedAction, headingMode, autoFlightSpeed, maxFlightSpeed and flightPathMode variables of WaypointMission.Builder. Then we use a for loop to set each DJIWaypoint's altitude in the waypointMissionBuilder's waypointsList. Next, we invoke the loadMission() method of WaypointMissionOperator and pass the waypointMissionBuilder.build() as its parameter to load the waypoint mission to the operator.
Upload Waypoint Mission
Now, let's create the following methods to setup WaypointMissionOperatorListener:
|
In the code above, we invoke the addListener() and removeListener() methods of WaypointMissionOperator to add and remove the WaypointMissionOperatorListener and then invoke the addListener() method at the bottom of onCreate() method and invoke the removeListener() method in the onDestroy() method.
Next, initialize the WaypointMissionOperatorListener instance and implement its onExecutionFinish() method to show a message to inform user when the mission execution finished.
Furthermore, let's set waypointList of WaypointMission.Builder when user tap on the map to add a waypoint in the onMapClick() method and implement the uploadWayPointMission() method to upload mission to the operator as shown below:
|
Lastly, let's add the R.id.upload case checking in the onClick() method:
case R.id.upload:{ |
Start and Stop Mission
Once the mission finish uploading, we can invoke the startMission() and stopMission() methods of WaypointMissionOperator to implement the start and stop mission features as shown below:
private void startWaypointMission(){ |
Lastly, let's improve the onClick() method to improve the clear button action and implement the start and stop button actions:
|
Test Waypoint Mission with DJI Simulator
You've come a long way in this tutorial, and it's time to test the whole application.
Important: Make sure the battery level of your aircraft is more than 10%, otherwise the waypoint mission may fail!
Build and run the project to install the application into your android device. After that, please connect the aircraft to your PC or Mac running DJI Assistant 2 Simulator via a Micro USB cable. Then, power on the remote controller and the aircraft, in that order.
Next, press the Simulator button in the DJI Assistant 2 and feel free to type in your current location's latitude and longitude data into the simulator.
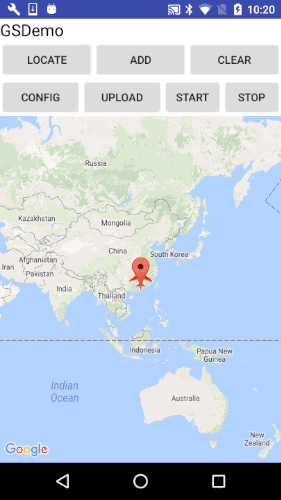
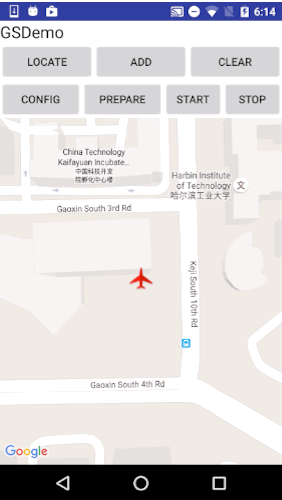
Then connect your android device to the remote controller using USB cable and run the application. Go back to the DJI Assistant 2 Simulator on your PC or Mac and press the Start Simulating button. A tiny red aircraft will appear on the map in your application, if you press the LOCATE button, the map view will zoom in to the region you are in and will center the aircraft:
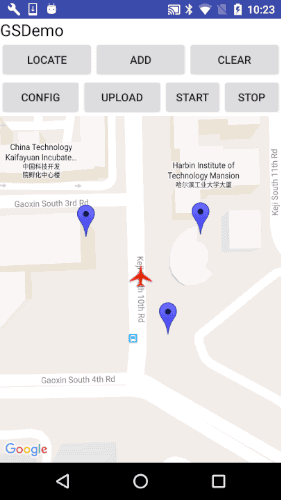
Next, press the Add button and tap on the Map where you want to add waypoints, as shown below:
Once you press the CONFIG button, the Waypoint Configuration dialog will appear. Modify the settings as you want and press Finish button. Then press the UPLOAD button to upload the mission.
If upload mission success, press the START button to start the waypoint mission execution.
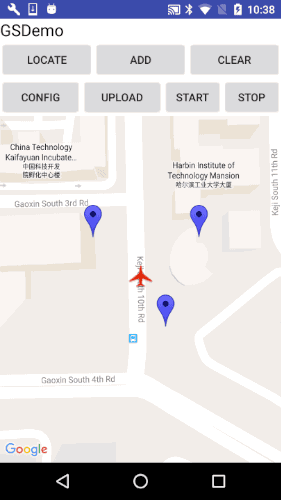
Now you should see the aircraft move towards the waypoints you set previously on the map view, as shown below:
At the same time, you are able to see the Mavic Pro take off and start to fly in the DJI Assistant 2 Simulator.
When the waypoint mission finishes, an "Execution finished: Success!" message will appear and the Mavic Pro will start to go home!
Also, the remote controller will start beeping. Let's take a look at the DJI Assistant 2 Simulator now:
The Mavic Pro will eventually go home, land, and the beeping from the remote controller will stop. The application will go back to its normal status. If you press the CLEAR button, all the waypoints you previously set will be cleared. During the mission, if you'd ever like to stop the DJIWaypoint mission, you can do so by pressing the STOP button.
Summary
In this tutorial, you’ve learned how to setup and use the DJI Assistant 2 Simulator to test your waypoint mission application, upgrade your aircraft's firmware to the developer version, use the DJI Mobile SDK to create a simple map view, modify annotations of the map view, show the aircraft on the map view by using GPS data from the DJI Assistant 2 Simulator. Next, you learned how to use the WaypointMission.Builder to configure waypoint mission settings, how to create and set the waypointList in the WaypointMission.Builder. Moreover, you learned how to use WaypointMissionOperator to upload, start and stop missions.
Congratulations! Now that you've finished the demo project, you can build on what you've learned and start to build your own waypoint mission application. You can improve the method which waypoints are added(such as drawing a line on the map and generating waypoints automatically), play around with the properties of a waypoint (such as heading, etc.), and adding more functionality. In order to make a cool waypoint mission application, you still have a long way to go. Good luck and hope you enjoy this tutorial!