If you come across any mistakes or bugs in this tutorial, please let us know by sending emails to dev@dji.com. Please feel free to send us Github pull request and help us fix any issues.
In this tutorial, you will learn how to use DJI Android UX SDK and DJI Android SDK to create a fully functioning mini-DJI Go app easily, with standard DJI Go UIs and functionalities. By the end of this tutorial you will have an app that you can use to show the camera FPV view, check aircraft status, shoot photos, record videos and so on.
You can download the tutorial's final sample project from this Github Page.
We use Mavic Pro and Nexus 5 as an example to make this demo. For more details of customizing the layouts for iPhone devices, please check the tutorial's Github Sample Project. Let's get started!
Introduction
DJI UX SDK is a visual sdk consisting of UI Elements. It helps you simplify the creation of DJI Mobile SDK based apps in Android. With similar design to DJI Go,UI Elements allow you to create consistent UX between your apps and DJI apps.
Additionally, with the ease of use, UX SDK let you focus more on business and application logic.
As DJI UX SDK is built on top of DJI Mobile SDK and VideoPreviewer, you need to use it with them together in your application development.
For an in depth learning on DJI UX SDK, please go to the UX SDK Introduction.
Application Activation and Aircraft Binding in China
For DJI SDK mobile application used in China, it's required to activate the application and bind the aircraft to the user's DJI account.
If an application is not activated, the aircraft not bound (if required), or a legacy version of the SDK (< 4.1) is being used, all camera live streams will be disabled, and flight will be limited to a zone of 100m diameter and 30m height to ensure the aircraft stays within line of sight.
Now, open Android Studio and select File -> New -> New Project to create a new project, named "UXSDKDemo". Enter the company domain and package name (Here we use "com.dji.uxsdkdemo") you want and press Next. Set the minimum SDK version as API 19: Android 4.4 (KitKat) for "Phone and Tablet" and press Next. Then select "Empty Activity" and press Next. Lastly, leave the Activity Name as "MainActivity", and the Layout Name as "activity_main", press "Finish" to create the project.
Configure Gradle Script
Double click on the "build.gradle(Module: app)" in the project navigator to open it and add the following code:
In the code above, we implement the following features:
Add the packagingOptions to prevent any unexpected crash of the application.
Add the compile and provided dependencies to import the latest DJI Android UX SDK and SDK Maven dependency.
Once you finished the steps above, select Tools -> Android -> Sync Project with Gradle Files and wait for Gradle project sync to finish.
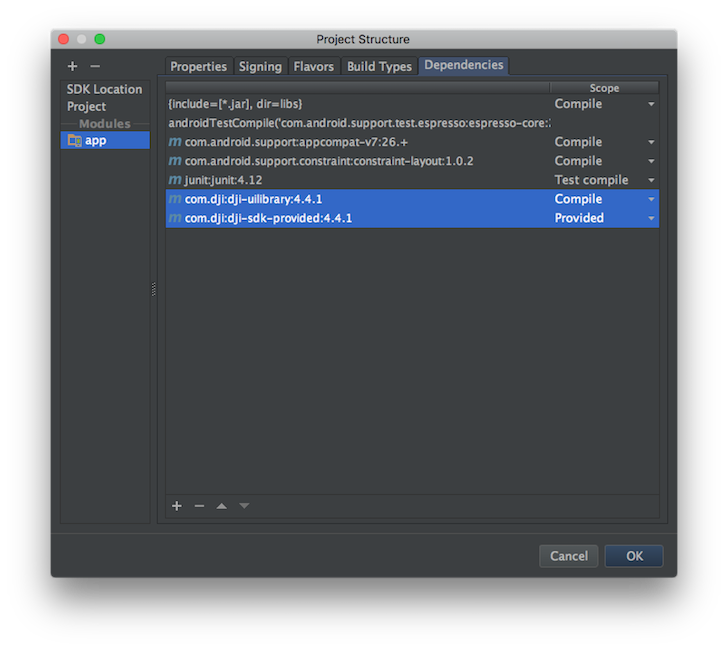
Double Check Maven Dependency
Select File->Project Structure in the Android Studio menu to open the "Project Structure" window. Then select the "app" module and click the Dependencies tab. You should see the latest DJI Android UX SDK compile and sdk provided dependencies are already imported.
Application Activation and Aircraft Binding in China
For DJI SDK mobile application used in China, it's required to activate the application and bind the aircraft to the user's DJI account.
If an application is not activated, the aircraft not bound (if required), or a legacy version of the SDK (< 4.1) is being used, all camera live streams will be disabled, and flight will be limited to a zone of 100m diameter and 30m height to ensure the aircraft stays within line of sight.
<!-- Widgets in top status bar --> <LinearLayout android:id="@+id/signal" android:layout_width="match_parent" android:layout_height="25dp" android:background="@color/dark_gray" android:orientation="horizontal">
<!--Take off and return home buttons on left --> <LinearLayout android:layout_width="40dp" android:layout_height="wrap_content" android:layout_centerVertical="true" android:layout_marginStart="12dp" android:orientation="vertical">
In the xml file above, we implement the following UIs:
Firstly, we add the dji.ui.widget.FPVWidget and dji.ui.widget.FPVOverlayWidget elements to show the first person view (FPV).
Next, on top of the screen, we create a LinearLayout to group the top status bar widgets, like PreFlightStatusWidget, FlightModeWidget, GPSSignalWidget, RemoteControlSignalWidget, etc.
Moreover, we create another LinearLayout to group the camera configurations and config widgets below the status bar widgets, like AutoExposureLockWidget, FocusExposureSwitchWidget, CameraConfigISOWidget, CameraConfigStorageWidget, etc. Also we add the dji.ui.widget.RemainingFlightTimeWidget element to show the remaining flight time widget below the top status bar widgets too.
Below the top status bar, we add a RemainingFlightTimeWidget to show the remaining flight time.
At the bottom of the screen, we add another LinearLayout to group the DashboardWidget. It includes the circular CompassWidget, the DistanceHomeWidget, the HorizontalVelocityWidget, the DistanceRCWidget, the VerticalVelocityWidget and the AltitudeWidget as shown below:
On the left side of the screen, we add a LinearLayout to group the TakeOffWidget and ReturnHomeWidget which will be shown as two buttons.
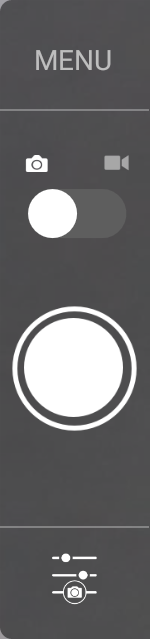
On the right side of the screen, we add the dji.ui.widget.controls.CameraControlsWidget element to create a CameraControlsWidget to show the camera control widget. Tapping the Menu button on top will toggle between show and hide CameraSettingAdvancedPanel. Tapping the switch button in the middle will toggle camera mode between shoot photo and record video. Tapping the bottom button will toggle between show and hide CameraSettingExposurePanel.
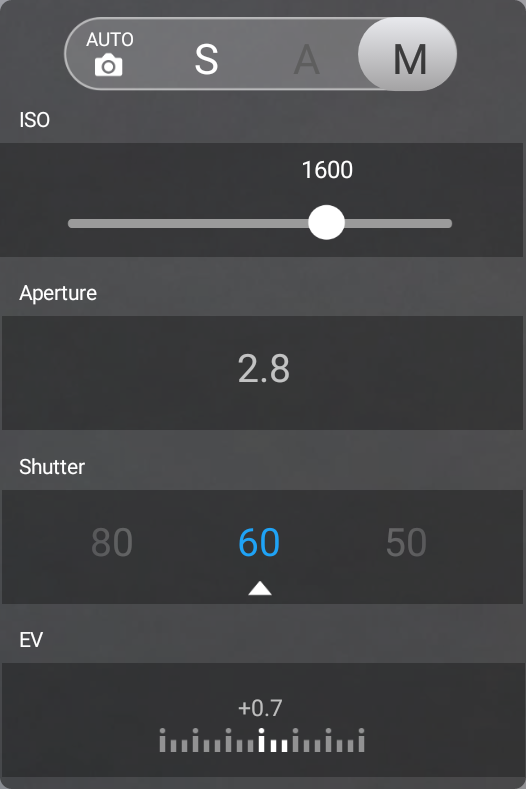
To add the CameraSettingExposurePanel, we add the dji.ui.panel.CameraSettingExposurePanel element and configure its attributes.
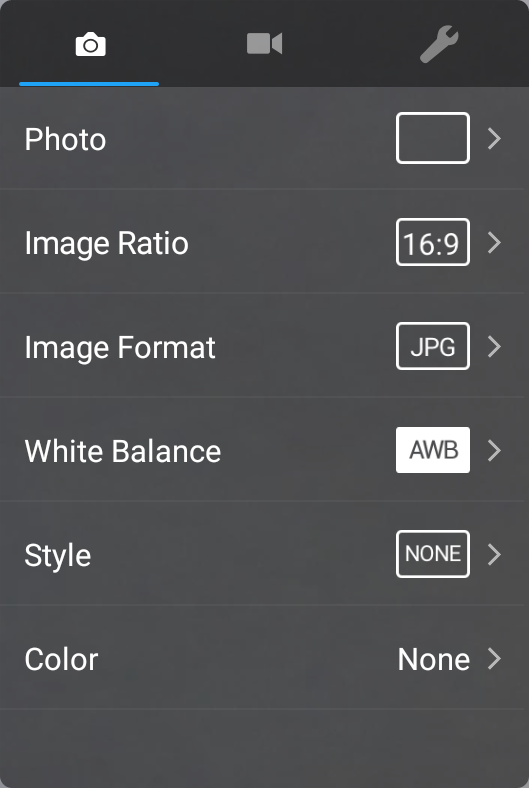
To add the CameraSettingAdvancedPanel, we add the dji.ui.panel.CameraSettingAdvancedPanel element and configure its attributes.
Lastly, we add the dji.ui.panel.PreFlightCheckListPanel element to create the PreFlightCheckListPanel. When user press on the PreFlightStatusWidget, it will show up below the top status bar.
Once you finished the steps above, open the "colors.xml" file and replace the content with the following:
Moreover, let's open the "styles.xml" file and replace the content with the following:
<resources>
<!-- Base application theme. --> <stylename="AppTheme"parent="@style/Base.Theme.AppCompat.Light.NoActionBar"> </style>
</resources>
With the help of DJI UX SDK, it's simple and straightforward to implement the standard DJI Go UIs and functionalities in your own application.
Application Registration
Now let's register our application with the App Key you apply from DJI Developer Website. If you are not familiar with the App Key, please check the Get Started.
Implementing MApplication and DemoApplication
Right click on the 'com.dji.uxsdkdemo' module in the project navigator and select "New -> Java Class" to create a new file, enter "MApplication" as the Name. Then replace the code with the following:
Here, we override the attachBaseContext() method to add the Helper.install(MApplication.this); line of code. Also, override the onCreate() method to invoke the same onCreate() method of DemoApplication class.
Note: Since some of SDK classes now need to be loaded before using, the loading process is done by Helper.install(). Developer needs to invoke this method before using any SDK functionality. Failing to do so will result in unexpected crashes.
Once we finished the steps above, let's continue to create the DemoApplication class, and replace the code with the same file in this tutorial's sample project, here we explain the important part of it:
@Override publicvoidonCreate(){ super.onCreate(); mHandler = new Handler(Looper.getMainLooper());
//Check the permissions before registering the application for android system 6.0 above. int permissionCheck = ContextCompat.checkSelfPermission(getApplicationContext(), android.Manifest.permission.WRITE_EXTERNAL_STORAGE); int permissionCheck2 = ContextCompat.checkSelfPermission(getApplicationContext(), android.Manifest.permission.READ_PHONE_STATE); if (Build.VERSION.SDK_INT < Build.VERSION_CODES.M || (permissionCheck == 0 && permissionCheck2 == 0)) {
//This is used to start SDK services and initiate SDK. DJISDKManager.getInstance().registerApp(getApplicationContext(), mDJISDKManagerCallback); } else { Toast.makeText(getApplicationContext(), "Please check if the permission is granted.", Toast.LENGTH_LONG).show(); }
/** * When starting SDK services, an instance of interface DJISDKManager.DJISDKManagerCallback will be used to listen to * the SDK Registration result and the product changing. */ mDJISDKManagerCallback = new DJISDKManager.SDKManagerCallback() {
//Listens to the SDK registration result @Override publicvoidonRegister(DJIError error){ if(error == DJISDKError.REGISTRATION_SUCCESS) { DJISDKManager.getInstance().startConnectionToProduct(); Handler handler = new Handler(Looper.getMainLooper()); handler.post(new Runnable() { @Override publicvoidrun(){ Toast.makeText(getApplicationContext(), "Register Success", Toast.LENGTH_LONG).show(); } }); loginAccount();
} @Override publicvoidonInitProcess(DJISDKInitEvent djisdkInitEvent, int i){
} }; }
Here, we implement several features:
We override the onCreate() method to check the permissions and invoke the registerApp() method of DJISDKManager to register the application first.
Initialize the SDKManagerCallback variable and implement its two interface methods. You can use the onRegister() method to check the Application registration status and show text message to inform users. When the product is connected or disconnected, the onProductConnect() and onProductDisconnect() methods will be invoked. Moreover, we use the onComponentChange() method to check the component changes and invoke the notifyStatusChange() method to notify the changes.
Please initialize the DJI Android SDK class variables inside the onCreate() method of DemoApplication class after the MApplication class is created, which finished loading the SDK classes by invoking the Helper.install().
For more details, please check this tutorial's Github Sample project.
Modifying AndroidManifest file
Once you finished the steps above, let's open the "AndroidManifest.xml" file and add the following elements on top of the application element:
Here, we request permissions that the application must be granted in order for it to register DJI SDK correctly. Also, we declare the camera and USB hardware which are used by the application.
Moreover, add the android:name=".MApplication" at the beginning of the application element:
In the code above, you should substitute your App Key of the application for "Please enter your App Key here." in the value attribute under the android:name="com.dji.sdk.API_KEY" attribute. For the "accessory_filter.xml" file, you can get it from this tutorial's Github Sample project.
Lastly, update the "MainActivity" activity elements as shown below:
// When the compile and target version is higher than 22, please request the // following permissions at runtime to ensure the // SDK work well. if (Build.VERSION.SDK_INT >= Build.VERSION_CODES.M) { ActivityCompat.requestPermissions(this, new String[]{Manifest.permission.WRITE_EXTERNAL_STORAGE, Manifest.permission.VIBRATE, Manifest.permission.INTERNET, Manifest.permission.ACCESS_WIFI_STATE, Manifest.permission.WAKE_LOCK, Manifest.permission.ACCESS_COARSE_LOCATION, Manifest.permission.ACCESS_NETWORK_STATE, Manifest.permission.ACCESS_FINE_LOCATION, Manifest.permission.CHANGE_WIFI_STATE, Manifest.permission.MOUNT_UNMOUNT_FILESYSTEMS, Manifest.permission.READ_EXTERNAL_STORAGE, Manifest.permission.SYSTEM_ALERT_WINDOW, Manifest.permission.READ_PHONE_STATE, } , 1); }
setContentView(R.layout.activity_main); }
}
In the onCreate() method, we request several permissions at runtime to ensure the SDK works well when the compile and target SDK version is higher than 22(Like Android Marshmallow 6.0 device and API 23).
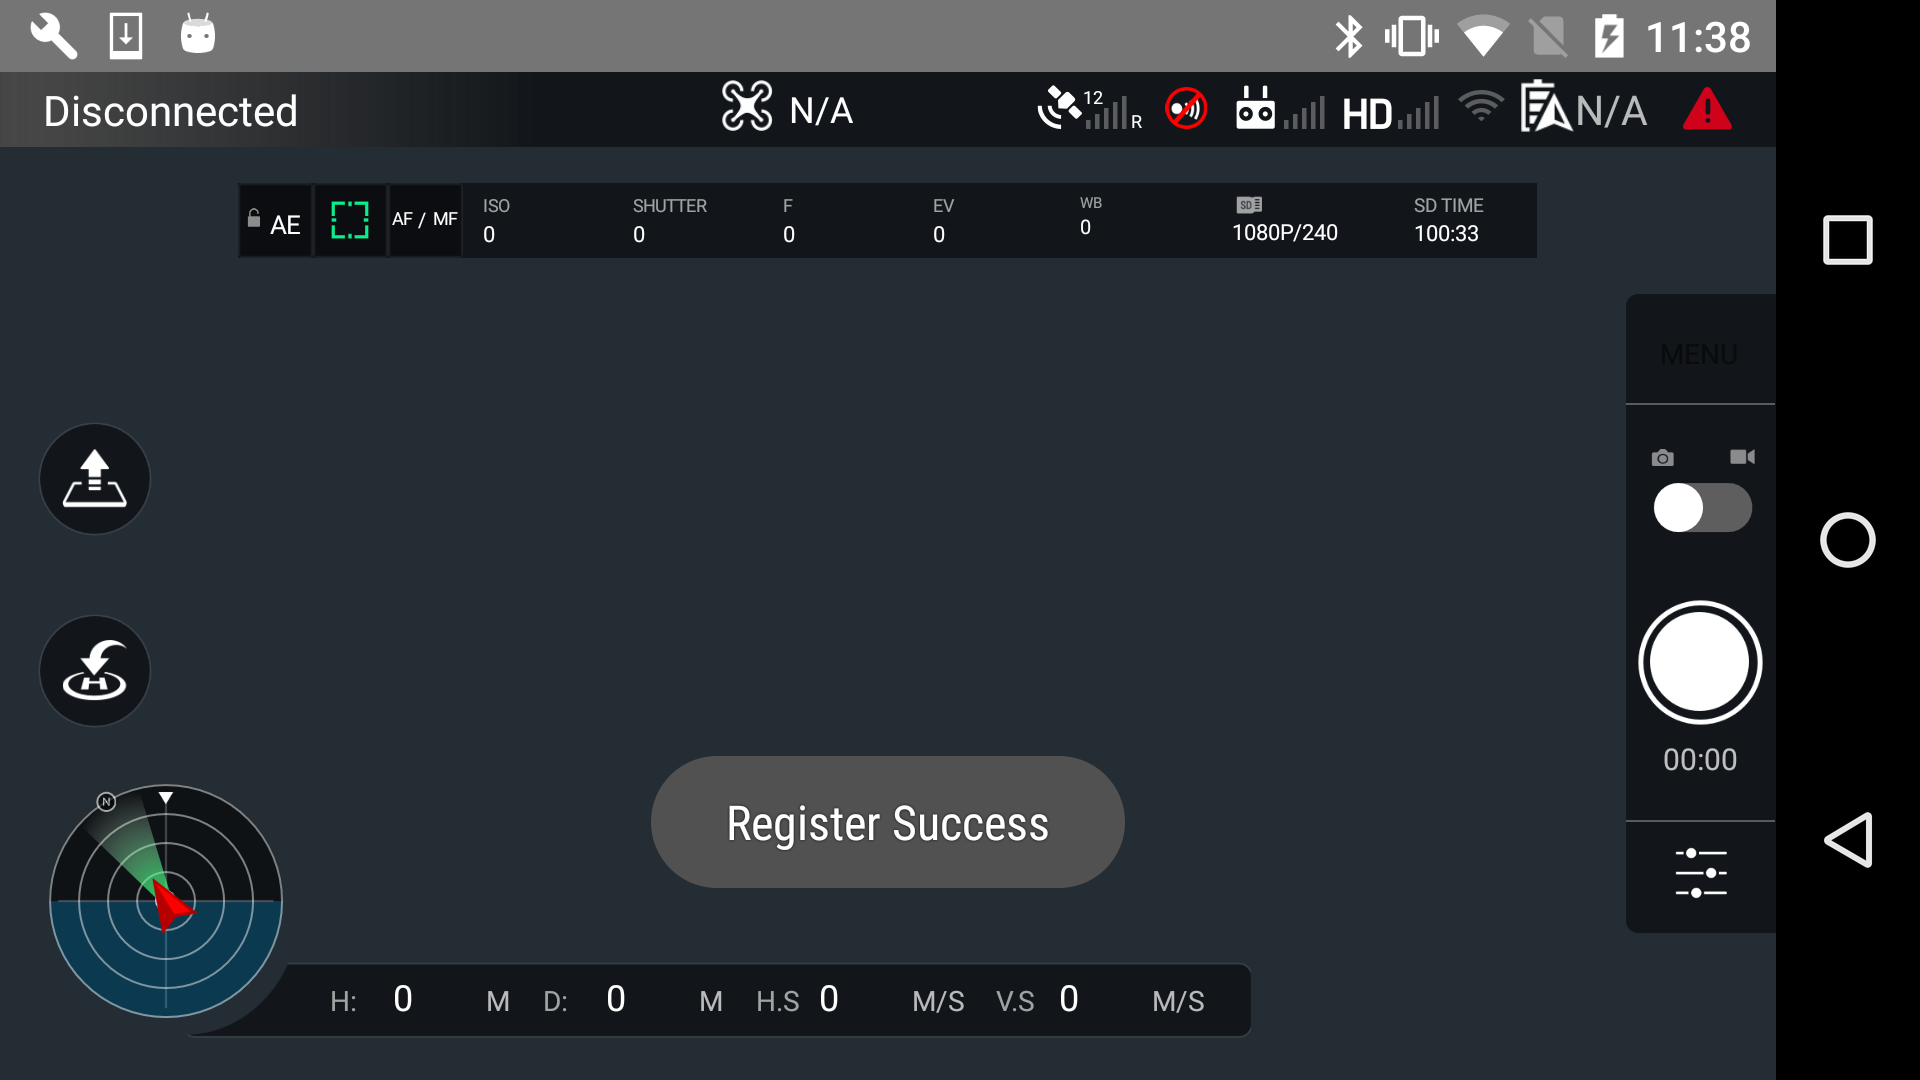
Now, let's build and run the project and install it to your Android device. If everything goes well, you should see the "Register Success" textView like the following screenshot when you register the app successfully.
Connecting to the Aircraft and Run the Project
Now, please check this Connect Mobile Device and Run Application guide to run the application and try the mini-DJI Go features of UX SDK based on what we've finished of the application so far!
If you can see the live video feed and test the features like this, congratulations! Using the DJI UX SDK is that easy.
Summary
In this tutorial, you have learned how to use the DJI Android UX SDK and DJI Android SDK to create a fully functioning mini-DJI Go app easily, with standard DJI Go UIs and functionalities. Hope you enjoy it!