Creating a TapFly and ActiveTrack Missions Application
In this tutorial, you will learn how to use the TapFly and ActiveTrack Missions of DJI iOS SDK to create a cool application for DJI Mavic Pro. Also, you will get familiar with DJITapFlyMissionOperator, DJIActiveTrackMissionOperator and using the Simulator of DJI Assistant 2 for testing, which is convenient for you to test the missions indoor. So let's get started!
You can download the tutorial's final sample project from this Github Page.
Introduction
The TapFly and ActiveTrack missions bring you a more autonomous flying experience. They are originally supported by Phantom 4, now they are also supported by Mavic Pro, Phantom 4 Pro, Phantom 4 Advanced, Spark, M200 and Inspire 2.
TapFly Mission
Given a coordinate in the live video stream (which can come from a user tap), the aircraft will calculate and fly towards the coordinate's direction in the real world. During a flight, the aircraft will automatically detect and avoid obstacles. Also, the aircraft will stop flying in the direction if it reaches its radius limitation, the mission is stopped, the user pulls back on the pitch stick or if it comes to an obstacle it cannot bypass.
During the mission, you can use the remote controller's yaw stick to adjust the heading of the aircraft, which also adjusts the direction of flight to the new yaw.
Here is a video for you to get the first impression of the TapFly Mission.
ActiveTrack Mission
An ActiveTrack Mission allows an aircraft to track a moving subject using the vision system and without a GPS tracker on the subject. To use an ActiveTrack mission:
The main camera is used to track the target, so the gimbal cannot be adjusted during an ActiveTrack mission. During the mission, the aircraft can be manually flown with pitch, roll and throttle to move around the subject being tracked.
Here is a video for you to get the first impression of the ActiveTrack Mission.
Implementing the UI of Application
Importing SDK and Register Application
Now, let's create a new project in Xcode, choose Single View Application template for your project and press "Next", then enter "P4Missions" in the Product Name field and keep the other default settings.
Once the project is created, let's delete the ViewController.h and ViewController.m files, which are created by Xcode when you create the project. Then create a UIViewController named RootViewController and set the class of original ViewController object to "RootViewController" and make the ViewController embed in a Navigation Controller and set it as the Storyboard Entry Point in Main.storyboard.
Next, let's import the DJISDK.framework to the project and implement the registration process in the RootViewController. If you are not familiar with the process of importing and activating DJI SDK, please check this tutorial: Importing and Activating DJI SDK in Xcode Project for details.
Importing the DJIWidget
You can check the Creating a Camera Application tutorial to learn how to download and import the DJIWidget into your Xcode project.
Application Activation and Aircraft Binding in China
For DJI SDK mobile application used in China, it's required to activate the application and bind the aircraft to the user's DJI account.
If an application is not activated, the aircraft not bound (if required), or a legacy version of the SDK (< 4.1) is being used, all camera live streams will be disabled, and flight will be limited to a zone of 100m diameter and 30m height to ensure the aircraft stays within line of sight.
To learn how to implement this feature, please check this tutorial Application Activation and Aircraft Binding.
Setup the Storyboard
1. Creating UIButtons
Drag and drop two UIButton objects to the RootViewController and named them as "TapFly Mission" and "ActiveTrack Mission". Remember to add Auto Layout constraints to the two buttons. Moreover, drag and drop two UIViewController objects from the Object library and place them on the right of the RootViewController.
2. Adding Two ViewControllers
Control drag from the two buttons to the two new UIViewController objects separately and choose the "Show" action segue. Here we create two UIViewController classes and named them as "ActiveTrackViewController" and "TapFlyViewController". Then set the class of the two new UIViewController objects in storyboard as these two classes.
Next, drag two Bar Button items(Name them both as "Status") from Object Library and place them on the right side of navigation bar of "ActiveTrackViewController" and "TapFlyViewController" objects in the storyboard.
Now, let's check the screenshot of the current storyboard UI:
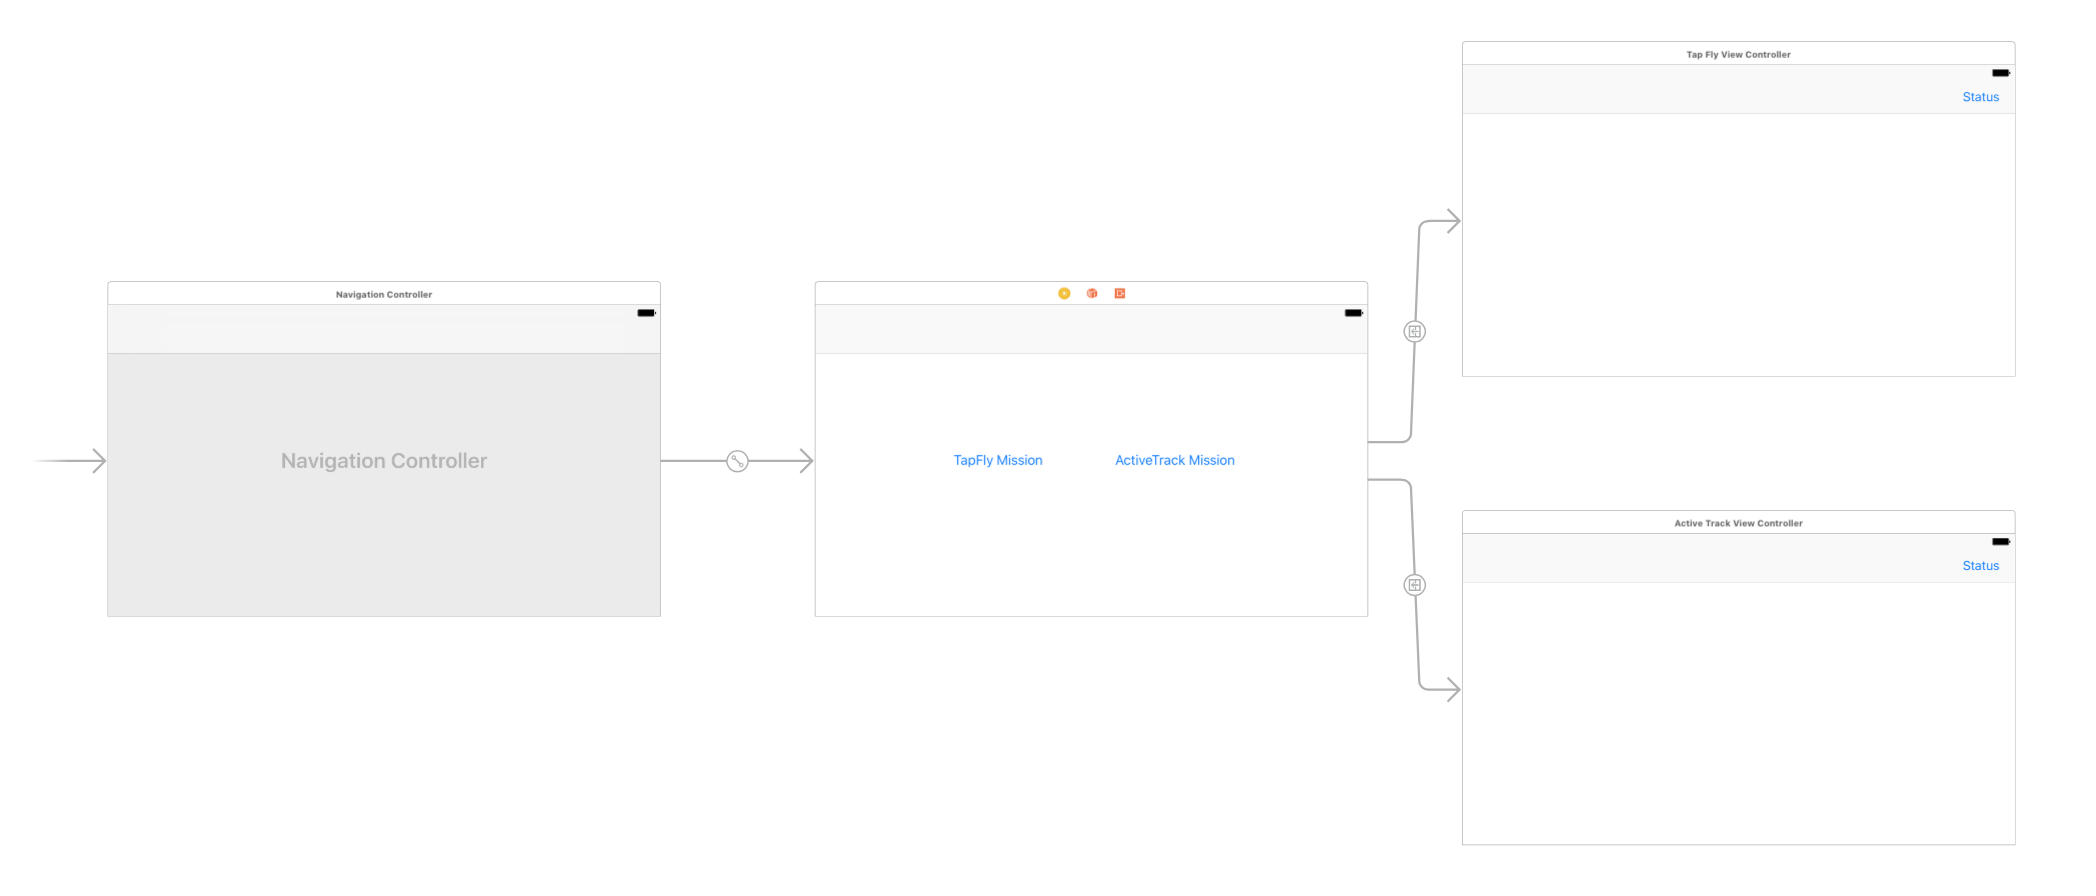
It looks pretty simple and clear, this will be the workflow of our demo application.
Coordinate Transformations for Missions
Before we dive into the implementation of two missions, let's learn something about the special coordinate transformations of them.
TapFly Mission Coordinate Transformation
If we check the DJITapFlyMission.h file, you can see the following two properties:
@property(nonatomic, readonly) DJISDKVector3D *direction; |
1. The direction property is a DJISDKVector3D object, which represents a cartesian vector in 3D space. You can get the actual flying direction of the aircraft using the N-E-D(North-East-Down) coordinate system when the aircraft is executing a TapFly mission.
2. The imageLocation property is the image point from the live video stream where the vision system should calculate the flight direction from. The image point is normalized to [0,1] where (0,0) is the top left corner and (1,1) is the bottom right.
Here is a diagram to show the coordinate transformation of the mission:
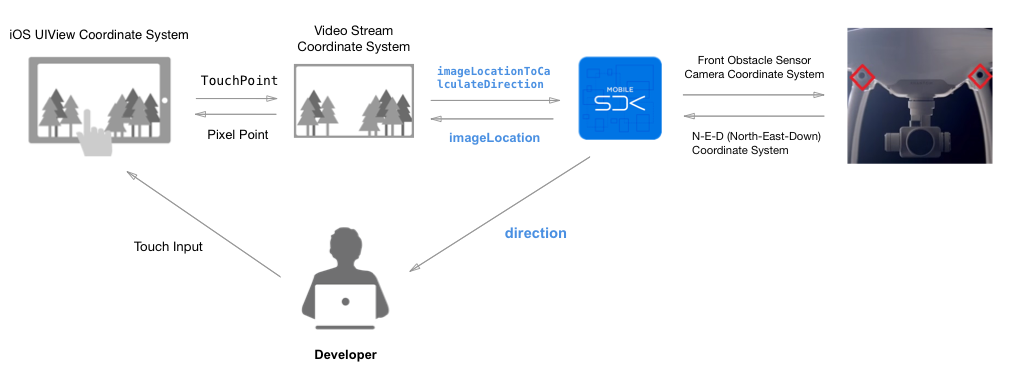
As the diagram shown above, you can see the process of transformation.
-
The
imageLocationToCalculateDirectionproperty shown above is transformed from TouchPoint (CGPoint) to a Video Stream Coordinate System CGPoint. -
The
directionproperty shown above belongs to the N-E-D (North-East-Down) Coordinate System and will be sent to you by the SDK. -
The
imageLocationproperty shown above belongs to the Video Stream Coordinate System and will be sent to you by the SDK.
So in our demo application, in order to implement the TapFly mission, we should transform the user's touch location (A CGPoint object) of UIView Coordinate System into the image location (A CGPoint object) of Video Stream Coordination System and pass it to the following imageLocationToCalculateDirection property of DJITapFlyMission:
@property(nonatomic, assign) CGPoint imageLocationToCalculateDirection; |
ActiveTrack Mission Coordinate Transformation
Next, let's check the DJIActiveTrackMission.h file, you may see the following two properties.
- DJIActiveTrackMission Interface
@property (nonatomic, readwrite) CGRect targetRect; |
- DJIActiveTrackTrackingState Interface
@property (nonatomic, readonly) CGRect targetRect; |
1. The targetRect property in the DJIActiveTrackMission interface is a bounding box for the target. The rectangle is normalized to [0,1] where (0,0) is
the top left of the video preview and (1,1) is the bottom right.
The size parameter of CGRect can be set to 0 to initialize the mission with a point instead of a rectangle. If the mission is initialized with a point, the vision system will try to recognize the object around the point and return the representative rect in the status delegate.
2. Another targetRect property in the DJIActiveTrackTrackingState interface is a rectangle in the live video view image that represents the target being tracked. The rectangle is normalized to [0,1] where (0,0) is the top left of the video preview and (1,1) is the bottom right.
Here is a diagram to show the coordinate transformation of the ActiveTrack mission:
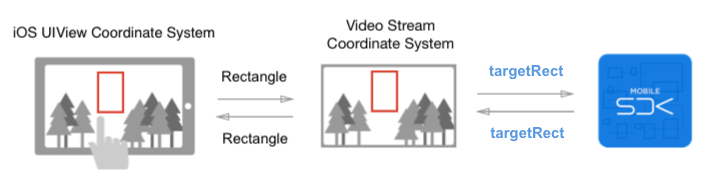
As the diagram shown above, you can see the process of transformation.
- The two
targetRectproperties shown above belongs to the Video Stream Coordinate System.
So in order to implement the ActiveTrack Mission, we should transform the user's touch rect (A CGRect object) of UIView Coordinate System into the tracking rect (A CGRect object) of Video Stream Coordination System and pass it to the targetRect property of DJIActiveTrackMission interface. The SDK will send you the targetRect property of DJIActiveTrackTrackingState interface to update the rectangle on your screen.
Implementing the TapFly Mission
Working on the UI of TapFlyViewController
Now let's create a new UIView class and name it as "PointingTouchView". We use this UIView to update and draw the tapping point of the direction which you want the aircraft to fly towards on the screen.
Go back to the TapFlyViewController object in the storyboard. Drag and drop two UIView objects to the view controller and adjust their size to be full screen. Create two IBOutlets for them in the class extension part of TapFlyViewController.m file and connect them between Storyboard and the .m file as shown below:
@property (weak, nonatomic) IBOutlet UIView *fpvView; |
Remember to place the fpvView at the bottom, and change the top UIView object's class to "PointingTouchView".
Next, Drag and drop two UILabel objects, two UIButton objects, a UISwitch object and a UISlider object on top of the View of Tap Fly View Controller and place them at the positions as shown below:
For more details of the UI customization, please check the Github source code of this demo project. Lastly, create six IBOutlet properties and five IBActions methods for them in the TapFlyViewController.m file as shown below:
@property (weak, nonatomic) IBOutlet UIButton* startMissionBtn; |
- (IBAction)showStatusButtonAction:(id)sender { |
Implementing the Coordinate Transformation Methods
Let's create a useful NSObject class named "DemoUtility", it contains some useful Macros and Class methods for the demo project. Here is the interface of it:
|
It firstly imports the DJISDK and DJIVideoPreviewer header files, then defines several methods to do the mission coordinate transformations.
Moreover, here are the coordinate transformations class methods' implementations:
+ (CGPoint) pointToStreamSpace:(CGPoint)point withView:(UIView *)view |
The "StreamSpace" in the above method names means the video stream coordinate system. Those methods include transformations of CGPoint, CGSize and CGRect, we will use them frequently later. For the remaining implementation of this class, please check this tutorial's Github sample project.
Working on the PointingTouchView
Now let's go to PointingTouchView.h file and replace it with the following codes:
|
Here, we create two methods to update the touching point and its color.
Next, go to the PointingTouchView.m file and replace it with the following codes:
|
In the code above, we implement the updatePoint: and updatePoint:andColor: methods to update the point and fillColor instance variables. Moreover, we implement the -(void)drawRect:(CGRect)rect method to draw a circle and fill it with color for the touching point on the PointingTouchView.
Implementing the TapFlyViewController
Showing Live Video Stream
In order to show the live video stream in the TapFlyViewController, we should import the following headers and implement the protocols of DJIVideoFeedListener firstly:
|
Then, invoke the start instance method of DJIVideoPreviewer, set its view as fpvView property object and invoke the addListener method of DJIVideoFeeder to add TapFlyViewController as the listener. We should also set DJICamera's delegate as TapFlyViewController in the viewWillAppear method as shown below:
-(void) viewWillAppear:(BOOL)animated |
Remember to invoke the unSetView method of DJIVideoPreviewer and set its view to nil in the viewWillDisappear method to remove the previous glView. Also, invoke the removeListener method of DJIVideoFeeder to remove the listener:
-(void) viewWillDisappear:(BOOL)animated |
Finally, let's implement the DJIVideoFeedListener's delegate method to show the live video stream on the fpvView:
|
Working on the TapFly Mission
Setup UITapGestureRecognizer
If we want to recognize the user's tap gesture on the screen, we need to create a UITapGestureRecognizer instance object in the viewDidLoad method and implement its action selector method as shown below:
- (void)viewDidLoad { |
-(void) onScreenTouched:(UIGestureRecognizer*)recognizer |
In the onScreenTouched: method, we firstly get the CGPoint of touch event by invoking the locationInView: method of UIGestureRecognizer. Then we invoke the updatePoint:andColor: method of PointingTouchView to draw the point with green color on the screen.
Lastly, we call the pointToStreamSpace:withView: method of DemoUtility to transform the touch point to a Video Stream Coordinate CGPoint object and pass it to the startTapFlyMissionWithPoint: method to configure the TapFly mission. We will implement this method later.
Configure the Mission
Before we start the DJITapFlyMission, let's use the DJITapFlyMissionOperator to configure the following settings:
1. AutoFlightSpeed
You can set the aircraft's auto flight speed during the mission by invoking the setAutoFlightSpeed:withCompletion: method of DJITapFlyMissionOperator. The range for it is [1, 10] m/s.
2. HorizontalObstacleBypassEnabled
If you want to allow the aircraft to bypass or move around an obstacle by going to the left or right of the obstacle when executing TapFly mission, you can invoke the setHorizontalObstacleBypassEnabled:withCompletion: method of DJITapFlyMissionOperator and pass YES as the parameter. Otherwise, the aircraft will only go over an obstacle to avoid it.
Now, let's implement the above settings in source code. Create the isMissionRunning and speed properties in the class extension and then implement the the following methods:
- (DJITapFlyMissionOperator *) missionOperator { |
In the code above, we implement the following things:
-
First, we create the
missionOperatormethod to fetch theDJITapFlyMissionOperatorobject fromDJIMissionControl. -
Next, in the
isExecutingState:method, we check the enum values of theDJITapFlyMissionStateand return a BOOL value. Moreover, in theisMissionRunningmethod, we fetch thecurrentStateobject from theDJITapFlyMissionOperator, invoke theisExecutingStatemethod and return a BOOL value to identify if the TapFlyMission is executing. -
In the
updateBypassStatusmethod, we invoke thegetHorizontalObstacleBypassEnabledWithCompletionmethod ofDJITapFlyMissionOperatorand update thebypassSwitchervalue in the completion block. -
Similarly, in the
updateSpeedSlidermethod, we invoke thegetAutoFlightSpeedWithCompletion:method ofDJITapFlyMissionOperatorand update thespeedLabel's text value and thespeedSlider's value in the completion block. -
Furthermore, in the
onSliderValueChanged:IBAction method, we invoke thesetAutoFlightSpeed:withCompletion:method ofDJITapFlyMissionOperatorto dynamically set the flight speed for the tap fly mission. In the completion block, we invoke theupdateSpeedSlidermethod to update the values ofspeedLabelandspeedSlider. -
Lastly, in the
onSwitchValueChanged:IBAction method, we invoke thesetHorizontalObstacleBypassEnabled:withCompletion:method ofDJITapFlyMissionOperatorto enable or disable the horizontal obstacle bypass feature of tap fly mission.
Start the Mission
Now, let's implement the following methods to start the tap fly mission:
-(void) startTapFlyMissionWithPoint:(CGPoint)point |
In the startTapFlyMissionWithPoint: method, we firstly initialize the tapFlyMission object and then set the imageLocationToCalculateDirection value of DJITapFlyMission as the CGPoint point. This imageLocationToCalculateDirection property is where we should pass the coordinate transformation CGPoint to do the coordinate transformation. It is also the image point from the video feed where the vision system should calculate the flight direction from.
Next, set the tapFlyMode property of DJITapFlyMission as DJITapFlyModeForward enum value, for more details, please check the DJITapFlyMode enum in DJITapFlyMissionTypes.h header file. Lastly, invoke the shouldShowStartMissionButton method to show the start mission button.
Let's continue to implement the onStartMissionButtonAction: IBAction method as shown below:
-(IBAction) onStartMissionButtonAction:(UIButton*)sender |
Here, we invoke the startMission:withCompletion: method of DJITapFlyMissionOperator to start the tap fly mission. If we start the tap fly mission successfully, invoke the shouldShowStartMissionButton: method to hide the startMissionBtn and show the stopMissionBtn. Otherwise, invoke the updatePoint: method of PointingTouchView to reset the touch point circle.
Add Listener to Receive Mission Events
During the TapFly mission execution, we can add a listener to receive the mission events for status infos. You can use this status infos to inform users or update the UI interface.
Now, let's import the DJIScrollView class and xib files to the project, create the following properties in the class extension:
@property (weak, nonatomic) DJIScrollView* statusView; |
Here, we create the statusView to show the tap fly mission status infos, and create the logString to store the log infos.
Next, let's add the following code at the bottom of the viewDidLoad method:
self.statusView = [DJIScrollView viewWithViewController:self]; |
In the code above, we initialize the statusView firstly, then invoke the addListenerToEvents:withQueue:andBlock: method of DJITapFlyMissionOperator to add TapFlyViewController as the listener to receive the events of the TapFly mission. In the completion block, we invoke the didReceiveEvent: method and pass the received event variable as the parameter to it.
Furthermore, let's create the following two methods:
-(void)didReceiveEvent:(DJITapFlyMissionEvent *)event { |
The didReceiveEvent: method is a bit more complicated. Let's explain it step by step:
-
We invoke the
isExecutingState:method to check if the TapFly mission is either "Resetting", "Paused" or "Executing", if so, we show thestopMissionBtn, otherwise, we reset thepointproperty in thePointingTouchViewand hide both thestartMissionBtnandstopMissionBtn. Next, check if the TapFly mission is stopped and show alert view to inform users with errors if they exist. -
Furthermore, check if the
executionStateexists, then get the image point from the video feed and invoke thepointFromStreamSpace:method ofDemoUtilityto convert it to the iOS UIView coordinate system. Then with thepointobject, we can update the circle's position and color drawing on the screen based on theexecutionState. -
Store the TapFly execution state infos into the
logStringand show it in thestatusView.
Stop Mission
Finally, let's implement the onStopMissionButtonAction: IBAction method to stop the TapFly mission:
-(IBAction) onStopMissionButtonAction:(UIButton*)sender |
In order to show the status log, let's implement the showStatusButtonAction: IBAction method as shown below:
- (IBAction)showStatusButtonAction:(id)sender { |
For more implementation details of the TapFlyViewController file, please check the Github source code.
Now let's build and run the project, if everything goes well, you should be able to use the TapFly mission now.
Important: Remember to switch the remote controller to P mode before you test the TapFly mission.
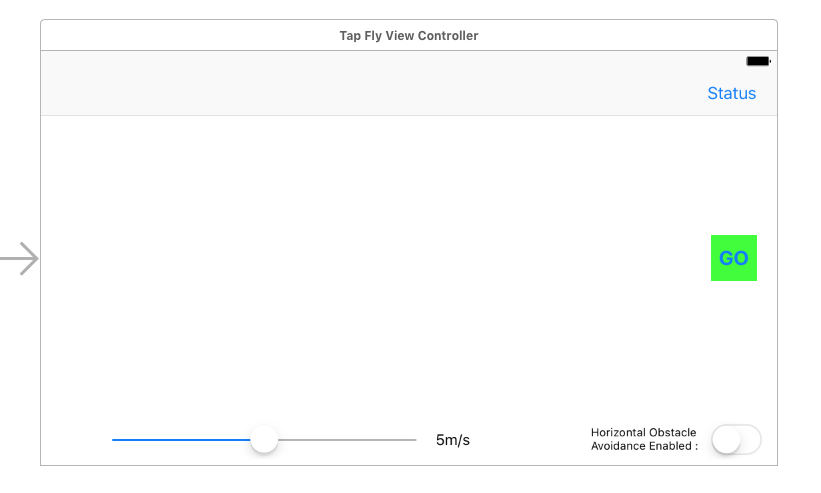
Here is a gif animation for you to get a better understanding of using the TapFly mission feature:
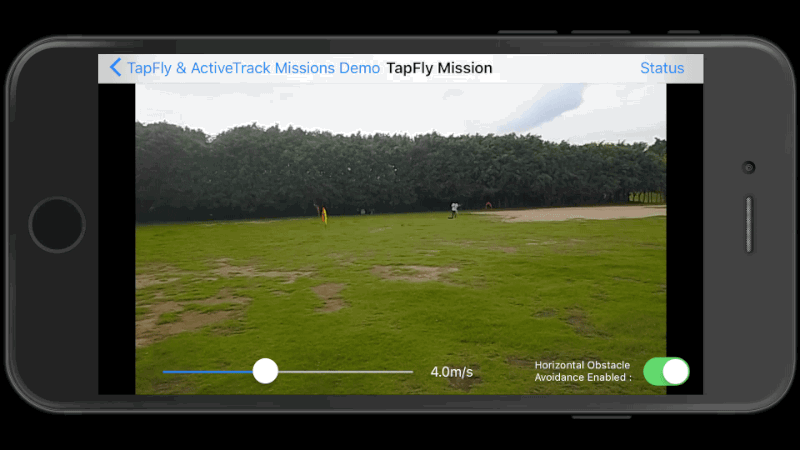
In the animation, when you tap on the screen, a green circle appears, which is the direction you want Mavic Pro fly towards. Press the GO button on the right side, Mavic Pro will start to execute the TapFly mission and fly. When you want to stop the mission, just press the X button, Mavic Pro will stop immediately and hover there.
Implementing ActiveTrack Mission
Working on the UI of ActiveTrackViewController
1. Now let's create a new UIView class and name it as "TrackingRenderView". We use this UIView to track the user's UITouch Event and draw the tracking rectangle of the object on it.
2. Let's go back to the ActiveTrackViewController object in the storyboard. Drag and drop two UIView objects to the view controller and adjust their size to be full screen. Create two IBOutlets for them in the class extension part of ActiveTrackViewController.m file and connect them between Storyboard and the .m file as shown below:
@property (weak, nonatomic) IBOutlet UIView *fpvView; |
Remember to place the fpvView at the bottom, and change the top UIView object's class to "TrackingRenderView".
3. Drag and drop two UILabel objects, four UIButton objects and two UISwitch objects on top of the View of Active Track View Controller and place them on the right positions as shown below:
For more details of the UI customization, please check the Github source code of this demo project. Lastly, create seven IBOutlet properties and four IBAction methods for them in the ActiveTrackViewController.m file as shown below:
@property (weak, nonatomic) IBOutlet UIButton *acceptButton; |
- (IBAction) onStopButtonClicked:(id)sender |
Implementing the TrackingRenderView
Let's go to TrackingRenderView.h file and replace it with the following codes:
|
You can see a few things are happening here:
1. Firstly, we create two TrackingRenderViewDelegate methods, they are used to track your single touch event and drawing rectangle touch event.
2. We use the trackingRect property to store the updated tracking CGRect of moveing subject and draw it on the TrackingRenderView. The isDottedLine BOOL value is used for drawing dotted line. The text NSString property is used to store and draw text on the TrackingRenderView.
3. Lastly, we create the updateRect:fillColor: method to update the tracking rect and fill its color.
Next, let's come to the TrackingRenderView.m file and replace it with the following codes:
|
Here, we implement the four event-handling methods for touches to track user's multi touch and invoke the related TrackingRenderViewDelegate methods. Also, we implement the -(void)drawRect:(CGRect)rect method to draw the tracking rectangle, dotted line and text on the TrackingRenderView.
Implementing the ActiveTrackViewController
Showing Live Video Stream
In order to show the live video stream of Mavic Pro's camera on the app, let's come to ActiveTrackViewController.m file and implement its class extension part firstly. Import the following headers and implement the protocols of DJIVideoFeedListener and TrackingRenderViewDelegate:
|
Then, in the viewWillAppear: method, invoke the start instance method of DJIVideoPreviewer, set its view as fpvView property object and invoke the addListener method of DJIVideoFeeder to add ActiveTrackViewController as the listener. We should also set DJICamera's delegate as ActiveTrackViewController as shown below:
-(void) viewWillAppear:(BOOL)animated |
Remember to invoke the unSetView method of DJIVideoPreviewer and set its view to nil in the viewWillDisappear method to remove the previous glView. Also, invoke the removeListener method of DJIVideoFeeder to remove the listener:
-(void) viewWillDisappear:(BOOL)animated |
Lastly, let's implement the DJIVideoFeedListener's delegate method to show the live video stream on the fpvView:
|
Setup ActiveTrack Mission
Configure the Mission
Before we start the DJIActiveTrackMission, let's use the DJIActiveTrackMissionOperator to configure the following settings:
- Enable/Disable Gesture Mode
Gesture mode allows the subject to confirm tracking as well as take pictures using gestures. Raise your arms in a V, the human subject can accept the confirmation to track them. Gesture mode can only be enabled when the aircraft is flying but not tracking a target. If the aircraft is already tracking a target, disabling gesture mode will stop the ActiveTrack mission.
You can check this video to get a better understanding of the Gesture Mode.
Now let's implement the onGestureEnabledSwitchValueChanged: IBAction method as shown below:
- (IBAction)onGestureEnabledSwitchValueChanged:(UISwitch*)sender { |
In the code above, we invoke the setGestureModeEnabled:withCompletion: method of DJIActiveTrackMissionOperator to set the gesture mode, and invoke updateGestureEnabled method to update the gestureSwitch value in the completion block if set geature mode successfully.
- Enable/Disable Retreat
When retreat is enabled, the aircraft will retreat (fly backwards) when the target comes toward it. When it is disabled, the aircraft will not retreat and instead rotate the gimbal pitch down to track the target as it goes underneath. If the target goes beyond the gimbal's pitch stop, the target will be lost and the mission will stop.
Here, let's implement the onRetreatEnabledSwitchValueChanged: IBAction method as shown below:
- (IBAction) onRetreatEnabledSwitchValueChanged:(UISwitch*)sender |
As you see the code above, we invoke the setRetreatEnabled:withCompletion: method of DJIActiveTrackMissionOperator to enable the retreat feature. Also, in the completion block, if set retreat enable successfully, we invoke the updateRetreatEnabled method to update the retreatSwitch's "on" value.
- Set Recommended Configuration
Using this feature, we can set the recommended camera and gimbal configuration that optimizes performance for the ActiveTrack Mission in most environments.
Let's implement the onSetRecommendedConfigurationClicked: IBAction method as shown below:
- (IBAction)onSetRecommendedConfigurationClicked:(id)sender { |
Here, we can invoke the setRecommendedConfigurationWithCompletion: method of DJIActiveTrackMissionOperator to set the recommended camera and gimbal configuration. Then show alert views to inform users in the completion block.
Start the Mission
1. The ActiveTrack Mission can track both moving subjects and humans.
- Track Moving Subjects
For moving subjests, you need to provide a CGRect struct of tracking rectangle to the DJIActiveTrackMission object's rect property.
DJIActiveTrackMission* mission = [[DJIActiveTrackMission alloc] init]; |
- Track Humans
For humans, you can either provide a CGRect struct of tracking rectangle or a CGRect struct with just CGPoint. Like you can tap on the human on your iPhone's screen.
DJIActiveTrackMission* mission = [[DJIActiveTrackMission alloc] init]; |
2. Now, let's set the TrackingRenderView's delegate as ActiveTrackViewController in the viewDidLoad method and implement the delegate methods as shown below:
- (void)viewDidLoad { |
-(DJIActiveTrackMissionOperator *) missionOperator { |
The renderViewDidTouchAtPoint: delegate method get invoked when you do single touch on the screen, there are two situations for it:
-
If you draw a tracking rectangle on a moving subject, and the vision system need to confirm it, you can touch the rectangle and invoke the
acceptConfirmationWithCompletion:method of theDJIActiveTrackMissionOperator, if you want to cancel the tracking, you can touch outside the rectangle, and invoke thestopMissionWithCompletion:method. -
If you want to track a human, you can touch the human on the screen. By doing that, you will get a CGPoint from the delegate method and invoke the DemoUtility's
pointToStreamSpace:withView:method to transform the touch CGPoint to a Video Stream Coordinate CGPoint object. Then pass it to thetargetRectproperty ofDJIActiveTrackMissionOperatorand invoke the following method of DJIActiveTrackMissionOperator to start the ActiveTrack mission:
-(void)startMission:(DJIActiveTrackMission *)mission withCompletion:(DJICompletionBlock)completion; |
Moreover, the renderViewDidMoveToPoint:fromPoint:isFinished: delegate method get invoked when user try to draw a rectangle on the screen to track moving subject. You can get the startPoint and endPoint from the delegate method and invoke the DemoUtility's rectWithPoint:andPoint: method to convert them to a CGRect object. When you finish drawing the rectangle, invoke the startMissionWithRect: method to start the mission.
Furthermore, let's implement the startMissionWithRect: method here:
-(void) startMissionWithRect:(CGRect)rect |
In the code above, we firstly invoke the rectToStreamSpace:withView: method of DemoUtility to transform the drawing rectangle to a Video Stream coordinate rectangle, call it normalizedRect. Then create the DJIActiveTrackMission instance object and pass the normalizedRect to its targetRect property. If start mission failed, we reset the drawing rect in the renderView and show alert view to inform users.
Accept and Reject Confirmation
When the vision system is not sure if the tracking rectangle is around the user's desired target, it will need confirmation before starting to fly relative to the target. Let's implement the onAcceptButtonClicked: IBAction method as shown below:
- (IBAction)onAcceptButtonClicked:(id)sender { |
If you want to stop the aircraft from following the target, and ask for user's confirmation again, you can invoke the stopAircraftFollowingWithCompletion: method of DJIActiveTrackMissionOperator as shown below:
- (IBAction)onRejectButtonClicked:(id)sender { |
Add Listener to Receive Mission Events
When the active track mission is executing, we can add a listener to receive the mission events for status infos. You can use this status infos to inform users or update the UI interface. Now, let's add the following code at the bottom of the viewDidLoad method:
self.statusView = [DJIScrollView viewWithViewController:self]; |
In the code above, we initialize the statusView firstly, then invoke the addListenerToEvents:withQueue:andBlock: method of DJIActiveTrackMissionOperator to add ActiveTrackViewController as the listener to receive the events of the ActiveTrack mission. In the completion block, we invoke the didUpdateEvent: method and pass the received event variable as the parameter to it.
Furthermore, let's create the following two methods:
-(void)didUpdateEvent:(DJIActiveTrackMissionEvent *)event { |
In the code above, we implement the following features:
-
We get the
previousStateandcurrentStateproperties from the receivedDJIActiveTrackMissionEvent, then use them to check if the mission is interrupted and shows alert view to inform users with related errors. -
Next, we get the
targetRectin the live video feed fromDJIActiveTrackTrackingStateobject and invoke therectFromStreamSpace:method to transform it to the tracking rectangle (A CGRect object) of UIView Coordinate System. If the target state isDJIActiveTrackTargetStateWaitingForConfirmation, we show the "?" text to inform users to confirm the tracking subject. -
Moreover, use different color to represent different
DJIActiveTrackTargetStateand invoke theupdateRect:fillColor:method ofTrackingRenderViewto update the TrackingRenderView's rectangle drawing and filling color. -
Lastly, we store different mission state infos in the
logStringobject and show them in thestatusView.
Stop Mission
Finally, let's implement the stopMissionWithCompletion: method of DJIActiveTrackMissionOperator to stop the ActiveTrack Mission. Update content of the onStopButtonClicked: IBAction method as shown below:
- (IBAction) onStopButtonClicked:(id)sender |
In order to show the status log, let's implement the showStatusButtonAction: IBAction method as shown below:
- (IBAction)showStatusButtonAction:(id)sender { |
For more implementation details of the ActiveTrackViewController.m file, please check the Github source code.
Now let's build and run the project, if everything goes well, you should be able to use the ActiveTrack mission of Mavic Pro now.
Important: Remember to switch the remote controller to P mode before you test the ActiveTrack mission.
Here is a gif animation for you to get a better understanding of using the ActiveTrack mission:
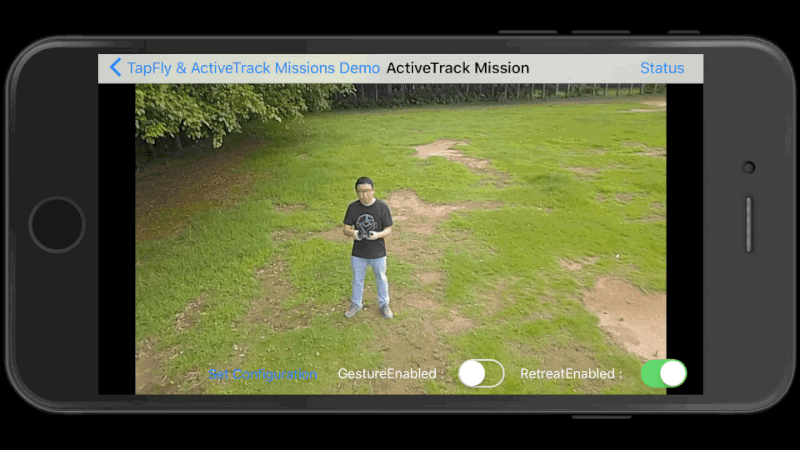
In the animation, you can see there is a person standing there, you can touch the screen to draw a green rectangle on him. Then the rectangle will turn orange and a question mark will appear to ask you for confirmation. You can press the A button on the right side to accept the confirmation.
After the confirmation, the ActiveTrack mission starts. The person walks around and the green rectangle will follow it to track its movement. This means that Mavic Pro is now tracking you automatically!
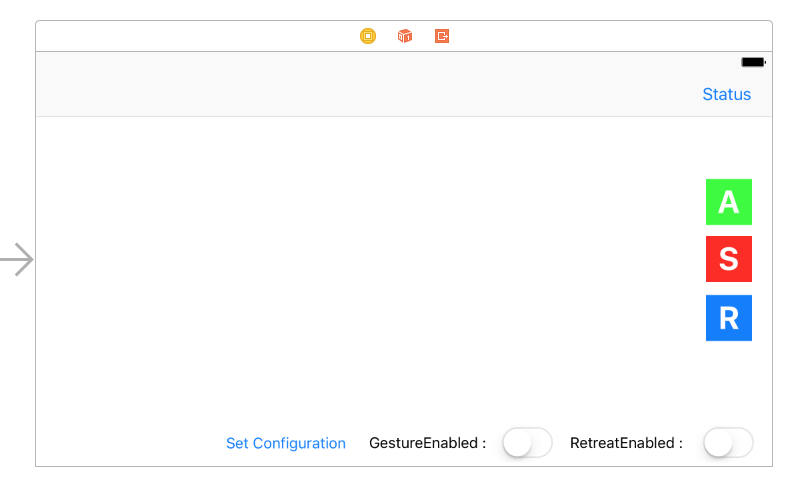
You can press the R button to stop the aircraft from following you and ask for your confirmation again. Also, press the S button if you want to stop the ActiveTrack mission.
Moreover, if you switch on the GestureEnabled switcher at the bottom of the screen, you will enable the gesture mode of Mavic Pro. Raise your arms in a V, Mavic Pro will recognize you and start to track you automatically.
Lastly, you can try to switch on the RetreatEnabled switcher at the bottom right corner of the screen to enable the Retreat feature. Once you go towards the Mavic Pro, it will fly backwards.
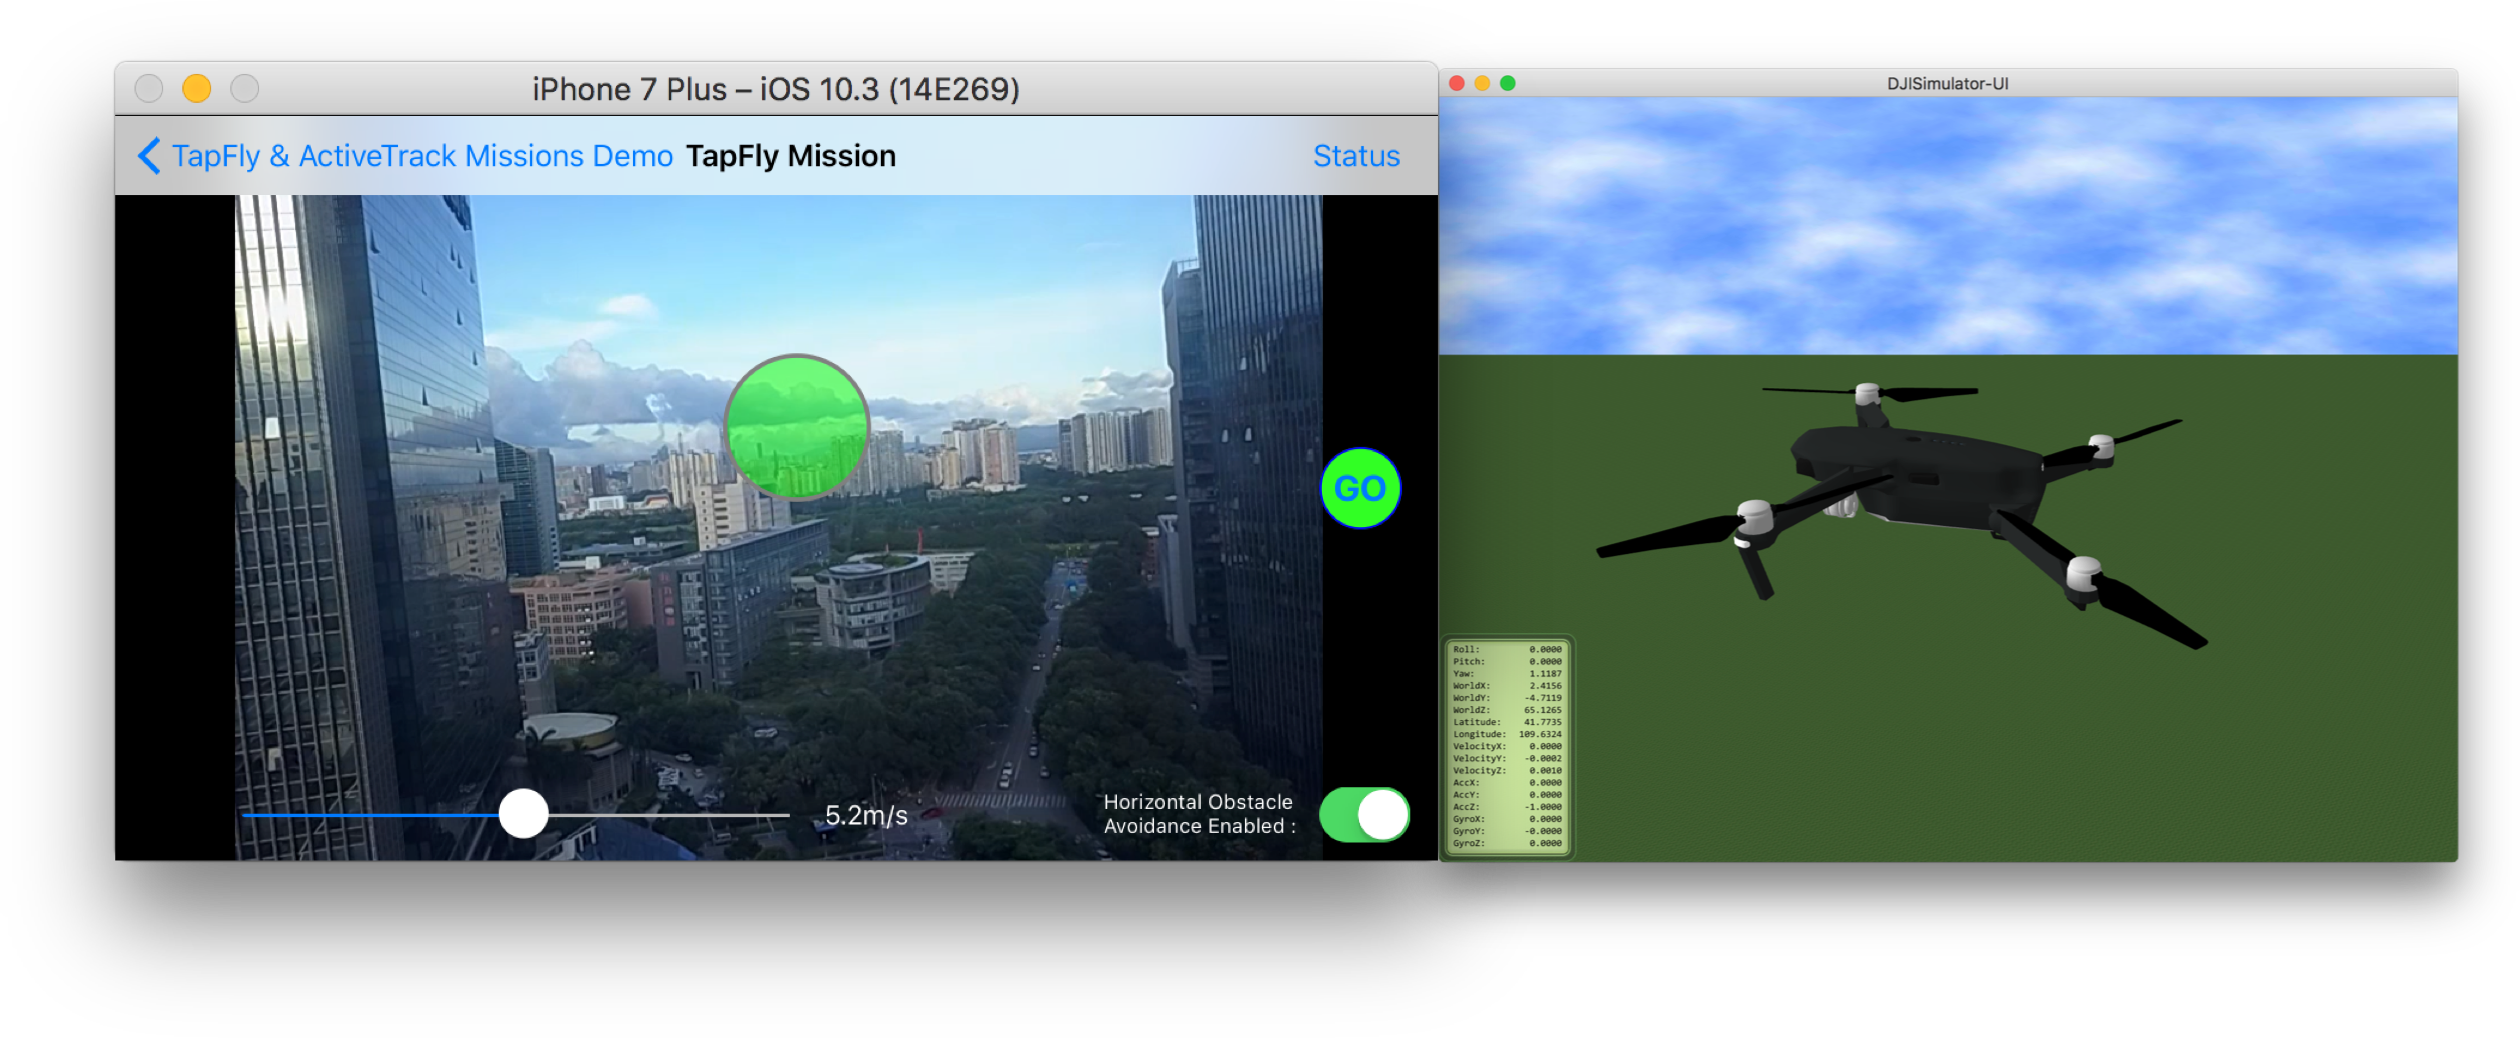
Using the DJI Assistant 2 for Mission Testing
Since most of our developers don't have a perfect testing environment, like a big indoor space, wide backyard, etc. If we need to go outdoors and bring our laptop to debug and test our application everytime, it's time consuming and not efficient.
Luckily, we have a new DJI Assistant 2 (Includes the 3D Simulator) for you to test the mission easily on your Mac. The simulator creates a virtual 3D environment from flight data transmitted to the Mac.
You can check the Using DJI Assistant 2 Simulator for its basic usage.
Now you can connect your iPhone which is running the demo application to the remote controller, and start to test the TapFly and ActiveTrack missions on the simulator of the DJI Assistant 2.
Moreover, another good news is you can use the DJI Bridge App to test the application directly on the iOS Simulator! If you are not familiar with the DJI Bridge App, please check the DJI Bridge App Tutorial.
Let's go to RootViewController.m file and add a Macro on top of the class extension part as shown below:
|
Then modify the DJISDKManagerDelegate method as shown below:
- (void)appRegisteredWithError:(NSError *)error |
Now, make sure your Mac and your iPhone(Running DJI Bridge App) connect to the same WiFi network, pass the Debug ID on the DJI Bridge App to the enableBridgeModeWithBridgeAppIP: method. Build and run the app on the iOS Simulator with Xcode, control the remote controller to take off the aircraft in the simulator. You can start to test the TapFly and ActiveTrack mission directly on your Mac now!
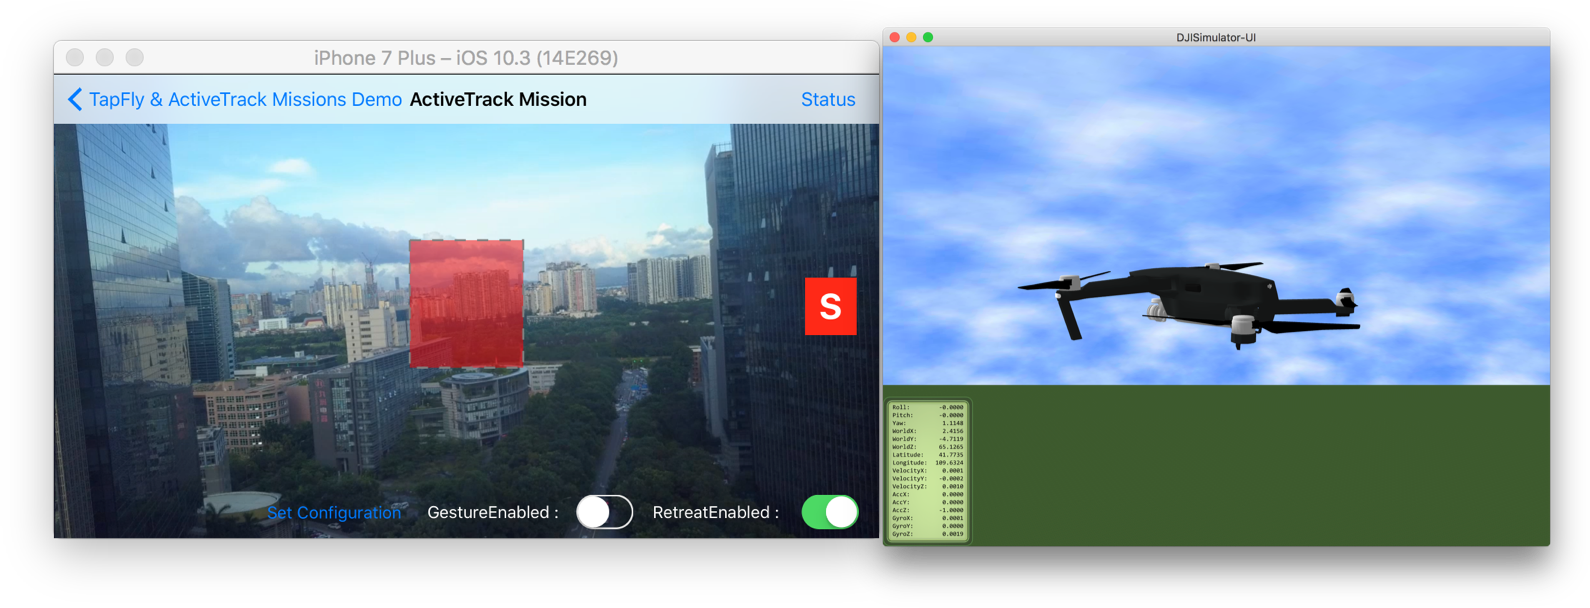
Here are two screenshots of testing the two missions on your Mac:
- TapFly Mission Test
- AciveTrack Mission Test
Summary
Congratulations! You've finished the demo project and implement the two cool TapFly and ActiveTrack missions using DJI Mobile SDK. It's easy and straightforward. You've learned how to use the DJITapFlyMission, DJIActiveTrackMission, DJITapFlyMissionOperator and DJIActiveTrackMissionOperator to implement the features. Also, you know how to setup and use the simulator of DJI Assistant 2 and DJI Bridge App to test the two missions on your Mac easily.
But, In order to make a cool TapFly and ActiveTrack mission application, you still have a long way to go. You can add more necessary features like showing the battery percentage, GPS signal quality, add a checklist like DJI Go app to check the aircraft status before flying, etc. Good luck and hope you enjoy this tutorial!