DJI GEO System Tutorial

2018-01-31v4.4.1Github

If you come across any mistakes or bugs in this tutorial, please let us know by sending emails to dev@dji.com. Please feel free to send us Github pull request and help us fix any issues.


In this tutorial, you will learn how to use the FlyZoneManager and FlyZoneInformation of DJI Mobile SDK to get the fly zone information, and unlock authorization fly zones.

You can download the tutorial's final sample project from this Github Page.

We use Phantom 4 as an example to make this demo. Let's get started!

Introduction

The Geospatial Environment Online (GEO) system is a best-in-class geospatial information system that provides drone operators with information that will help them make smart decisions about where and when to fly. It combines up-to-date airspace information, a warning and flight-restriction system, a mechanism for unlocking (self-authorizing) drone flights in locations where flight is permitted under certain conditions, and a minimally-invasive accountability mechanism for these decisions.

Application Activation and Aircraft Binding in China

For DJI SDK mobile application used in China, it's required to activate the application and bind the aircraft to the user's DJI account.

If an application is not activated, the aircraft not bound (if required), or a legacy version of the SDK (< 4.1) is being used, all camera live streams will be disabled, and flight will be limited to a zone of 100m diameter and 30m height to ensure the aircraft stays within line of sight.

To learn how to implement this feature, please check this tutorial Application Activation and Aircraft Binding.

Implementing the UI of the Application

In the Importing and Activating DJI SDK in Android Studio Project tutorial, you have learned how to import the DJI Android SDK into your Android Studio project and activate your application. If you haven't read that previously, please take a look at it. Once you've done that, let's continue to create the project.

Importing Maven Dependency

Open Android Studio and select File -> New -> New Project to create a new project, named 'DJIGEODemo'. Enter the company domain and package name (Here we use "com.dji.geodemo") you want and press Next. Set the minimum SDK version as API 19: Android 4.4 (KitKat) for "Phone and Tablet" and press Next. Then select "Empty Activity" and press Next. Lastly, leave the Activity Name as "MainActivity", and the Layout Name as "activity_main", Press "Finish" to create the project.

In our previous tutorial Importing and Activating DJI SDK in Android Studio Project, you have learned how to import the Android SDK Maven Dependency and activate your application. If you haven't read that previously, please take a look at it and implement the related features. Once you've done that, continue to implement the next features.

Configurating Google Maps API Key

Since we create this demo project using "Google Maps Activity" of Android Studio, the Google Play Services is set up automatically for you. You can now start using the Google Maps Android APIs to develop your app.

To learn how to generate SHA-1 key and how to apply for an Google Maps API key in Google Developer Console, please refer to the Setting Up Google Play Services section of Creating a MapView and Waypoint Application tutorial.

Once you finish the above step, please open the "google_maps_api.xml" file in the values folder and replace the YOUR_KEY_HERE with the Google Maps API key you just get as shown below:

<string name="google_maps_key" translatable="false" templateMergeStrategy="preserve">YOUR_KEY_HERE</string>

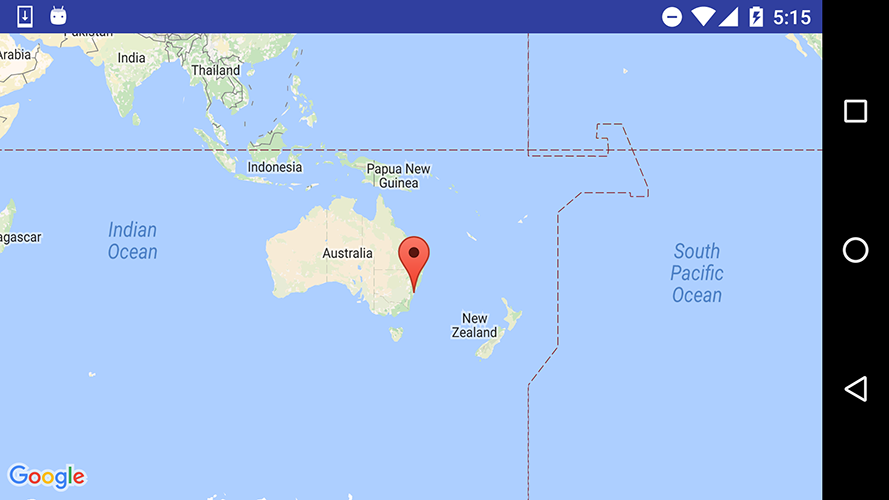
Now build and run the project and install it on an Android device(We use Nexus 5 here), you should see the Google Map loads successfully as shown below:

googleMap

Building the Layouts of Activity

1. Implementing MApplication and GEODemoApplication

You can check the Creating an Camera Application tutorial and the sample project of this tutorial for the detailed implementations of the MApplication and GEODemoApplication.

2. Implementing the ConnectionActivity

Implementing UI Elements in ConnectionActivity Class

To improve the user experience, we had better create an activity to show the connection status between the DJI Product and the SDK, once it's connected, the user can press the OPEN button to enter the MainActivity.

Now let's Right-click on the package com.dji.geodemo in the project navigator and choose New -> Activity -> Basic Activity, Type in "ConnectionActivity" in the "Activity Name" field and press "Finish" button.

Next, replace the code of the "ConnectionActivity.java" file with the following:

public class ConnectionActivity extends Activity implements View.OnClickListener {

private static final String TAG = ConnectionActivity.class.getName();

private TextView mTextConnectionStatus;
private TextView mTextProduct;
private Button mBtnOpen;

@Override
protected void onCreate(Bundle savedInstanceState) {
super.onCreate(savedInstanceState);

setContentView(R.layout.activity_connection);
initUI();
}

@Override
public void onResume() {
Log.e(TAG, "onResume");
super.onResume();
}

@Override
public void onPause() {
Log.e(TAG, "onPause");
super.onPause();
}

@Override
public void onStop() {
Log.e(TAG, "onStop");
super.onStop();
}

public void onReturn(View view){
Log.e(TAG, "onReturn");
this.finish();
}

@Override
protected void onDestroy() {
Log.e(TAG, "onDestroy");
super.onDestroy();
}

private void initUI() {
mTextConnectionStatus = (TextView) findViewById(R.id.text_connection_status);
mTextProduct = (TextView) findViewById(R.id.text_product_info);
mBtnOpen = (Button) findViewById(R.id.btn_open);
mBtnOpen.setOnClickListener(this);
}

@Override
public void onClick(View v) {
switch (v.getId()) {
case R.id.btn_open: {
Intent intent = new Intent(this, MainActivity.class);
startActivity(intent);
break;
}
default:
break;
}
}

}

In the code shown above, we implement the following features:

  1. Create the layout UI elements variables, including two TextureViews mTextConnectionStatus, mTextProduct, and one Button mBtnOpen.

  2. In the onCreate() method, we request several permissions at runtime to ensure the SDK works well when the compile and target SDK version is higher than 22(Like Android Marshmallow 6.0 device and API 23). Then invoke the initUI() methods to initialize the UI elements.

  3. Next, implement the initUI() method to initialize the three TextViews and the Button. Then invoke setOnClickListener() method of mBtnOpen and pass this as the param.

  4. Lastly, override the onClick() method to implement the btn_open button action. Here we create an Intent object by passing "MainActivity.class" as the component class to be used for the intent. Then invoke the startActivity() method to start the MainActivity.

Implementing the ConnectionActivity Layout

Open the activity_connection.xml layout file and replace the code with the following:

<?xml version="1.0" encoding="utf-8"?>
<RelativeLayout xmlns:android="http://schemas.android.com/apk/res/android"
xmlns:tools="http://schemas.android.com/tools"
android:layout_width="match_parent"
android:layout_height="match_parent"
android:orientation="vertical">

<TextView
android:id="@+id/text_connection_status"
android:layout_width="wrap_content"
android:layout_height="wrap_content"
android:gravity="center"
android:text="Status: No Product Connected"
android:textColor="@android:color/black"
android:textSize="20dp"
android:textStyle="bold"
android:layout_alignBottom="@+id/text_product_info"
android:layout_centerHorizontal="true"
android:layout_marginBottom="89dp" />

<TextView
android:id="@+id/text_product_info"
android:layout_width="wrap_content"
android:layout_height="wrap_content"
android:layout_centerHorizontal="true"
android:layout_marginTop="270dp"
android:text="@string/product_information"
android:textColor="@android:color/black"
android:textSize="20dp"
android:gravity="center"
android:textStyle="bold"
/>

<Button
android:id="@+id/btn_open"
android:layout_width="150dp"
android:layout_height="55dp"
android:layout_centerHorizontal="true"
android:layout_marginTop="350dp"
android:background="@drawable/round_btn"
android:text="Open"
android:textColor="@color/colorWhite"
android:textSize="20dp"
/>

<TextView
android:layout_width="wrap_content"
android:layout_height="wrap_content"
android:layout_centerHorizontal="true"
android:layout_marginTop="430dp"
android:text="@string/sdk_version"
android:textSize="15dp"
android:id="@+id/textView2" />

<TextView
android:layout_width="wrap_content"
android:layout_height="wrap_content"
android:textAppearance="?android:attr/textAppearanceSmall"
android:text="DJIGEODemo"
android:id="@+id/textView"
android:layout_marginTop="58dp"
android:textStyle="bold"
android:textSize="20dp"
android:textColor="@color/colorBlack"
android:layout_alignParentTop="true"
android:layout_centerHorizontal="true" />

</RelativeLayout>

In the xml file, we create four TextViews and one Button within a RelativeLayout. We use the TextView(id: text_connection_status) to show the product connection status and use the TextView(id:text_product_info) to show the connected product name. The Button(id: btn_open) is used to open the MainActivity.

Configuring the Resource XMLs

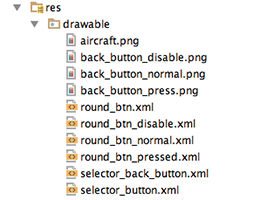
Once you finish the above steps, let's copy all the images file from this Github sample project's drawable folder (app->src->main->res->drawable) to the same folder in your project.

imageFiles

Moreover, open the "colors.xml" file and update the content as shown below:

<?xml version="1.0" encoding="utf-8"?>
<resources>
<color name="colorPrimary">#3F51B5</color>
<color name="colorPrimaryDark">#303F9F</color>
<color name="colorAccent">#FF4081</color>
<color name="title_dark">#212121</color>
<color name="white">#FFFFFF</color>
<color name="button_normal">#50808080</color>
<color name="button_press">#5086BFFF</color>
<color name="colorWhite">#FFFFFF</color>
<color name="colorBlack">#000000</color>
</resources>

Furthermore, open the "strings.xml" file and replace the content with the followings:

<?xml version="1.0" encoding="utf-8"?>
<resources>

<string name="app_name">DJIGEODemo</string>
<string name="title_activity_GEODemo">GEODemo</string>
<string name="action_settings">Settings</string>
<string name="disconnected">Disconnected</string>
<string name="product_information">Product Information</string>
<string name="connection_loose">Status: No Product Connected</string>
<string name="sdk_version">DJI SDK Version: 3.3</string>

</resources>

Lastly, open the "styles.xml" file and replace the content with the followings:

<resources>

<!-- Base application theme. -->
<style name="AppTheme" parent="Theme.AppCompat.Light.DarkActionBar">
<!-- Customize your theme here. -->
<item name="colorPrimary">@color/colorPrimary</item>
<item name="colorPrimaryDark">@color/colorPrimaryDark</item>
<item name="colorAccent">@color/colorAccent</item>
</style>

</resources>

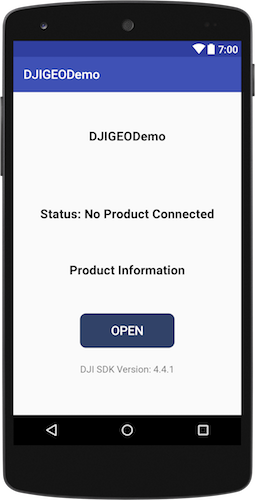
Now, if you open the activity_main.xml file, and click on the Design tab on the bottom left, you should see the preview screenshot of ConnectionActivity as shown below:

ConnectionActivity

3. Creating the MainActivity

Implementing the MainActivity Layout

Open the activity_main.xml layout file and replace the code with the following:

<LinearLayout xmlns:android="http://schemas.android.com/apk/res/android"
xmlns:tools="http://schemas.android.com/tools"
android:layout_width="match_parent"
android:layout_height="match_parent"
android:orientation="vertical"
tools:context="com.dji.geodemo.MainActivity">

<RelativeLayout
android:id="@+id/main_title_rl"
android:layout_width="fill_parent"
android:layout_height="40dp"
android:background="@color/title_dark">

<ImageButton
android:id="@+id/ReturnBtnCamera"
android:layout_width="wrap_content"
android:layout_height="35dp"
android:layout_alignParentLeft="true"
android:layout_centerVertical="true"
android:layout_marginLeft="5dp"
android:adjustViewBounds="true"
android:background="@android:color/transparent"
android:onClick="onReturn"
android:scaleType="centerInside"
android:src="@drawable/selector_back_button" />

<TextView
android:id="@+id/ConnectStatusTextView"
android:layout_width="wrap_content"
android:layout_height="wrap_content"
android:layout_centerInParent="true"
android:text="GEODemo"
android:textColor="@android:color/white"
android:textSize="21sp" />
</RelativeLayout>

<RelativeLayout
android:layout_width="match_parent"
android:layout_height="match_parent">

<fragment xmlns:android="http://schemas.android.com/apk/res/android"
xmlns:tools="http://schemas.android.com/tools"
xmlns:map="http://schemas.android.com/apk/res-auto"
android:layout_width="match_parent"
android:layout_height="match_parent"
android:id="@+id/map"
tools:context="com.dji.myapplication.MainActivity"
android:name="com.google.android.gms.maps.SupportMapFragment"/>

<ScrollView
android:layout_width="wrap_content"
android:layout_height="wrap_content"
android:layout_alignParentLeft="true"
android:layout_alignParentStart="true"
android:layout_centerVertical="true"
android:scrollbars="vertical">

<LinearLayout
android:layout_width="wrap_content"
android:layout_height="wrap_content"
android:orientation="vertical">

<Button
android:id="@+id/geo_login_btn"
style="@style/left_button_list_button"
android:text="@string/geo_login"/>

<Button
android:id="@+id/geo_logout_btn"
style="@style/left_button_list_button"
android:text="@string/geo_logout"/>

<Button
android:id="@+id/geo_unlock_nfzs_btn"
style="@style/left_button_list_button"
android:text="@string/geo_unlock_nfzs"/>

<Button
style="@style/left_button_list_button"
android:id="@+id/geo_get_unlock_nfzs_btn"
android:text="@string/geo_get_unlock_nfzs"
android:layout_width="match_parent"
android:layout_height="match_parent" />

<Button
style="@style/left_button_list_button"
android:id="@+id/geo_get_surrounding_nfz_btn"
android:text="@string/geo_get_surrounding_nfz"
android:layout_width="wrap_content"
android:layout_height="wrap_content" />

<Button
android:id="@+id/geo_update_location_btn"
style="@style/left_button_list_button"
android:text="@string/geo_update_location" />

</LinearLayout>
</ScrollView>

<TextView
android:layout_width="180dp"
android:layout_height="wrap_content"
android:id="@+id/login_status"
android:textSize="14sp"
android:textColor="@android:color/black"
android:layout_alignParentRight="true"
android:layout_marginRight="0dp"
android:textAlignment="center" />

<ScrollView
android:layout_width="180dp"
android:layout_height="400dp"
android:layout_alignParentRight="true"
android:scrollbars="vertical"
android:layout_below="@+id/login_status">
<TextView
android:layout_width="wrap_content"
android:layout_height="wrap_content"
android:textColor="@android:color/black"
android:id="@+id/fly_zone_tv"
/>
</ScrollView>
</RelativeLayout>

</LinearLayout>

In the xml file, we implement the following UIs:

  1. Create a RelativeLayout to add a back button and a TextView to show the SDK connection status on the top.

  2. Then create a RelativeLayout and add a scrollView on the left side with eight Buttons from top to bottom: "Login", "Logout", "Unlock NFZs", "Get Unlock NFZs", "Get Surrounding NFZ" and "Update Location", place them vertically.

  3. Lastly, on the right side, we add a TextView to show the login status and a scrollView with a textView inside to show the fly zone infos.

Next, open the styles.xml file in the "values" folder and add the following code below the "AppTheme" style:

<style name="left_button_list_button">
<item name="android:minHeight">@dimen/left_button_list_button_height</item>
<item name="android:layout_width">@dimen/left_button_list_button_width</item>
<item name="android:layout_height">wrap_content</item>
<item name="android:paddingLeft">@dimen/left_button_list_button_padding_left</item>
<item name="android:paddingRight">@dimen/left_button_list_button_padding_right</item>
<item name="android:layout_marginLeft">@dimen/left_button_list_button_margin_left</item>
<item name="android:layout_marginTop">@dimen/left_button_list_button_margin_top</item>
<item name="android:background">@drawable/selector_button</item>
<item name="android:textSize">@dimen/left_button_list_button_text_size</item>
<item name="android:textColor">@color/white</item>
</style>

Furthermore, create an xml file named "dimens.xml" inside the "values" folder and replace the code with the followings:

<resources>
<!-- Default screen margins, per the Android Design guidelines. -->
<dimen name="activity_horizontal_margin">16dp</dimen>
<dimen name="activity_vertical_margin">16dp</dimen>

<!-- left button list -->
<dimen name="left_button_list_button_width">150dp</dimen>
<dimen name="left_button_list_button_height">45dp</dimen>
<dimen name="left_button_list_button_padding_left">5dp</dimen>
<dimen name="left_button_list_button_padding_right">5dp</dimen>
<dimen name="left_button_list_button_margin_left">10dp</dimen>
<dimen name="left_button_list_button_margin_top">10dp</dimen>
<dimen name="left_button_list_button_text_size">14sp</dimen>

</resources>

Lastly, open the "strings.xml" file and replace the code with the followings:

<?xml version="1.0" encoding="utf-8"?>
<resources>
<string name="app_name">DJIGEODemo</string>

<string name="title_activity_GEODemo">GEODemo</string>

<string name="action_settings">Settings</string>
<string name="disconnected">Disconnected</string>
<string name="product_information">Product Information</string>
<string name="connection_loose">Status: No Product Connected</string>
<string name="sdk_version">DJI SDK Version: 3.3</string>

<!-- GEO with map testing activity-->
<string name="title_activity_geo_with_map_testing">GeoWithMapTestingActivity</string>
<string name="demo_desc_geo_with_map">Geo System With Map</string>

<string name="item_top_left_title">Category</string>
<string name="item_top_title">EventName</string>
<string name="Message_WaitStatus">Upload Status</string>

<string name="title_activity_geo_testing">GeoTestingActivity</string>
<string name="demo_desc_geo">Geo System</string>
<string name="geo_get_surrounding_nfz">Get Surrounding NFZ</string>
<string name="geo_get_location_nfz">Get location NFZ</string>
<string name="geo_get_unlock_nfz">Get Unlock NFZ</string>
<string name="geo_refresh_nfz">Refresh Local Data</string>
<string name="geo_unlock_nfzs">Unlock NFZs</string>
<string name="geo_get_unlock_nfzs">Get Unlock NFZs</string>
<string name="geo_login">Login</string>
<string name="geo_logout">Logout</string>
<string name="start_simulator">Start Simulator</string>
<string name="stop_simulator">Stop Simulator</string>
<string name="geo_update_location">Update Location</string>>

</resources>

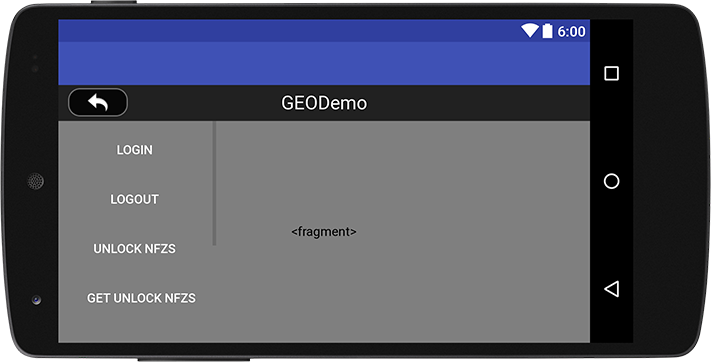
Now, if you open the "activity_maps.xml" file, and click on the Design tab on the bottom left, you should see the preview screenshot of MainActivity as shown below:

MainActivity

Implementing UI Elements in MainActivity Class

Let's come back to the MainActivity.java class, and replace the code with the following, remember to import the related classes as Android Studio suggested:

public class MainActivity extends FragmentActivity implements View.OnClickListener, OnMapReadyCallback {

private static final String TAG = MainActivity.class.getName();

private GoogleMap map;

protected TextView mConnectStatusTextView;
private Button btnLogin;
private Button btnLogout;
private Button btnUnlock;
private Button btnGetUnlock;
private Button btnGetSurroundNFZ;
private Button btnUpdateLocation;

private TextView loginStatusTv;
private TextView flyZonesTv;

@Override
protected void onCreate(Bundle savedInstanceState) {
super.onCreate(savedInstanceState);
setContentView(R.layout.activity_main);

initUI();

// Obtain the SupportMapFragment and get notified when the map is ready to be used.
SupportMapFragment mapFragment = (SupportMapFragment) getSupportFragmentManager()
.findFragmentById(R.id.map);
mapFragment.getMapAsync(this);
}

private void initUI() {

mConnectStatusTextView = (TextView) findViewById(R.id.ConnectStatusTextView);

btnLogin = (Button) findViewById(R.id.geo_login_btn);
btnLogout = (Button) findViewById(R.id.geo_logout_btn);
btnUnlock = (Button) findViewById(R.id.geo_unlock_nfzs_btn);
btnGetUnlock = (Button) findViewById(R.id.geo_get_unlock_nfzs_btn);
btnGetSurroundNFZ = (Button) findViewById(R.id.geo_get_surrounding_nfz_btn);
btnUpdateLocation = (Button) findViewById(R.id.geo_update_location_btn);

loginStatusTv = (TextView) findViewById(R.id.login_status);
loginStatusTv.setTextColor(Color.BLACK);
flyZonesTv = (TextView) findViewById(R.id.fly_zone_tv);
flyZonesTv.setTextColor(Color.BLACK);

btnLogin.setOnClickListener(this);
btnLogout.setOnClickListener(this);
btnUnlock.setOnClickListener(this);
btnGetUnlock.setOnClickListener(this);
btnGetSurroundNFZ.setOnClickListener(this);
btnUpdateLocation.setOnClickListener(this);
}

@Override
public void onClick(View v) {
switch (v.getId()) {
case R.id.geo_login_btn:
break;

case R.id.geo_logout_btn:
break;

case R.id.geo_unlock_nfzs_btn:
break;

case R.id.geo_get_unlock_nfzs_btn:
break;

case R.id.geo_get_surrounding_nfz_btn:
break;

case R.id.geo_update_location_btn:
break;

}
}

/**
* Manipulates the map once available.
* This callback is triggered when the map is ready to be used.
* This is where we can add markers or lines, add listeners or move the camera. In this case,
* we just add a marker near Sydney, Australia.
* If Google Play services is not installed on the device, the user will be prompted to install
* it inside the SupportMapFragment. This method will only be triggered once the user has
* installed Google Play services and returned to the app.
*/
@Override
public void onMapReady(GoogleMap googleMap) {
mMap = googleMap;

// Add a marker in Shenzhen and move the camera
LatLng shenzhen = new LatLng(22.537018, 113.953640);
mMap.addMarker(new MarkerOptions().position(shenzhen).title("Marker in shenzhen"));
mMap.moveCamera(CameraUpdateFactory.newLatLng(shenzhen));
}
}

In the code above, we implement the following features:

1. In the onCreate() method, we invoke the initUI() method and create "SupportMapFragment" variable to call the OnMapReady() method asynchronously.

2. In the initUI() method, we create a GoogleMap variable, eight Buttons and three TextViews variables for the UI elements, then create the initUI() method to init the UI elements and implement their setOnClickListener method and pass "this" as the parameter.

3. Next, we override the onClick() method for the eight buttons.

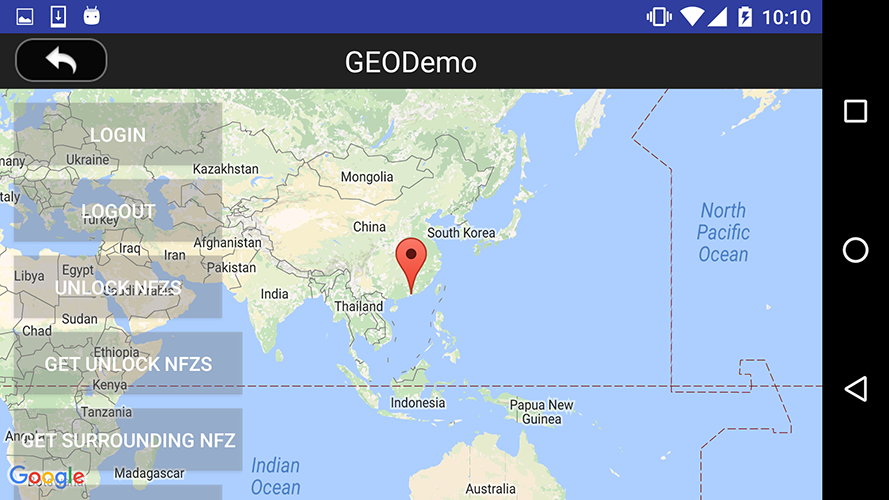
4. Lastly, we override the onMapReady() method to initialize the mMap. Then add a marker of Palo Alto, California here for example. So when the Google map is loaded, you will see a red pin tag on Palo Alto, California.

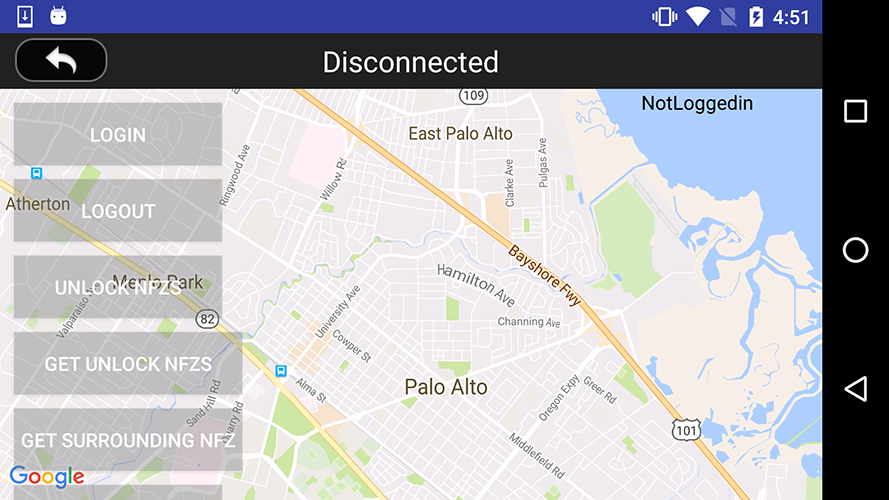
We have gone through a long process to setup the UI of the application. Now, let's build and run the project and install it in your Android device to test it. Here we use Nexus 5 for testing. When the application is launched, press the Open button in the ConnectionActivity to open the MainActivity view, then you should see the following screenshot:

p4MissionsUIDemo

Registering Your Application

1. Modifying AndroidManifest file

After you finish the above steps, let's register our application with the App Key you apply from DJI Developer Website. If you are not familiar with the App Key, please check the Get Started.

Let's open the AndroidManifest.xml file and add the following elements on top of <application> element:

<!-- SDK permission requirement -->
<uses-permission android:name="android.permission.BLUETOOTH" />
<uses-permission android:name="android.permission.BLUETOOTH_ADMIN" />
<uses-permission android:name="android.permission.INTERNET" />
<uses-permission android:name="android.permission.WRITE_EXTERNAL_STORAGE" />
<uses-permission android:name="android.permission.READ_PHONE_STATE" />
<uses-permission android:name="android.permission.READ_EXTERNAL_STORAGE" />
<uses-permission android:name="android.permission.ACCESS_COARSE_LOCATION" />
<uses-permission android:name="android.permission.ACCESS_NETWORK_STATE" />
<uses-permission android:name="android.permission.ACCESS_FINE_LOCATION" />
<uses-permission android:name="android.permission.CHANGE_WIFI_STATE" />
<uses-permission android:name="android.permission.ACCESS_WIFI_STATE" />
<uses-permission android:name="android.permission.CHANGE_CONFIGURATION" />
<uses-permission android:name="android.permission.SYSTEM_ALERT_WINDOW" />
<uses-permission android:name="android.permission.WRITE_SETTINGS" />
<uses-permission android:name="android.permission.VIBRATE" />
<uses-permission android:name="android.permission.WAKE_LOCK" />
<uses-permission android:name="android.permission.MOUNT_UNMOUNT_FILESYSTEMS" />

<uses-feature
android:name="android.hardware.usb.host"
android:required="false" />
<uses-feature
android:name="android.hardware.usb.accessory"
android:required="true" />
<uses-feature
android:glEsVersion="0x00020000"
android:required="true" />

<!-- SDK requirement permission end -->

In the code above, we specify the permissions of your application needs by adding <uses-permission> elements as children of the <manifest> element.

Moreover, because not all Android-powered devices are guaranteed to support the USB accessory and host APIs, include two elements that declare that your application uses the "android.hardware.usb.accessory" and "android.hardware.usb.host" feature.

Finally, we need to specify the requirement for OpenGL ES version 2.

For more details of description on the permissions, refer to https://developers.google.com/maps/documentation/android/config.

Furthermore, let's replace the <application> element with the followings:

<!-- SDK requirement permission end -->
<application
android:name="com.dji.geodemo.MApplication"
android:allowBackup="true"
android:icon="@mipmap/ic_launcher"
android:label="@string/app_name"
android:supportsRtl="true"
android:theme="@style/AppTheme">

<!-- DJI SDK -->

<uses-library android:name="com.android.future.usb.accessory" />

<meta-data
android:name="com.dji.sdk.API_KEY"
android:value="Please enter your App Key here." />
<meta-data
android:name="com.google.android.geo.API_KEY"
android:value="@string/google_maps_key" />
<meta-data
android:name="com.google.android.gms.version"
android:value="@integer/google_play_services_version" />

<activity
android:name="dji.sdk.sdkmanager.DJIAoaControllerActivity"
android:screenOrientation="landscape"
android:theme="@android:style/Theme.Translucent">
<intent-filter>
<action android:name="android.hardware.usb.action.USB_ACCESSORY_ATTACHED" />
</intent-filter>

<meta-data
android:name="android.hardware.usb.action.USB_ACCESSORY_ATTACHED"
android:resource="@xml/accessory_filter" />
</activity>

<!-- DJI SDK -->

<activity android:name=".ConnectionActivity"
android:screenOrientation="portrait">

<intent-filter>
<action android:name="android.intent.action.MAIN" />
<category android:name="android.intent.category.LAUNCHER" />
</intent-filter>
</activity>
<activity android:name=".MainActivity"
android:screenOrientation="landscape"></activity>
</application>

Please enter the App Key of the application in the value part of android:name="com.dji.sdk.API_KEY" attribute. For more details of the AndroidManifest.xml file, please check this tutorial's Github source code of the demo project.

2. Working on the GEODemoApplication and ConnectionAcitity

For the implementation of the registration logics in the "GEODemoApplication.java" and "ConnectionAcitity.java" files, we don't explain the details here. Please check this tutorial's Github source code.

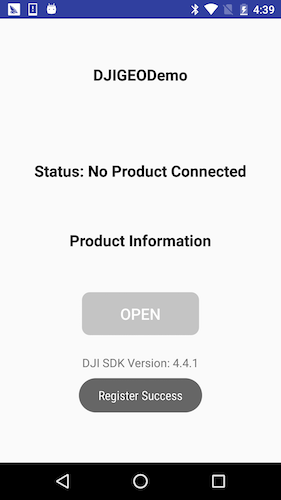
Now let's build and run the project and install it to your Android device. If everything goes well, you should see the "Register Success" textView like the following screenshot when you register the app successfully.

registerSuccess

Implementing GEO Features in MainActivity

Update the Connection Status TextView

Let's open MainActivity.java file and add the following two methods to update the mConnectStatusTextView content when product's connection changes:


@Override
public void onResume() {
Log.e(TAG, "onResume");
super.onResume();
updateTitleBar();
}

private void updateTitleBar() {
if (mConnectStatusTextView == null) return;
boolean ret = false;
BaseProduct product = GEODemoApplication.getProductInstance();
if (product != null) {
if (product.isConnected()) {
//The product is connected
MainActivity.this.runOnUiThread(new Runnable() {
public void run() {
mConnectStatusTextView.setText(GEODemoApplication.getProductInstance().getModel() + " Connected");
}
});
ret = true;
} else {
if (product instanceof Aircraft) {
Aircraft aircraft = (Aircraft) product;
if (aircraft.getRemoteController() != null && aircraft.getRemoteController().isConnected()) {
// The product is not connected, but the remote controller is connected
MainActivity.this.runOnUiThread(new Runnable() {
public void run() {
mConnectStatusTextView.setText("only RC Connected");
}
});
ret = true;
}
}
}
}

if (!ret) {
// The product or the remote controller are not connected.

MainActivity.this.runOnUiThread(new Runnable() {
public void run() {
mConnectStatusTextView.setText("Disconnected");
}
});
}
}

Working on Login and Logout Features

Now, let's add the following code at the bottom of initUI() method in MainActivity.java file:

MainActivity.this.runOnUiThread(new Runnable() {
public void run() {
loginStatusTv.setText(loginStatusTv.setText(UserAccountManager.getInstance().getUserAccountState().name());
}
});

In the code above, we invoke the getUserAccountState() method of UserAccountManager to fetch the current user account status and update the textView loginStatusTv's text content.

Next, let's implement the onClick() method for btnLogin and btnLogout buttons as shown below:

@Override
public void onClick(View v) {
switch (v.getId()) {
case R.id.geo_login_btn:
UserAccountManager.getInstance().logIntoDJIUserAccount(this,
new CommonCallbacks.CompletionCallbackWith<UserAccountState>() {
@Override
public void onSuccess(final UserAccountState userAccountState) {
showToast(userAccountState.name());
MainActivity.this.runOnUiThread(new Runnable() {
@Override
public void run() {
loginStatusTv.setText(userAccountState.name());
}
});
}

@Override
public void onFailure(DJIError error) {
showToast(error.getDescription());
}
});

break;

case R.id.geo_logout_btn:

UserAccountManager.getInstance().logoutOfDJIUserAccount(new CommonCallbacks.CompletionCallback() {
@Override
public void onResult(DJIError error) {
if (null == error) {
showToast("logoutOfDJIUserAccount Success");
MainActivity.this.runOnUiThread(new Runnable() {
@Override
public void run() {
loginStatusTv.setText("NotLoggedin");
}
});
} else {
showToast(error.getDescription());
}
}
});

break;
case R.id.geo_unlock_nfzs_btn:
break;

case R.id.geo_get_unlock_nfzs_btn:
break;

case R.id.geo_get_surrounding_nfz_btn:
break;

case R.id.geo_update_location_btn:
break;

}
}

In the code above, we invoke the logIntoDJIUserAccount() method of UserAccountManager to present a login view for the user to login. When login success, we update the loginStatusTv's text content with the user account status. Similarly, invoke the logoutOfDJIUserAccount() method of UserAccountManager to log out the user account.

Working on GEO System Features

Update Fly Zone Info and Aircraft Location

If you want to unlock a fly zone, you may need to get the fly zone's ID first. Now let's update the fly zone info in the flyZonesTv and update the aircraft's location when simulated coordinate data changes.

Create the following variables above the onCreate() method as shown below:

private Marker marker;
private LatLng latLng;
private double droneLocationLat = 181, droneLocationLng = 181;
private FlightController mFlightController = null;

Then add the following two methods above the onMapReady() method as shown below:

private void initFlightController() {

if (isFlightControllerSupported()) {
mFlightController = ((Aircraft) DJISDKManager.getInstance().getProduct()).getFlightController();
mFlightController.setStateCallback(new FlightControllerState.Callback() {
@Override
public void onUpdate(FlightControllerState
djiFlightControllerCurrentState) {
if (mMap != null) {
droneLocationLat = djiFlightControllerCurrentState.getAircraftLocation().getLatitude();
droneLocationLng = djiFlightControllerCurrentState.getAircraftLocation().getLongitude();
updateDroneLocation();
}
}
});
}
}

public static boolean checkGpsCoordinates(double latitude, double longitude) {
return (latitude > -90 && latitude < 90 && longitude > -180 && longitude < 180) && (latitude != 0f && longitude != 0f);
}

private void updateDroneLocation(){
runOnUiThread(new Runnable() {
@Override
public void run() {
if (marker != null) {
marker.remove();
}
if (checkGpsCoordinates(droneLocationLat, droneLocationLng)) {

LatLng pos = new LatLng(droneLocationLat, droneLocationLng);

//Create MarkerOptions object
final MarkerOptions markerOptions = new MarkerOptions();
markerOptions.position(pos);
markerOptions.icon(BitmapDescriptorFactory.fromResource(R.drawable.aircraft));
marker = mMap.addMarker(markerOptions);
}
}
});
}

private boolean isFlightControllerSupported() {
return DJISDKManager.getInstance().getProduct() != null &&
DJISDKManager.getInstance().getProduct() instanceof Aircraft &&
((Aircraft) DJISDKManager.getInstance().getProduct()).getFlightController() != null;
}

In the code above, we mainly initialize the mFlightController variable and implement the setStateCallback() method of FlightController to invoke the updateDroneLocation() method to update the aircraft location on the map view when it's moving.

Moreover, let's update the onMapReady() method with the following codes:

@Override
public void onMapReady(GoogleMap googleMap) {
LatLng paloAlto = new LatLng(37.4613697, -122.1237315);

mMap = googleMap;
mMap.moveCamera(CameraUpdateFactory.newLatLng(paloAlto));
mMap.animateCamera(CameraUpdateFactory.zoomTo(17.0f));
if (ActivityCompat.checkSelfPermission(this, android.Manifest.permission.ACCESS_FINE_LOCATION) != PackageManager.PERMISSION_GRANTED && ActivityCompat.checkSelfPermission(this, Manifest.permission.ACCESS_COARSE_LOCATION) != PackageManager.PERMISSION_GRANTED) {
mMap.setMyLocationEnabled(true);
return;
}

printSurroundFlyZones();
}

In the code above, we initialize the mMap variable and invoke the moveCamera() and animateCamera() methods of GoogleMap class to move the camera and zoom in on the map. Then, invoke the printSurroundFlyZones() method to update the fly zone info.

Lastly, add the following two methods below the onMapReady() method as shown below:

private void printSurroundFlyZones() {

DJISDKManager.getInstance().getFlyZoneManager().getFlyZonesInSurroundingArea(new CommonCallbacks.CompletionCallbackWith<ArrayList<FlyZoneInformation>>() {
@Override
public void onSuccess(ArrayList<FlyZoneInformation> flyZones) {
showToast("get surrounding Fly Zone Success!");
updateFlyZonesOnTheMap(flyZones);
showSurroundFlyZonesInTv(flyZones);
}

@Override
public void onFailure(DJIError error) {
showToast(error.getDescription());
}
});
}

private void showSurroundFlyZonesInTv(final List<FlyZoneInformation> flyZones) {
MainActivity.this.runOnUiThread(new Runnable() {
@Override
public void run() {
StringBuffer sb = new StringBuffer();
for (FlyZoneInformation flyZone : flyZones) {
if (flyZone != null && flyZone.getCategory() != null){

sb.append("FlyZoneId: ").append(flyZone.getFlyZoneID()).append("\n");
sb.append("Category: ").append(flyZone.getCategory().name()).append("\n");
sb.append("Latitude: ").append(flyZone.getCoordinate().getLatitude()).append("\n");
sb.append("Longitude: ").append(flyZone.getCoordinate().getLongitude()).append("\n");
sb.append("FlyZoneType: ").append(flyZone.getFlyZoneType().name()).append("\n");
sb.append("Radius: ").append(flyZone.getRadius()).append("\n");
sb.append("Shape: ").append(flyZone.getShape().name()).append("\n");
sb.append("StartTime: ").append(flyZone.getStartTime()).append("\n");
sb.append("EndTime: ").append(flyZone.getEndTime()).append("\n");
sb.append("UnlockStartTime: ").append(flyZone.getUnlockStartTime()).append("\n");
sb.append("UnlockEndTime: ").append(flyZone.getUnlockEndTime()).append("\n");
sb.append("Name: ").append(flyZone.getName()).append("\n");
sb.append("\n");
}
}
flyZonesTv.setText(sb.toString());
}
});
}

In the code above, we invoke the getFlyZonesInSurroundingArea method of FlyZoneManager to fetch the fly zone informations list, then in the onSuccess() method, invoke the showSurroundFlyZonesInTv() method to update the fly zone infos on flyZonesTv textView.

Lastly, let's implement the OnClick() method of btnGetSurroundNFZ and btnUpdateLocation buttons as shown below:

case R.id.geo_get_surrounding_nfz_btn:
printSurroundFlyZones();
break;

case R.id.geo_update_location_btn:
latLng = new LatLng(DataOsdGetPushCommon.getInstance().getLatitude(),
DataOsdGetPushCommon.getInstance().getLongitude());
if (latLng != null) {
//Create MarkerOptions object
final MarkerOptions markerOptions = new MarkerOptions();
markerOptions.position(latLng);
markerOptions.icon(BitmapDescriptorFactory.fromResource(R.drawable.aircraft));
marker = mMap.addMarker(markerOptions);
}
mMap.moveCamera(CameraUpdateFactory.newLatLng(latLng));
mMap.animateCamera(CameraUpdateFactory.zoomTo(15.0f));
break;

When you press the btnGetSurroundNFZ button, it will invoke the printSurroundFlyZones() method to update the fly zone infos on the flyZonesTv textView. When you press the btnUpdateLocation method, it will get the updated latitude and longitude data of the aircraft from DataOsdGetPushCommon and update the aircraft location on the map view. Then invoke the moveCamera() and animateCamera() method of GoogleMap to move and zoom in the camera to the aircraft's updated location on the map.

Unlock Fly Zones

Once you finished the above steps, let's create more variables on top of onCreate() method as shown below:

private MarkerOptions markerOptions = new MarkerOptions();
private ArrayList<Integer> unlockFlyZoneIds = new ArrayList<Integer>();

Next, update the onResume() method and add the following methods under the onCreate() method:

@Override
public void onResume() {
Log.e(TAG, "onResume");
super.onResume();
updateTitleBar();
initFlightController();
}

@Override
public void onPause() {
Log.e(TAG, "onPause");
super.onPause();
}

@Override
public void onStop() {
Log.e(TAG, "onStop");
super.onStop();
}

public void onReturn(View view) {
Log.e(TAG, "onReturn");
this.finish();
}

In the code above, we mainly override methods of android.app.Activity. In the onResume() method, we invoke the initFlightController() methods to initialize the mFlightController variable.

Next, add the following code at the bottom of onCreate() method:


DJISDKManager.getInstance().getFlyZoneManager()
.setFlyZoneStateCallback(new FlyZoneState.Callback() {
@Override
public void onUpdate(FlyZoneState status) {
showToast(status.name());
}
});

The code above will show the fly forbid status to the user. For example, if the aircraft is approaching a restricted fly area, it will pop up a message to warn the user.

Before we unlock the fly zones, we should show the fly zone on the map by drawing polygons or circles with different colors. Let's define a unlockableIds arrayList, two int values and a FlyfrbBasePainter object above the onCreate() method first:

private ArrayList<Integer> unlockableIds = new ArrayList<Integer>();
private final int limitFillColor = Color.HSVToColor(120, new float[] {0, 1, 1});
private final int limitCanUnlimitFillColor = Color.argb(40, 0xFF, 0xFF, 0x00);
private FlyfrbBasePainter painter = new FlyfrbBasePainter();

For more details of the FlyfrbBasePainter class, please check the "FlyfrbBasePainter.java" file in this tutorial's Github Sample Project.

Then create the updateFlyZonesOnTheMap() method and invoke it in printSurroundFlyZones() method as shown below:

private void updateFlyZonesOnTheMap(final ArrayList<FlyZoneInformation> flyZones) {
if (mMap == null) {
return;
}
MainActivity.this.runOnUiThread(new Runnable() {
@Override
public void run() {
mMap.clear();
if (latLng != null) {

//Create MarkerOptions object
final MarkerOptions markerOptions = new MarkerOptions();
markerOptions.position(latLng);
markerOptions.icon(BitmapDescriptorFactory.fromResource(R.drawable.aircraft));

marker = mMap.addMarker(markerOptions);
}
for (FlyZoneInformation flyZone : flyZones) {

//print polygon
if(flyZone.getSubFlyZones() != null){
SubFlyZoneInformation[] polygonItems = flyZone.getSubFlyZones();
int itemSize = polygonItems.length;
for(int i = 0; i != itemSize; ++i) {
if(polygonItems[i].getShape() == SubFlyZoneShape.POLYGON) {
DJILog.d("updateFlyZonesOnTheMap", "sub polygon points " + i + " size: " + polygonItems[i].getVertices().size());
DJILog.d("updateFlyZonesOnTheMap", "sub polygon points " + i + " category: " + flyZone.getCategory().value());
DJILog.d("updateFlyZonesOnTheMap", "sub polygon points " + i + " limit height: " + polygonItems[i].getMaxFlightHeight());
addPolygonMarker(polygonItems[i].getVertices(), flyZone.getCategory().value(), polygonItems[i].getMaxFlightHeight());
}
else if (polygonItems[i].getShape() == SubFlyZoneShape.CYLINDER){
LocationCoordinate2D tmpPos = polygonItems[i].getCenter();
double subRadius = polygonItems[i].getRadius();
DJILog.d("updateFlyZonesOnTheMap", "sub circle points " + i + " coordinate: " + tmpPos.getLatitude() + "," + tmpPos.getLongitude());
DJILog.d("updateFlyZonesOnTheMap", "sub circle points " + i + " radius: " + subRadius);

CircleOptions circle = new CircleOptions();
circle.radius(subRadius);
circle.center(new LatLng(tmpPos.getLatitude(),
tmpPos.getLongitude()));
switch (flyZone.getCategory()) {
case WARNING:
circle.strokeColor(Color.GREEN);
break;
case ENHANCED_WARNING:
circle.strokeColor(Color.BLUE);
break;
case AUTHORIZATION:
circle.strokeColor(Color.YELLOW);
unlockableIds.add(flyZone.getFlyZoneID());
break;
case RESTRICTED:
circle.strokeColor(Color.RED);
break;

default:
break;
}
mMap.addCircle(circle);
}
}
}
else {
CircleOptions circle = new CircleOptions();
circle.radius(flyZone.getRadius());
circle.center(new LatLng(flyZone.getCoordinate().getLatitude(), flyZone.getCoordinate().getLongitude()));
switch (flyZone.getCategory()) {
case WARNING:
circle.strokeColor(Color.GREEN);
break;
case ENHANCED_WARNING:
circle.strokeColor(Color.BLUE);
break;
case AUTHORIZATION:
circle.strokeColor(Color.YELLOW);
unlockableIds.add(flyZone.getFlyZoneID());
break;
case RESTRICTED:
circle.strokeColor(Color.RED);
break;

default:
break;
}
mMap.addCircle(circle);
}
}

}
});

}

private void addPolygonMarker(List<LocationCoordinate2D> polygonPoints, int area_level, int height) {
if(polygonPoints == null) {
return;
}

ArrayList<LatLng> points = new ArrayList<>();

for (LocationCoordinate2D point : polygonPoints) {
points.add(new LatLng(point.getLatitude(), point.getLongitude()));
}
int fillColor = limitFillColor;
if(painter.getmHeightToColor().get(height) != null) {
fillColor = painter.getmHeightToColor().get(height);
}
else if(area_level == FlyForbidProtocol.LevelType.CAN_UNLIMIT.value()) {
fillColor = limitCanUnlimitFillColor;
} else if(area_level == FlyForbidProtocol.LevelType.STRONG_WARNING.value() || area_level == FlyForbidProtocol.LevelType.WARNING.value()) {
fillColor = getResources().getColor(R.color.gs_home_fill);
}
Polygon plg = mMap.addPolygon(new PolygonOptions().addAll(points)
.strokeColor(painter.getmColorTransparent())
.fillColor(fillColor));

}

private void printSurroundFlyZones() {

DJISDKManager.getInstance().getFlyZoneManager().getFlyZonesInSurroundingArea(new CommonCallbacks.CompletionCallbackWith<ArrayList<FlyZoneInformation>>() {
@Override
public void onSuccess(ArrayList<FlyZoneInformation> flyZones) {
showToast("get surrounding Fly Zone Success!");
updateFlyZonesOnTheMap(flyZones);
showSurroundFlyZonesInTv(flyZones);
}

@Override
public void onFailure(DJIError error) {
showToast(error.getDescription());
}
});
}

In the code above, we implement the following features:

  1. In the updateFlyZonesOnTheMap() method, we use a for loop to get each flyZone object in the flyZones arraylist and then check if the flyZone has polygon fly zone and add different shape of fly zones with different colors on the map.

  2. Next, in the printSurroundFlyZones() method, we invoke getFlyZonesInSurroundingArea method of FlyZoneManager to get the fly zone infos in the surrounding area. Then invoke the updateFlyZonesOnTheMap() method and pass the flyZones object to draw flyzone shapes on the map. Also, invoke the showSurroundFlyZonesInTv() method to show fly zone infos on the flyZonesTv textView.

Finally, let's implement the onClick() method of btnUnlock and btnGetUnlock buttons as shown below:

case R.id.geo_unlock_nfzs_btn:

final AlertDialog.Builder builder = new AlertDialog.Builder(this);
final EditText input = new EditText(this);
input.setHint("Enter Fly Zone ID");
input.setInputType(EditorInfo.TYPE_CLASS_NUMBER);
builder.setView(input);
builder.setTitle("Unlock Fly Zones");
builder.setItems(new CharSequence[]
{"Continue", "Unlock", "Cancel"},
new DialogInterface.OnClickListener() {
public void onClick(DialogInterface dialog, int which) {
// The 'which' argument contains the index position
// of the selected item
switch (which) {
case 0:
if (TextUtils.isEmpty(input.getText())) {
dialog.dismiss();
} else {
String value1 = input.getText().toString();
unlockFlyZoneIds.add(Integer.parseInt(value1));
}
break;
case 1:
if (TextUtils.isEmpty(input.getText())) {
dialog.dismiss();
} else {
String value2 = input.getText().toString();
unlockFlyZoneIds.add(Integer.parseInt(value2));
DJISDKManager.getInstance().getFlyZoneManager().unlockFlyZones(unlockFlyZoneIds, new CommonCallbacks.CompletionCallback() {
@Override
public void onResult(DJIError error) {

unlockFlyZoneIds.clear();
if (error == null) {
showToast("unlock NFZ Success!");
} else {
showToast(error.getDescription());
}
}
});
}
break;
case 2:
dialog.dismiss();
break;
}
}
});

builder.show();
break;

case R.id.geo_get_unlock_nfzs_btn:

DJISDKManager.getInstance().getFlyZoneManager().getUnlockedFlyZones(new CommonCallbacks.CompletionCallbackWith<List<FlyZoneInformation>>(){
@Override
public void onSuccess(final List<FlyZoneInformation> flyZoneInformations) {
showToast("Get Unlock NFZ success");
showSurroundFlyZonesInTv(flyZoneInformations);
}

@Override
public void onFailure(DJIError djiError) {
showToast(djiError.getDescription());
}
});

break;

In the code above, we implement the following features:

1. For the case of btnUnlock button, we create an "AlertDialog" with the title of "Unlock Fly Zone ID", and add a EditText with the hint of "Enter Fly Zone ID". Then create three items for Continue, Unlock, and Cancel actions:

  • Continue Action

    It will add the current input fly zone ID to the unlockFlyZoneIds ArrayList and dismiss the "AlertDialog".

  • Unlock Action

    It will add the current input fly zone ID to unlockFlyZoneIds ArrayList and invoke the unlockFlyZones() method of FlyZoneManager by passing the unlockFlyZoneIds array to unlock fly zones.

  • Cancel Action

It will dismiss the "AlertDialog".

2. For the case of btnGetUnlock button, we invoke the getUnlockedFlyZones() method of FlyZoneManager to fetch unlocked fly zone infos, then override the onSuccess() method and invoke the showSurroundFlyZonesInTv() method by passing the flyZoneInformations ArrayList to update the fly zone infos in the right flyZonesTv textView.

For more details of the implementation, please check this tutorial's Github Sample Project.

Running the Sample Code

We have gone through a long way so far, now, let's build and run the project, connect the demo application to your Phantom 4 (Please check the Run Application for more details) and check all the features we have implemented so far.

Unlock Authorization Fly Zone Workflow

1. Login your verified DJI account, if it's a new account, you need to complete the verification process.

2. Open the Simulator of DJI Assistant 2 or DJI PC Simulator and enter the coordinate data (37.4613697, -122.1237315) (Near Palo Alto Airport) to start simulating the aircraft's coordinate to the authorization area.

3. Press UPDATE LOCATION and GET SURROUNDING NFZ buttons to update the aircraft location on the map and update the fly zone information around the aircraft on the right textView.

4. Get the authorization fly zone ID you want to unlock from the textView, the category of it should be Authorization.

5. Press UNLOCK NFZS button and enter the fly zone ID to unlock it.

6. If you unlock the fly zone successfully, you can press the GET SURROUNDING NFZ button to refresh the fly zone infos on the right textView, you may notice that one of the yellow circle will disappear in the map. And you can take off the aircraft in the simulator now.

Note: Limited Simulation Area

Currently, you can only test the GEO feature within 50km of (37.453671, -122.118101), which is the location of Palo Alto Airport in California, United States.

Login and Logout DJI Account

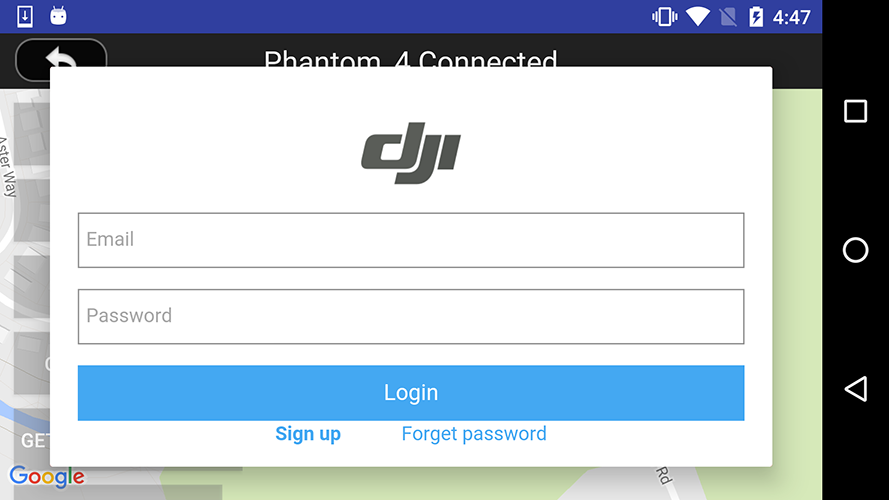
1. Login DJI Account

Press the LOGIN button and a login view will pop up as shown below:

login

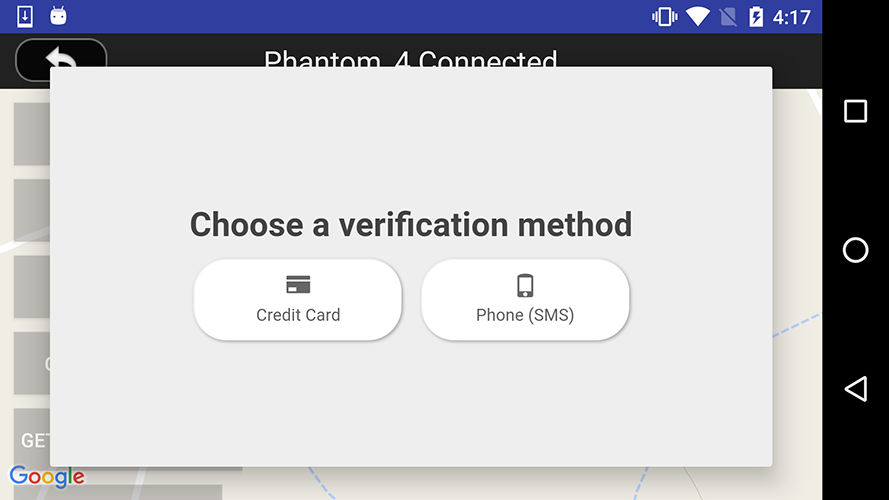
If it's a new DJI account, it will show a verification view as shown below:

verificationView

2. Logout DJI Account

Press the LOGOUT button to logout your DJI account.

On the upper right corner of the screenshot, you can check the loginStatusTv's info for the user account status as shown below:

accountStatus

Use DJISimulator to Simulate Aircraft Location

We will use the DJISimulator to simulate the test environment to locate the aircraft to specific latitude and longitude coordinate.

If you are using Phantom 4 for testing, please check DJI Assistant 2 Simulator tutorial for details, otherwise, if you are using Phantom 3 Professional, Inspire 1, etc, please check DJI PC Simulator tutorial for details.

Open the Simulator of DJI Assistant 2 or DJI PC Simulator and enter the coordinate data (37.4613697, -122.1237315) (Near Palo Alto Airport) to start simulating the aircraft's coordinate to the authorization area.

Press UPDATE LOCATION and GET SURROUNDING NFZ buttons to update the aircraft's location on the map and update the fly zone information around the aircraft on the right textView.

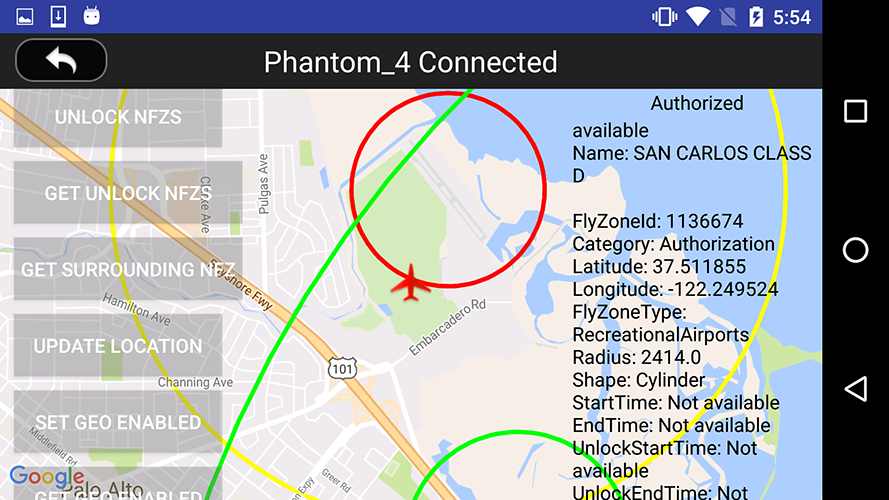
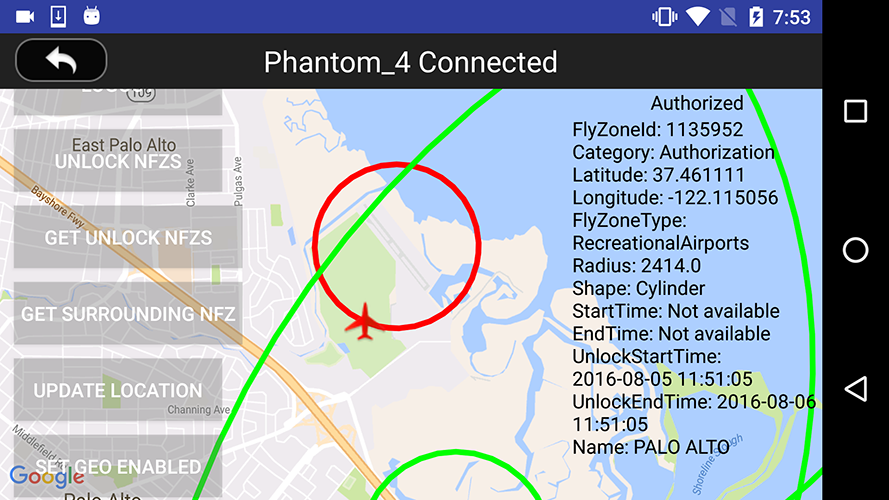
Wait for a while, you may see there a red aircraft placed inside the yellow circle, which is an authorization fly zone you can unlock as shown below:

updateFlyZone

Also the textView on the right side will show the FlyZoneInformation info, includes the fly zone name, fly zone id (required in the unlock process), fly zone category, type, etc.

Here are the explanation of the three fly zone circles:

  • Green Circle

    It represents the warning fly zones, which do not restrict flight and are informational to alert the user. In a warning fly zone, users should be prompted with a warning message describing the zone.

  • Yellow Circle

    It represents the authorization fly zone, which will restrict the flight by default, it can be unlocked by a GEO verified user.

  • Red Circle

    It represents the restricted fly zone, it will restrict the flight by default and cannot be unlocked by a GEO verified user.

Unlock and Get Unlock Fly Zones

1. Unlock Fly Zone

After you login with your DJI account and locate the aircraft to the coordinate of (37.4613697, -122.1237315), you can press the UNLOCK NFZS button and type in the fly zone ID to unlock it.

If you unlock the fly zone successfully, you can press the GET SURROUNDING NFZ button to refresh the fly zone infos on the right textView, and one of the yellow circle will disappear in the map as shown in the following gif animation:

unlockFlyZone

2. Get Unlock Fly Zone List

You can press the GET SURROUNDING NFZ button to get the fly zone you have unlocked before on the right textView as shown below:

getUnlockFlyZones

Lastly, please restart the aircraft to make the settings become effective.

Summary

In this tutorial, you've learned how to use the FlyZoneManager and FlyZoneInformation of DJI Mobile SDK to get the fly zone information, how to unlock authorization fly zones and how to add aircraft annotation and draw fly zone circle overlays on the map view to represent the fly zones. Moreover, you've learned how to use the DJISimulator to simulate the aircraft's coordinate and test the GEO System feature indoor without flying outside.

Hope this tutorial can help you integrate the GEO System feature in your DJI SDK based Application. Good luck, and hope you enjoyed this tutorial!