Creating a MapView and Waypoint Application
If you come across any mistakes or bugs in this tutorial, please let us know by sending emails to dev@dji.com. Please feel free to send us Github pull request and help us fix any issues.
In this tutorial, you will learn how to implement the DJIWaypoint Mission feature and get familiar with the usages of DJIMissionControl. Also you will know how to test the Waypoint Mission API with DJI Assistant 2 Simulator too. So let's get started!
You can download the tutorial's final sample project from this Github Page.
Application Activation and Aircraft Binding in China
For DJI SDK mobile application used in China, it's required to activate the application and bind the aircraft to the user's DJI account.
If an application is not activated, the aircraft not bound (if required), or a legacy version of the SDK (< 4.1) is being used, all camera live streams will be disabled, and flight will be limited to a zone of 100m diameter and 30m height to ensure the aircraft stays within line of sight.
To learn how to implement this feature, please check this tutorial Application Activation and Aircraft Binding.
Setup The Map View
1. Importing the SDK
Now, let's create a new project in Xcode, choose Single View Application template for your project and press "Next", then enter "GSDemo" in the Product Name field and keep the other default settings.
Once the project is created, let's import the DJISDK.framework to it. If you are not familiar with the process of importing DJI SDK, please check this tutorial: Importing and Activating DJI SDK in Xcode Project for details.
2. Creating the Map View
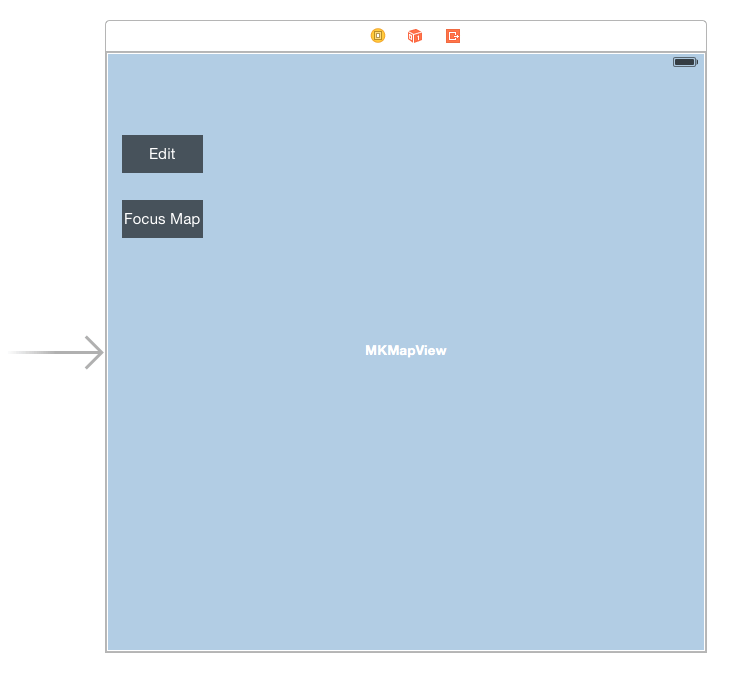
Now, let's open the GSDemo.xcworkspace and delete the ViewController.h and ViewController.m files, which were created by Xcode when you created the project. Then, create a viewController named "DJIRootViewController" and set it as the Root View Controller in Main.storyboard. Moreover, drag a MKMapView from Object Library to DJIRootViewController, setup its AutoLayout constraints, and set its delegate to DJIRootViewController, as seen below:
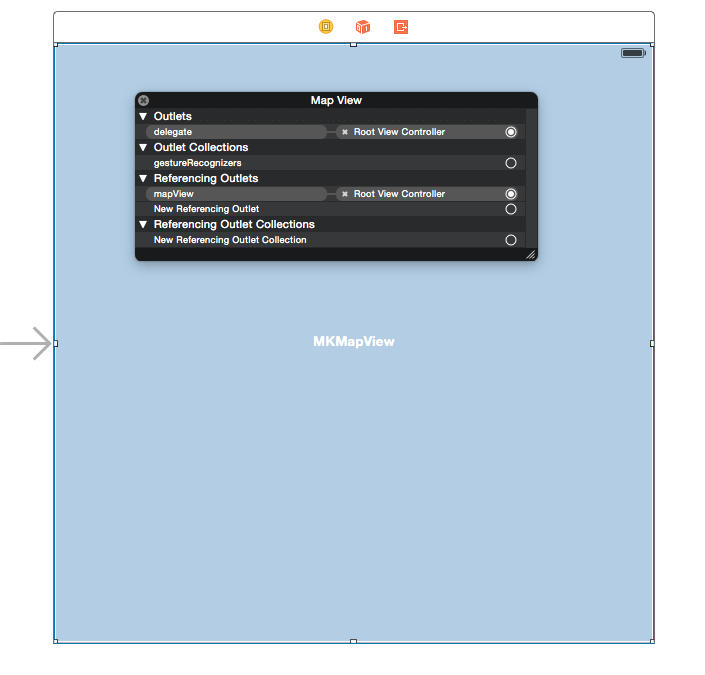
After that, import the MapKit.framework to the project and open the "DJIRootViewController.m" file, create an IBOutlet for the MKMapView, name it "mapView" and link it to the MKMapView in Main.storyboard. Import the following header files and implement MKMapView's delegate method:
|
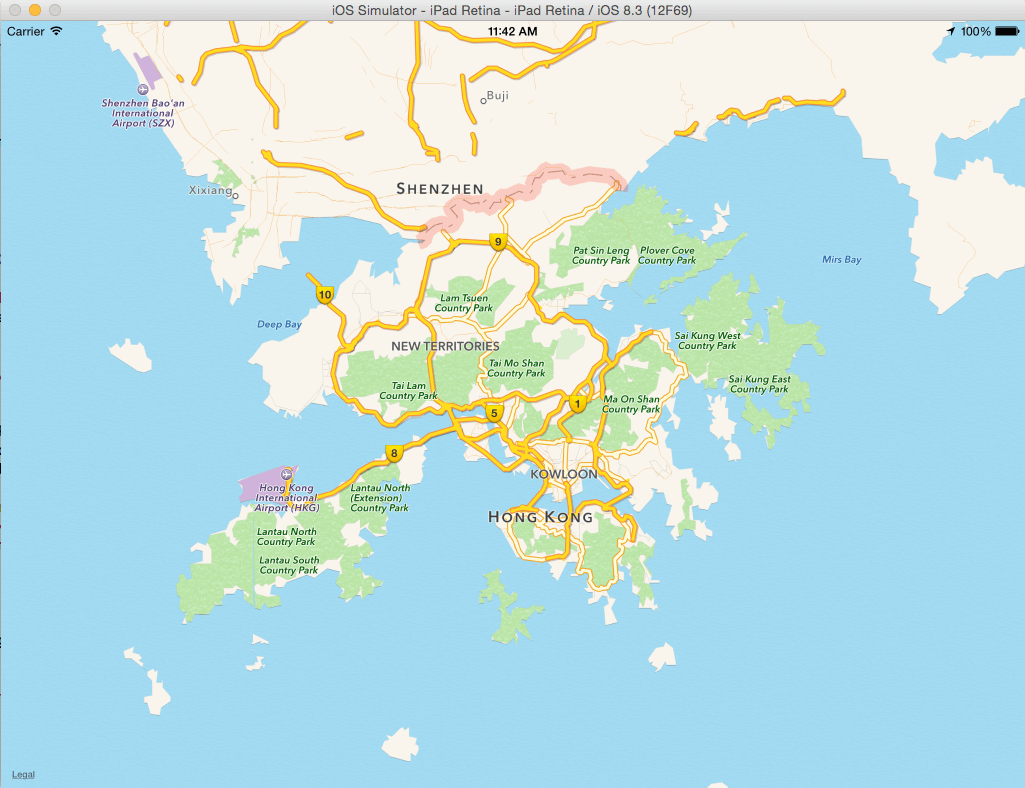
Now, let's build and run the project. If everything is as it should be, you should see the following screenshot:
3. Adding Annotations to the MapView
Currently, the map view is simple. Let's add something interesting to it. Create a new NSObject file named DJIMapController, which will be used to deal with the MKAnnotations(or for our purposes, Waypoints) logic on the map. Open the DJIMapController.h file and add the following code to it:
|
Here, we create an NSMutableArray called editPoints to store waypoint objects and add two methods to implement Add and Remove waypoints. The last method will be used to return the current waypoint objects on the map in an array.
Let's go to the DJIMapController.m file and replace the original code with the following:
|
First, we initialize the editPoints array in the init method, then create MKPointAnnotation objects from CGPoint and add them to our mapView, and finally implement the cleanAllPointsWithMapView method to clean up the editPoints array and the annotations on the mapView.
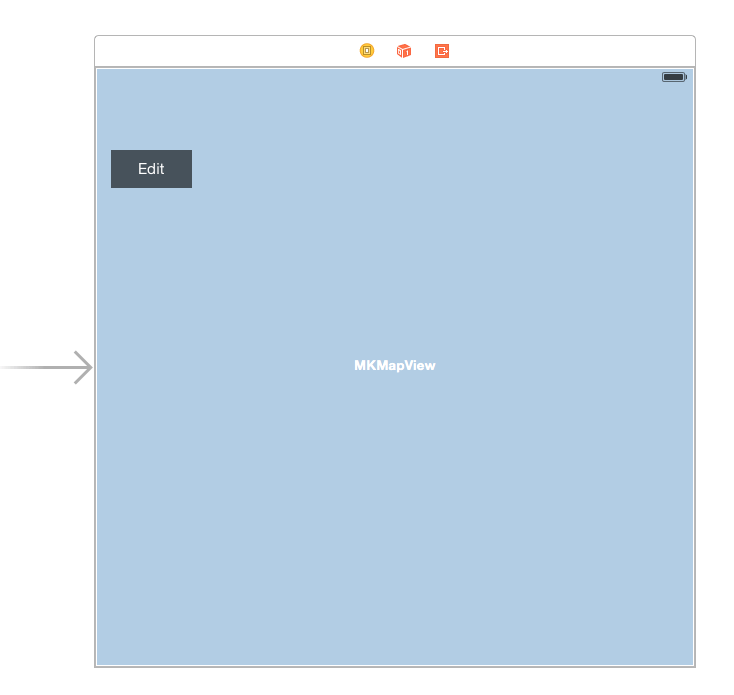
Go back to the DJIRootViewController.m file, import the DJIMapController.h header file, and create a DJIMapController property named mapController. Since we want to add annotation pins by tapping on the map, we also need to create a UITapGestureRecognizer named as tapGesture. Lastly, add a UIButton to the DJIRootViewController scene in Main.storyboard, set its IBOutlet name as "editBtn", and add an IBAction method named "editBtnAction" for it, as shown below:
@property (nonatomic, strong) DJIMapController *mapController; |
Once that is complete, open the DJIRootViewController.m file, initialize the mapController and tapGesture variables, and add the tapGesture to mapView to add waypoints. Furthermore, we need a boolean variable named "isEditingPoints" to store the edit waypoint state, which will also change the title of editBtn accordingly. Lastly, implement tapGesture's action method addWayPoints, as shown below:
@interface DJIRootViewController ()<MKMapViewDelegate> |
In the above code, we also added an NSNotification observer to check the DJI Mobile SDK's state, to make sure it was sucessfully registered. At the same time, we implement the addWaypoints gesture action by calling DJIMapController's
- (void)addPoint:(CGPoint)point withMapView:(MKMapView *)mapView
method to add waypoints to the map. Next, we implement the IBAction method editBtn, which will update the button's title and clean up waypoints based on the value of isEditingPoints. Finally, we implement MKMapViewDelegate's method to change the pin color to purple.
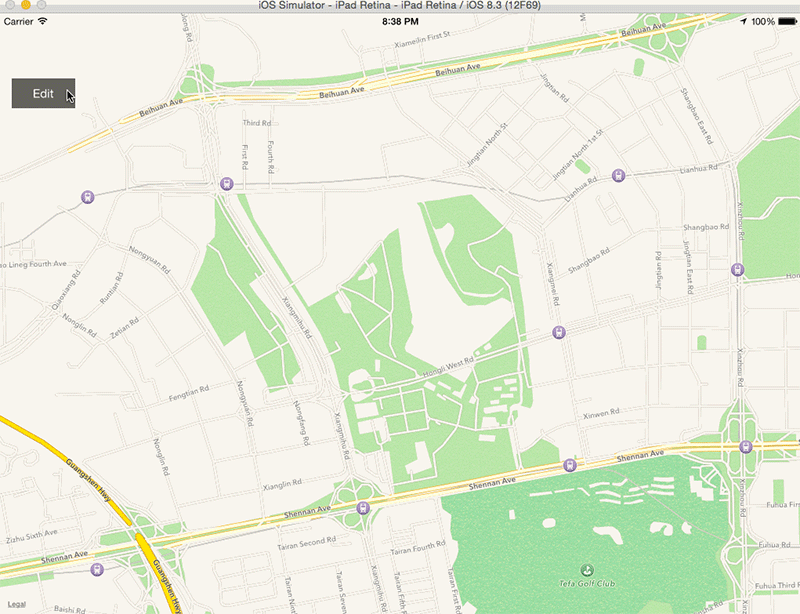
When you are done with all the steps above, build and run your project and try to add waypoints on the map. If everything is fine, you will see the following animation:
4. Focusing the MKMapView
You may be wondering why the map's location is different from your current location and why it is difficult to find your location on the map. Focusing the map to your current location quickly would be helpful for the application. To implement that feature, we need to use CLLocationManager.
Open the DJIRootViewController.m file and import CoreLocation's header file. Create a CLLocationManager property named "locationManager". Then create a CLLocationCoordinate2D property named "userLocation" to store the user's location data. Next, implement CLLocationManager's CLLocationManagerDelegate protocol in the class, as shown below:
|
In the code above, we also added a UIButton named "Focus Map" in DJIRootViewController's scene in Main.storyboard and added an IBAction method named as focusMapAction. Here is the screenshot of the scene from Main.storyboard:
Once you are done, go back to DJIRootViewController.m file and add the following code:
- (void)viewWillAppear:(BOOL)animated |
First, we initialize userLocation data to kCLLocationCoordinate2DInvalid in the viewDidLoad method. Then we add a new method named as "startUpdateLocation" to initialize locationManger, set its properties and start updating location. If the Location Service is not available, we add a UIAlertView to display the warning. The startUpdateLocation is called in viewWillAppear method and is stopped in the viewWillDisappear method. Moreover, we need to implement CLLocationManagerDelegate method to update userLocation property. Finally, we implement the "focusMapAction" method to focus mapView to the user's current location.
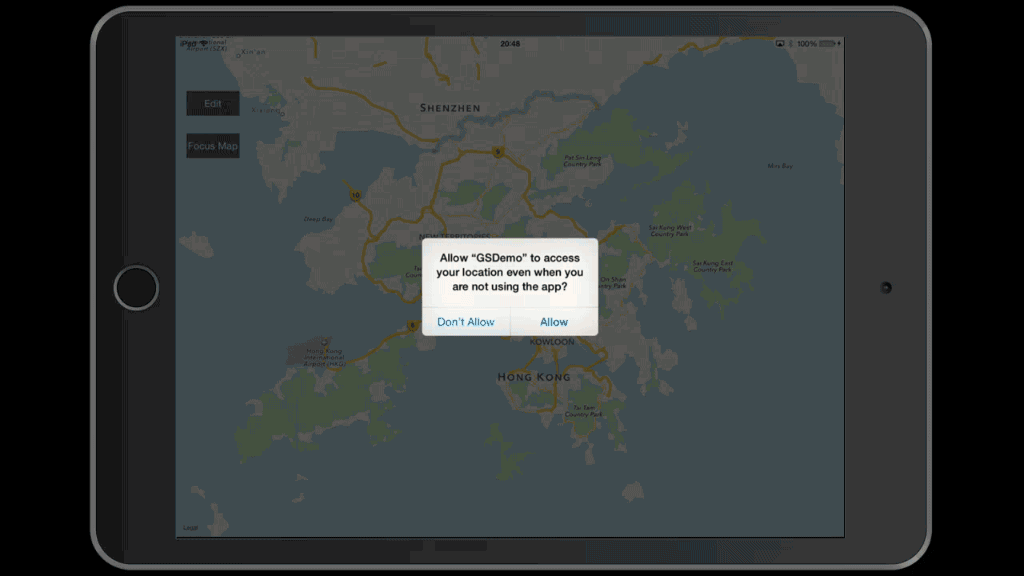
In iOS8, we must call locationManager's requestAlwaysAuthorization first, which was done in startUpdateLocation method.
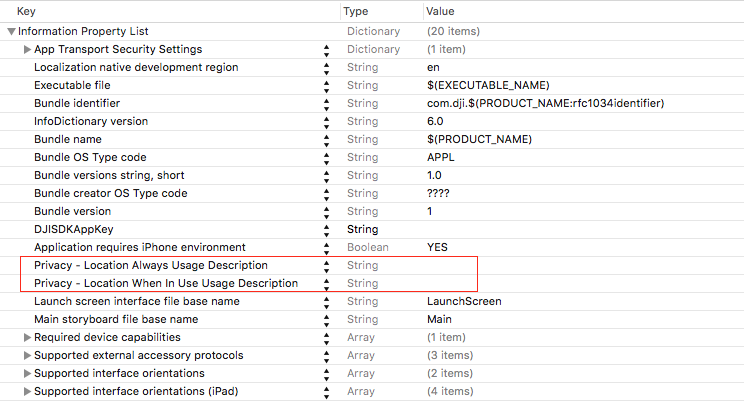
Next, add a "Privacy - Location Always Usage Description" or "Privacy - Location When In Use Usage Description" key to your project’s Info.plist containing the message to be displayed to the user when a UIAlert asking whether or not they want to allow the application to use their location. We set the messages empty here:
It's time to build and run the project to check the focus map feature. When you launch the app for the first time, a pop up alert asking for your permission to access your location will appear. Select Allow and press the Focus Map button. If the map view animates to your current location like the following animation, congratulations, you have finished the Focus Map feature!
5. Showing the Aircraft on Map View
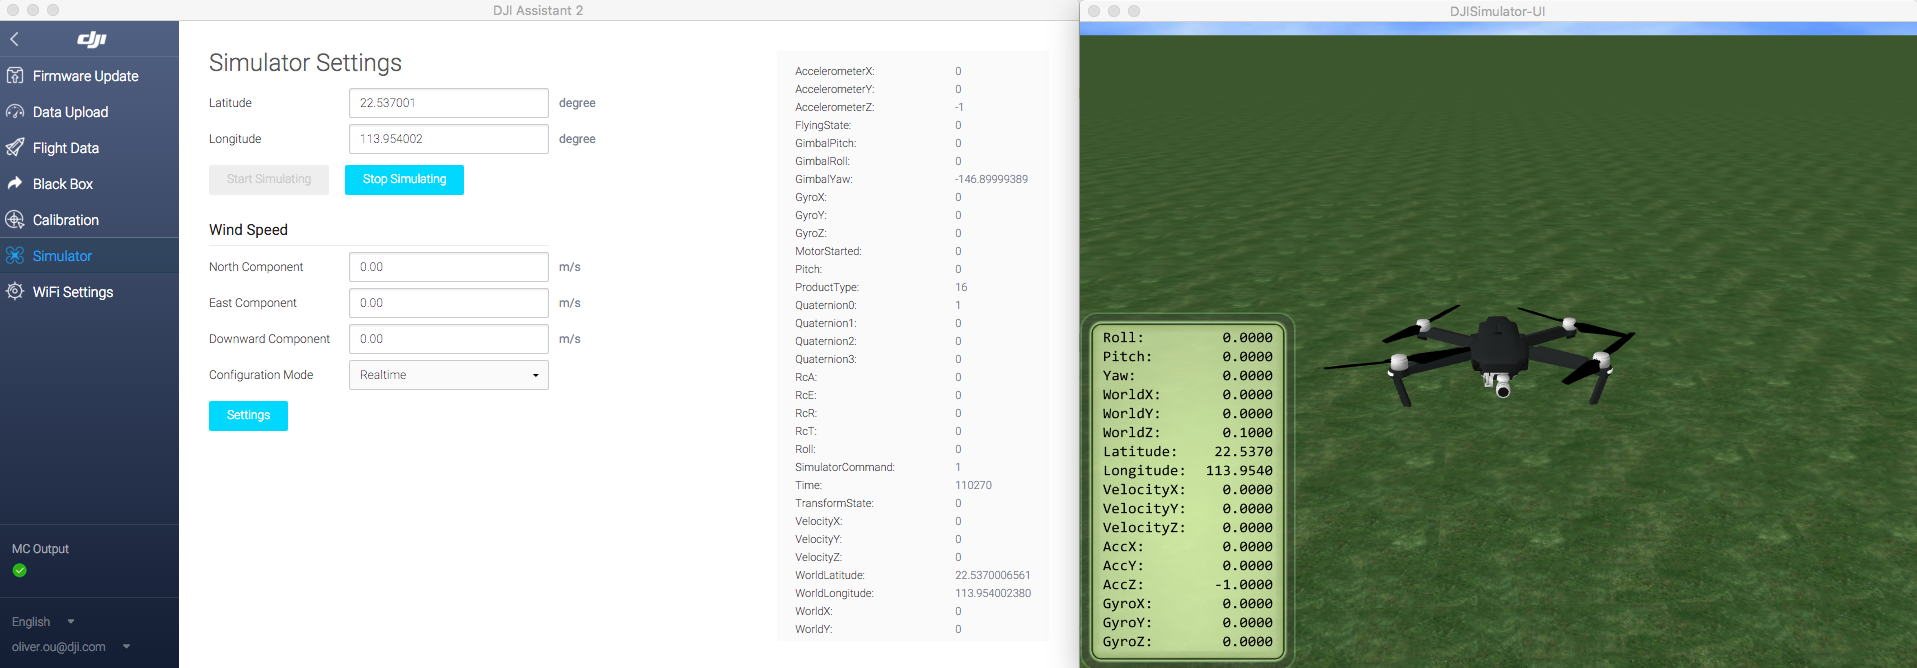
Now, we can focus the mapView to our current location, which is a good start! However, let's do something more interesting. We're going to simulate the aircraft's GPS location using the DJI Assistant 2 Simulator and show it on our map view.
You can check the DJI Assistant 2 Simulator for its basic usage. If you want to place the aircraft in your current GPS location on Map View, you can set the latitude and longitude values in the Simulator Config to yours. We take the simulator's initial values in the following example.
Let's come back to the code. Create a new subclass of MKAnnotationView named "DJIAircraftAnnotationView" and a new subclass of NSObject named DJIAircraftAnnotation. Below is the code:
- DJIAircraftAnnotationView.h
|
- DJIAircraftAnnotationView.m
|
In the code above, we create a MKAnnotationView for the aircraft, add a method named updateHeading to change the aircraft's rotation, and set its image to "aircraft.png"(You can get the image from this tutorial's demo project.) in the init method. Also, we disable the DJIAircraftAnnotationView's draggable property. Take a look at the code below:
- DJIAircraftAnnotation.h
|
- DJIAircraftAnnotation.m
|
The DJIAircraftAnnotation class implements the MKAnnotation protocol. It's used to store and update a CLLocationCoordinate2D property. Also, we can update DJIAircraftAnnotationView's heading with the updateHeading method.
Once you're done with that, open the DJIMapController.h file and import the DJIAircraftAnnotation.h file:
Then create a property of an instance of DJIAircraftAnnotation and name it aircraftAnnotation.
@property (nonatomic, strong) DJIAircraftAnnotation* aircraftAnnotation; |
Furthermore, add two new methods to update the aircraft's location and it's heading on the map.
/** |
Next, let's come back to the DJIMapController.m file and implement the two methods we just added:
-(void)updateAircraftLocation:(CLLocationCoordinate2D)location withMapView:(MKMapView *)mapView |
Also, since we don't want the aircraftAnnotation removed by the cleanAllPointsWithMapView method in the DJIMapController.m file, we need to modify it, as shown below:
- (void)cleanAllPointsWithMapView:(MKMapView *)mapView |
We add an if statement to check if the annotation of the map view is equal to the aircraftAnnotation property, and if it is not, we remove it. By doing so, we can prevent the Aircraft's annotation from being removed.
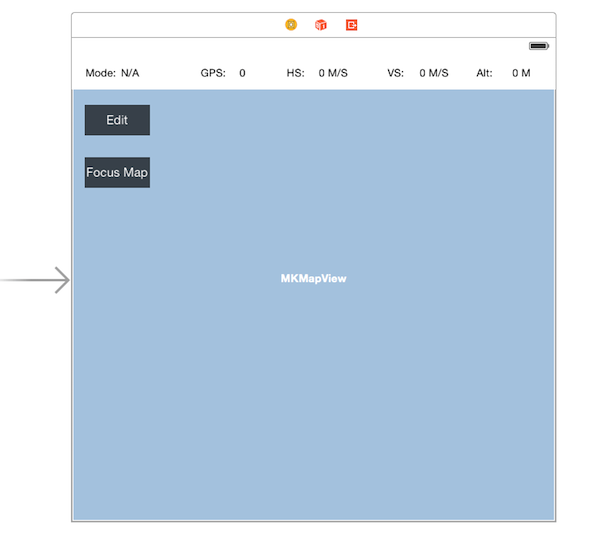
To provide a better user experience, we need to add a status view on top of the mapView to show the aircraft's flight mode type, current GPS satellite count, vertical and horizontal flight speed and the flight altitude. Let's add the UI in Main.storyboard's RootViewController Scene, as seen below:
Once that's done, open DJIRootViewController.m file, create IBOutlets for the above UI elements and import DJISDK's header file and implement "DJIFlightControllerDelegate" and "DJISDKManagerDelegate" protocols. Also, we need to create a CLLocationCoordinate2D property named droneLocation to record the aircraft's location, as shown below:
|
Now, let's initialize the UI elements' values in a new method called initUI. Call the initUI method in the viewDidLoad method. Lastly, create a new method named "registerApp" and invoke it in the viewDidLoad method to register the app as shown below:
|
- (void)viewDidLoad { |
Next, implement the "DJISDKManagerDelegate" method as follows:
|
In the code above, we can implement DJISDKManager's appRegisteredWithError: delegate method to check the register status and invoke the DJISDKManager's "startConnectionToProduct" method to connect to the aircraft. Moreover, the productConnected: delegate method will be invoked when the product connectivity status changes, so we can set DJIFlightController's delegate as DJIRootViewController here when product is connected.
You may notice that there is a "DemoUtility" class here, it's a class which defines methods that will be used frequently in the project. Let's implement it now. Create a new NSObject class and named it as "DemoUtility", replace its .h file and .m file with the followings:
|
|
Then in the viewWillDisappear method, we need to invoke the "stopUpdatingLocation" method of CLLocationManager to stop update location as shown below:
- (void)viewWillDisappear:(BOOL)animated |
Moreover, update the focusMapAction method to set droneLocation as the center of the map view's region, as shown below:
- (IBAction)focusMapAction:(id)sender { |
Next, We need to modify the MKMapViewDelegate method to what is shown below. It will check the annotation variable's class and set its annotationView as a DJIAircraftAnnotationView Class type object:
- (MKAnnotationView *)mapView:(MKMapView *)mapView viewForAnnotation:(id <MKAnnotation>)annotation |
Furthermore, let's implement the DJIFlightControllerDelegate method:
|
First, it will update the droneLocation with the aircraft's current location. Next, update the text for the status labels from the DJIFlightControllerState. Furthermore, update the aircraft's location and heading by calling the related methods from DJIMapController.
Now, let's test the application!
Build and run the project to install the app onto your mobile device. After that, please connect the aircraft to your Mac via a Micro USB cable, and then power on the aircraft and the remote controller. Click Simulator to enter the Simulator page. You can type in your current location's latitude and longitude data in the Simulator Settings, if you would like.
Then, run the app and connect your mobile device to the remote controller using Apple's lightning cable.
Next, let's go to the DJI Assistant 2 Simulator on your Mac and press the Start Simulation button. If you check the application now, a tiny red aircraft will be shown on the map as seen below:
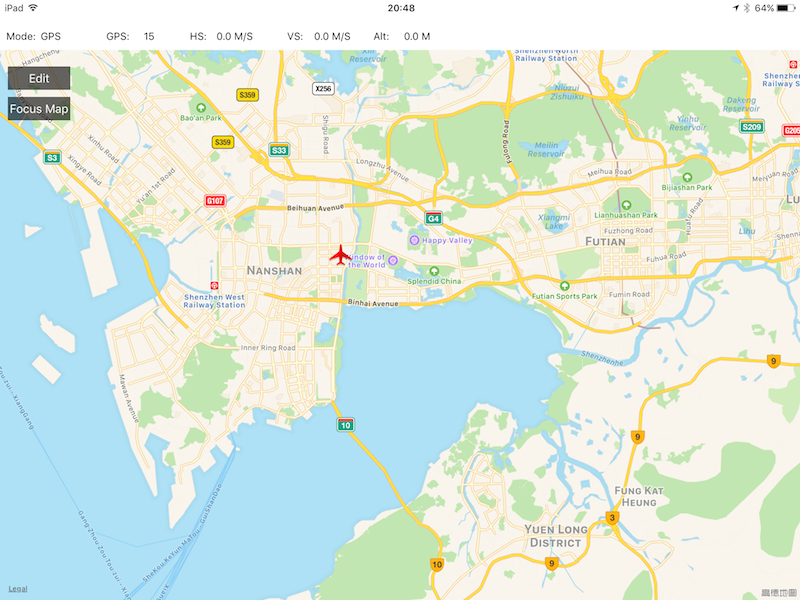
If you cannot find the aircraft, press the "Focus Map" button and the map view will zoom in to center the aircraft on the center of the map view region as shown below:
Now, if you press the Stop Simulation button on the Simulator Config, the aircraft will disappear on the map, since the simulator stops providing GPS data to the aircraft.
Refactoring the UI
As you seen, the project's code structure was simple and not robust. In order to develop it further in this tutorial, it will need to be refactored and we will need to add more UI elements.
1. Adding & Handling the New UIButtons
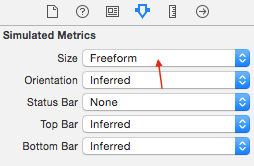
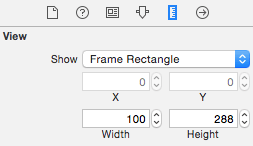
Firstly, we will create a new file named "DJIGSButtonController", which will be subclass of UIViewController. Make sure the check box saying "Also create XIB file" is selected when creating the file. Then open the DJIGSButtonController.xib file and set its size to Freeform under the "Size" dropdown in the Simulated Metrics section. In the view section, change the width to "100" and height to "288". Take a look at the changes made below:
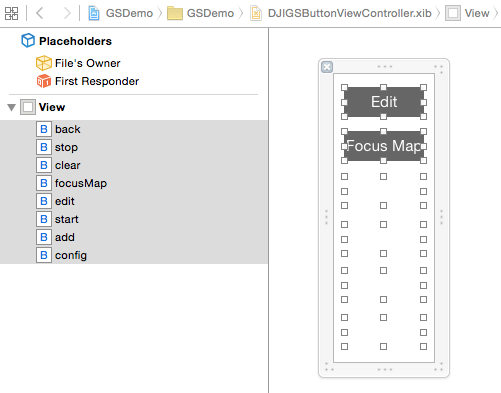
Next, drag eight UIButtons to the view and change their names to "Edit", "Back", "Clear", "Focus Map", "Start", "Stop", "Add" and "Config". "Edit" will sit on top of "Back", and "Focus Map" will sit on top of "Add". Make sure to hide the "Back", "Clear", "Start", "Stop", "Add" and "Config" buttons.
Then add IBOutlets and IBActions for each of the eight buttons in the DJIGSButtonViewController.h file. Also, we will add an Enum named DJIGSViewMode with the two different modes the application could be in. Next, we add serveral delegate methods to be implemented by the delegate viewcontroller when IBAction methods for the buttons are trigger. Lastly, add the method switchToMode:inGSButtonVC: to update the state of the buttons when the DJIGSViewMode changed. Take a look at the code below:
|
Once you've taken care of that, open the DJIGSButtonViewController.m file to replace all the code in the file with the following code:
|
With those changes, the code structure will look cleaner and more robust, which will help in its maintainence later on.
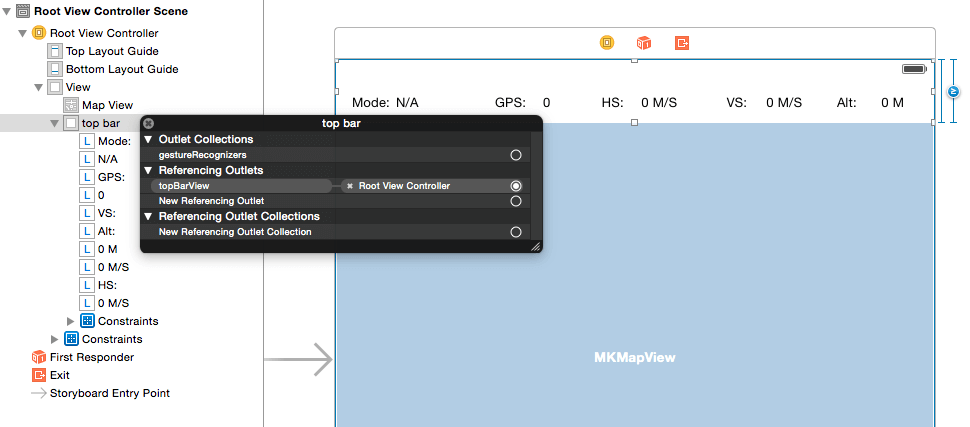
Now, let's go to the DJIRootViewController.m file and delete the editButton IBOutlet, the resetPointsAction method, and the focusMapAction method. After making those deletions, create an UIView IBOutlet named "topBarView" and link it to the Main.storyboard's RootViewController's view, as seen below:
Then, import the DJIGSButtonViewController.h header file. Create a property of type "DJIGSButtonViewController" named gsButtonVC and implement DJIGSButtonViewController's DJIGSButtonViewControllerDelegate protocol within the class, as shown below:
|
Furthermore, initialize the gsButtonVC property in the initUI method and move the original focusMapAction method's content to a new method named focusMap, as shown below:
self.gsButtonVC = [[DJIGSButtonViewController alloc] initWithNibName:@"DJIGSButtonViewController" bundle:[NSBundle mainBundle]]; |
- (void)focusMap |
Finally, implement DJIGSButtonViewController's delegate methods, as shown below:
|
In the switchToMode:inGSButtonVC: delegate method, we call the focusMap method. By doing this, we can focus the map view to the aircraft's location when the edit button is pressed, making it user friendly by preventing the user from having to zoom in to edit. Moreover, the isEditingPoints property value and the add button title will be updated in the addBtn:withActionInGSButtonVC method when the button is pressed.
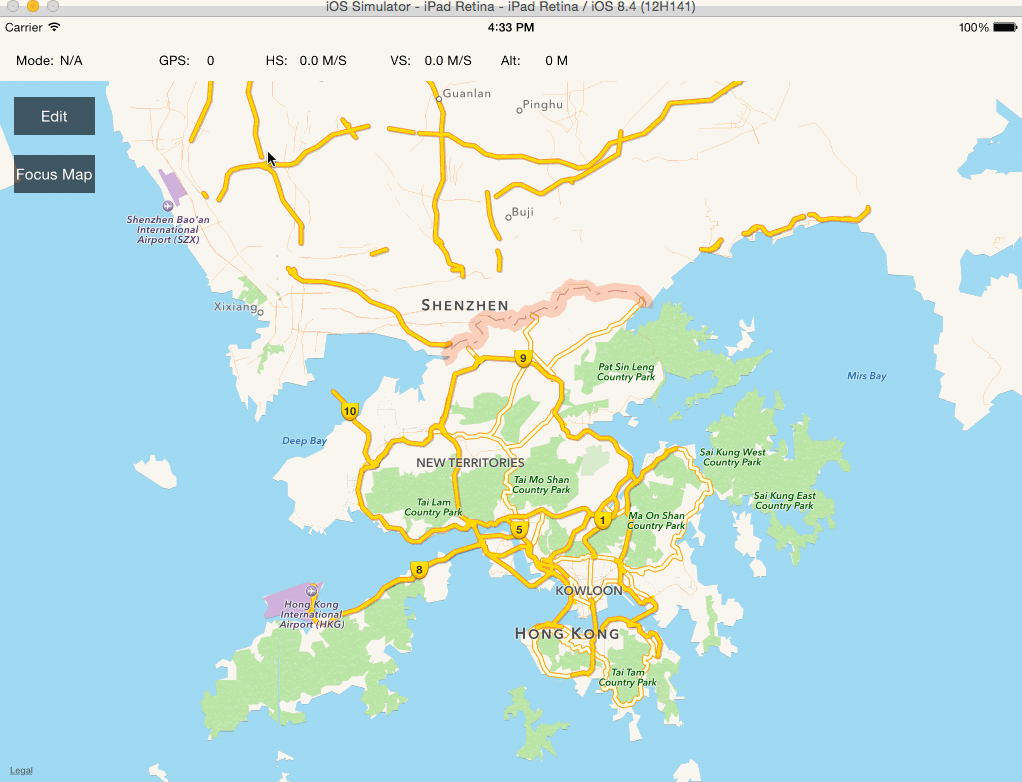
Now, let's build and run the project and try to press the Edit and Back Buttons. Here are the animation when you press them:
Configuring DJIWaypoint and DJIWaypointMission
DJIWaypoint
Let's go to DJIWaypoint.h file and check it out. For example, you can use:
-(id) initWithCoordinate:(CLLocationCoordinate2D)coordinate; |
to create a waypoint object with a specific coordinate. Once you create a waypoint, you can add a DJIWaypointAction to it by calling:
-(BOOL) addAction:(DJIWaypointAction*)action; |
Moreover, with waypoints, you have the ability to set the coordinate, altitude, heading and much more. For more details, please check the DJIWaypoint.h header file.
DJIWaypointMission
A DJIWaypointMission is used when you want to upload, start and stop a Waypoint Mission. You can add waypoints of type DJIWaypoint using the method:
- (void)addWaypoint:(DJIWaypoint *_Nonnull)waypoint; |
On the contrary, you can also delete waypoints from a task by using the method:
- (void)removeWaypoint:(DJIWaypoint *_Nonnull)waypoint; |
Moreover, you can set the "finishedAction" property which is of DJIWaypointMissionFinishedAction enum type to configure what the aircraft does when the task is finished. Finally, you can set the headingMode property which is a DJIWaypointMissionHeadingMode enum type to configure what the aircraft's heading is while executing a task.
For more details, please check the DJIWaypointMission.h header file in the DJI Mobile SDK.
Creating The DJIWaypointConfigViewController
For this demo, we will assume that the parameters of each waypoint being added to the map view are the same.
Now, let's create a new ViewController that will let the user to set the parameters of waypoints. Go to Xcode’s project navigator, right click on the GSDemo folder, select New File..., set its subclass to UIViewController, named it "DJIWaypointConfigViewController", and make sure "Also create XIB file" is selected. Next, open the DJIWaypointConfigViewController.xib file and implement the UI, as you see it below:
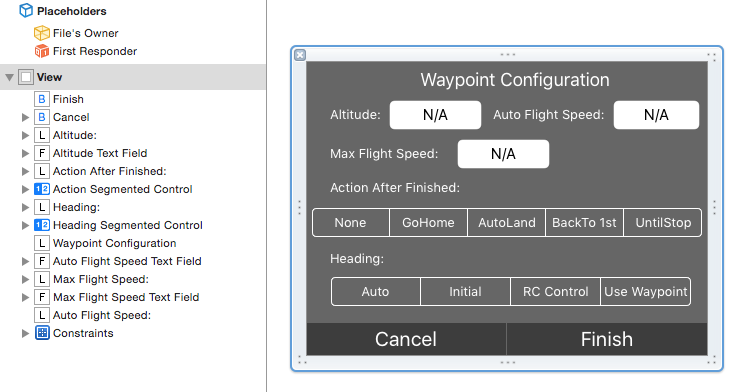
In the Waypoint Configuration ViewController, we use a UITextField to let the user set the altitude property of a DJIWaypoint object. Then, we use two UITextField to let the user set the maxFlightSpeed and autoFlightSpeed properties of DJIWaypointMission. Next, there are two UISegmentedControls to configure the finishedAction property and the headingMode property of a DJIWaypointMission object.
At the bottom, we add two UIButtons for the Cancel and Finish actions. For more details about the settings, such as frame's position, frame's size, and background color of each UI element, please check the DJIWaypointConfigViewController.xib file in the downloaded project source code.
Now, let's create IBOutlets and IBActions for each of the UI elements in the DJIWaypointConfigViewController.h file, as shown below:
|
Here, we also create two "DJIWaypointConfigViewControllerDelegate" delegate methods that are called when Cancel and Finish buttons are pressed.
Next, let's replace the code in the DJIWaypointConfigViewController.m file with the following code:
|
In the code above, we create an initUI method, which is called in the viewDidload method, to initialize the UI controls with some default data. For example, we set the default text for the altitudeTextField to 100, so there is no need for the user to type in a custom altitude value in the textField when the application is first opened. They will be able to press the Finish button right away instead of having to change the settings before they start.
Implementing the DJIWaypoint Mission
Adding the DJIWaypointConfigViewController to DJIRootViewController
Now,let's go to DJIRootViewController.m file, add the DJIWaypointConfigViewController.h header file at the top, and create a property of type DJIWaypointConfigViewController with the name "waypointConfigVC". Then, implement the DJIWaypointConfigViewControllerDelegate protocol, as shown below:
|
Next, let's add some code to initialize the waypointConfigVC instance variable and set its delegate as "DJIRootViewController" at the bottom of the initUI method:
-(void) initUI |
In the code above, we set the alpha property of the waypointConfigVC's view to 0 to initially hide the view. Then, center its location to the center of DJIRootViewController's view when it runs on iPad.
Furthermore, implement the DJIWaypointConfigViewControllerDelegate methods, as shown below:
|
In the first delegate method, we use a class method from UIView to animate the changing alpha value of waypointConfigVC's view:
+ (void)animateWithDuration:(NSTimeInterval)duration animations:(void (^)(void))animations NS_AVAILABLE_IOS(4_0); |
In the second delegate method, we do the same thing as we did in the first delegate method.
Lastly, replace the code in the configBtnActionInGSButtonVC: method with the following code to show the waypointConfigVC's view when the user presses the Config button:
- (void)configBtnActionInGSButtonVC:(DJIGSButtonViewController *)GSBtnVC |
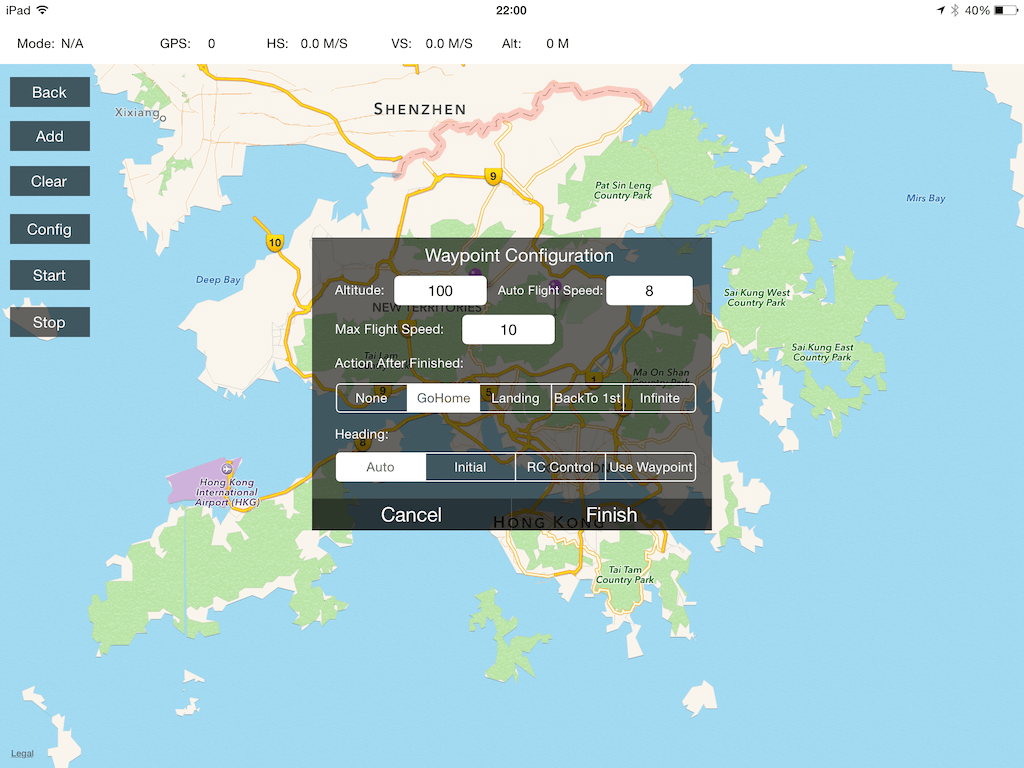
Once that's done, let's build and run the project. Try to show the waypointConfigVC's view by pressing the Edit button and Config button:
Handling The DJIWaypoint Mission
Now let's go back to DJIRootViewController.m file. Create a property of type DJIMutableWaypointMission and named it as "waypointMission" as shown below:
@property(nonatomic, strong) DJIMutableWaypointMission* waypointMission; |
We use DJIMutableWaypointMission here since it represents a waypoint mission that can be changed by modifying its parameters.
Next, replace the code in configBtnActionInGSButtonVC delegate method with the followings:
- (void)configBtnActionInGSButtonVC:(DJIGSButtonViewController *)GSBtnVC |
In the code above, we create a local NSArray variable named wayPoints and assign its value as the mapController's wayPoints array. Next, check whether or not the array exists or whether or not it's empty. If it is empty or does not exist, show a UIAlertView letting the user know there are no waypoints for the mission.
Important: For safety, it's important to add logic to check the GPS satellite count, before the start of the mission. If the satellite count is less than 6, you should prevent the user from starting the waypoint mission and show a warning. Since we are using the DJI Assistant 2 Simulator here, we are testing the application under a perfect situation, where the GPS satellite count is always 10.
Next, we use a for loop to get the CLLocation for each waypoint from the wayPoints array and check if its coordinate is valid by using the method:
BOOL CLLocationCoordinate2DIsValid(CLLocationCoordinate2D coord); |
Finally, if the coordinate is valid, we create a waypoint of type DJIWaypoint and add it to the waypointMission.
Once that is complete, let's create a missionOperator method and go to DJIWaypointConfigViewController's delegate method finishBtnActionInDJIWaypointConfigViewController and replace the code inside with the followings:
-(DJIWaypointMissionOperator *)missionOperator { |
Above, we use a for loop to set the altitude property of each DJIWaypoint in the waypointMission waypoint array based on the settings that are set in the DJIWaypointConfigViewController. After that is complete, we update the "maxFlightSpeed", "autoFlightSpeed", "headingMode" and "finishedAction" properties of waypointMission. Then we invoke the loadMission: method of DJIWaypointMissionOperator to load the waypointMission into the operator.
Furthermore, invoke the addListenerToFinished:withQueue:andBlock method of DJIWaypointMissionOperator and implement its block to inform the user by showing an alert view when the waypoint mission is finished.
Lastly, we call the uploadMissionWithCompletion: method of DJIWaypointMissionOperator to upload the waypoint mission for execution and show result messages.
Once you finished the above step, let's implement the startBtnActionInGSButtonVC method as shown below:
- (void)startBtnActionInGSButtonVC:(DJIGSButtonViewController *)GSBtnVC |
Here, call the startMissionWithCompletion: method of DJIWaypointMissionOperator to start the DJIWaypoint mission! Then create a UIAlertView to display error message when start mission failed.
Finally, let's implement the stopMissionExecutionWithCompletion method of DJIMissionControl in the DJIGSButtonViewController delegate method to stop the waypoint mission, as shown below:
- (void)stopBtnActionInGSButtonVC:(DJIGSButtonViewController *)GSBtnVC |
Showtime
You've come a long way in this tutorial, and it's time to test the whole application.
Important: Make sure the battery level of your aircraft is more than 10%, otherwise the waypoint mission may fail!
Build and run the project to install the application into your mobile device. After that, please connect the aircraft to your Mac via a Micro USB cable. Then, power on the remote controller and the aircraft, in that order.
Next, press the Simulator button in the DJI Assistant 2 and feel free to type in your current location's latitude and longitude data into the simulator.
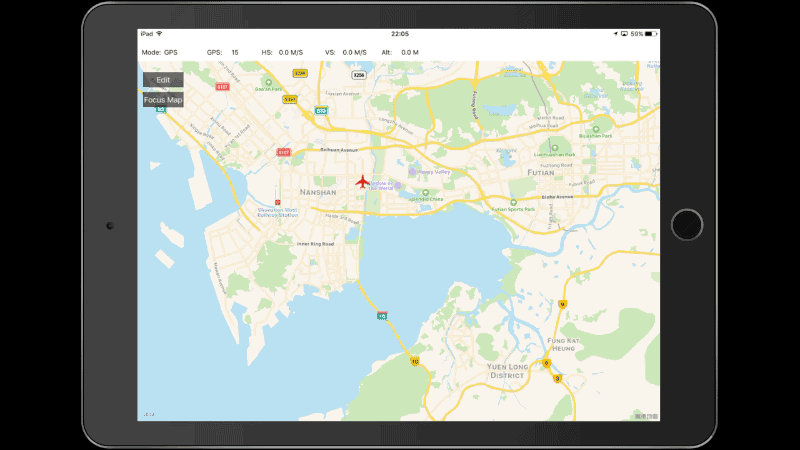
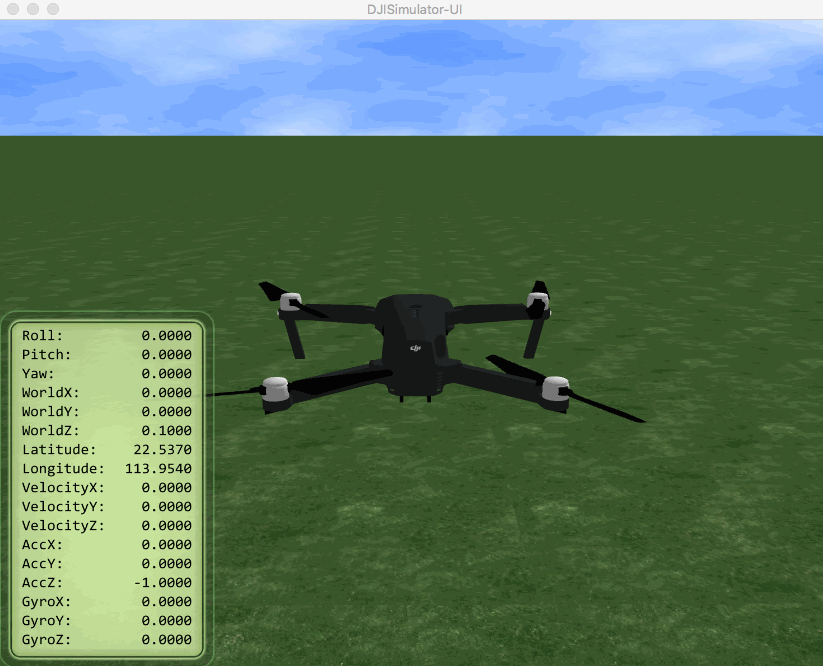
Next, let's come back to the DJI Assistant 2 Simulator on your Mac and press the Start Simulation button. A tiny red aircraft will appear on the map in your application, as seen below:
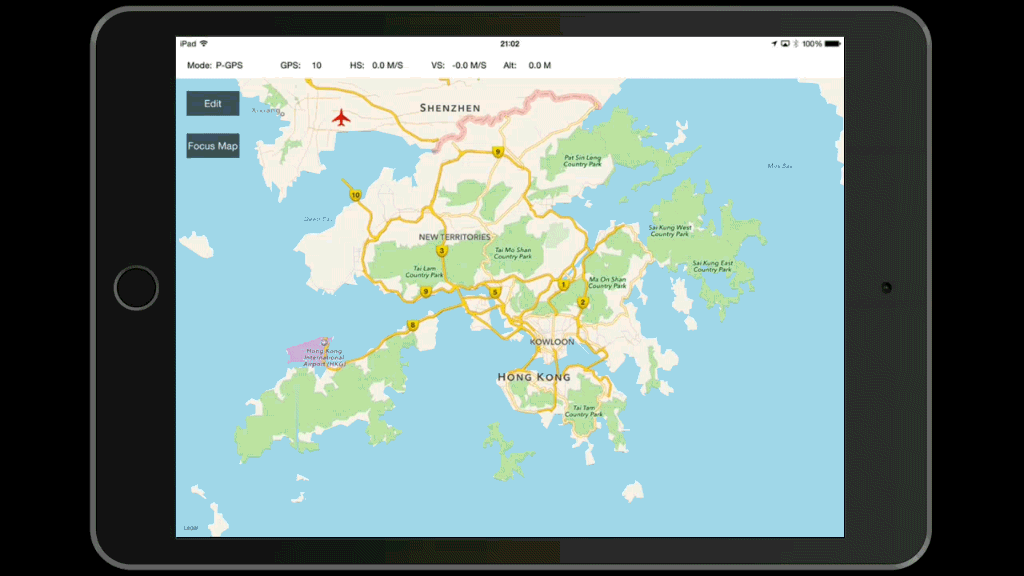
Press the Edit button, and the map view will zoom in to the region you are in and will center the aircraft:
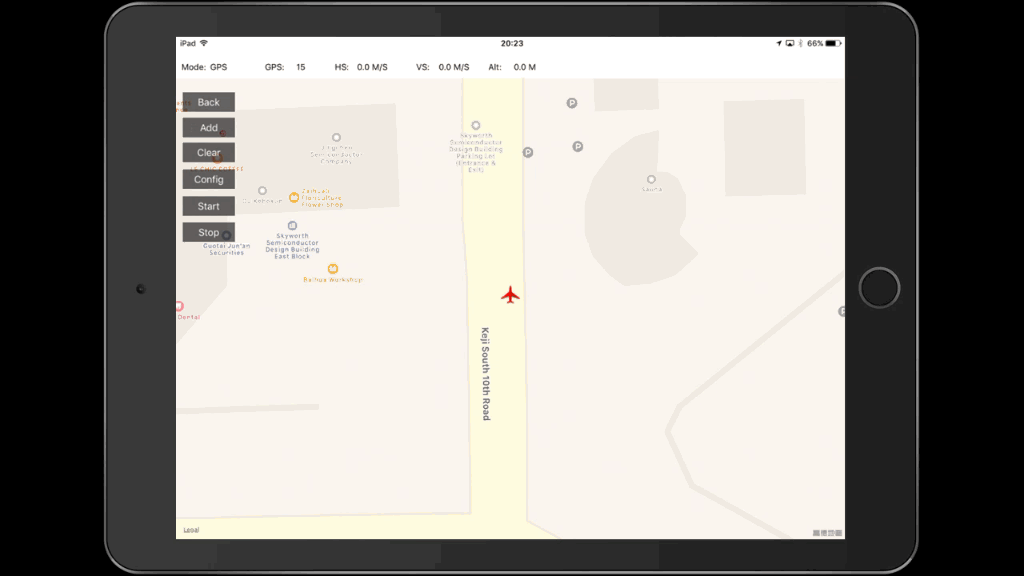
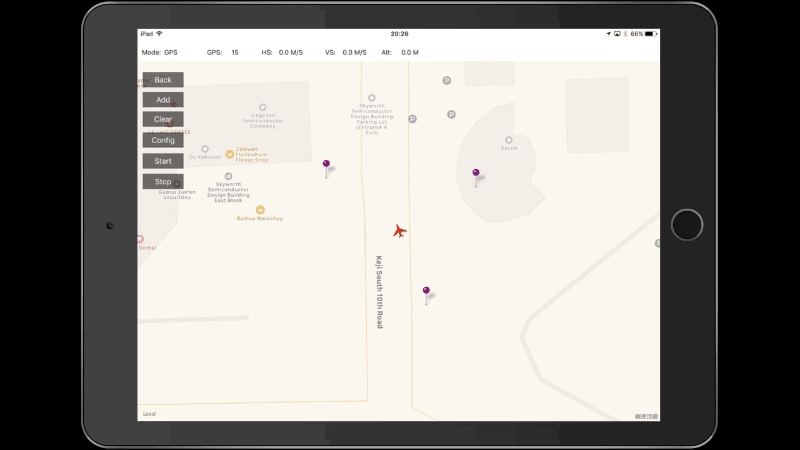
Next, test the waypoint feature by tapping wherever you'd like on the map view. Wherever you do tap, a waypoint will be added and a purple pin will appear exactly at the location of the waypoint, as shown below:
Once you press the Config button, the Waypoint Configuration view will appear. After you're satisfied with the changes, press the Finish button. The waypoint mission will start to prepare. Then press the Start button to start the waypoint mission execution. Now you will should see the aircraft move towards the waypoints you set previously on the map view, as shown below:
At the same time, you will be able to see the Mavic Pro take off and start to fly in the DJI Assistant 2 Simulator.
When the waypoint mission finishes, the Mavic Pro will start to go home!
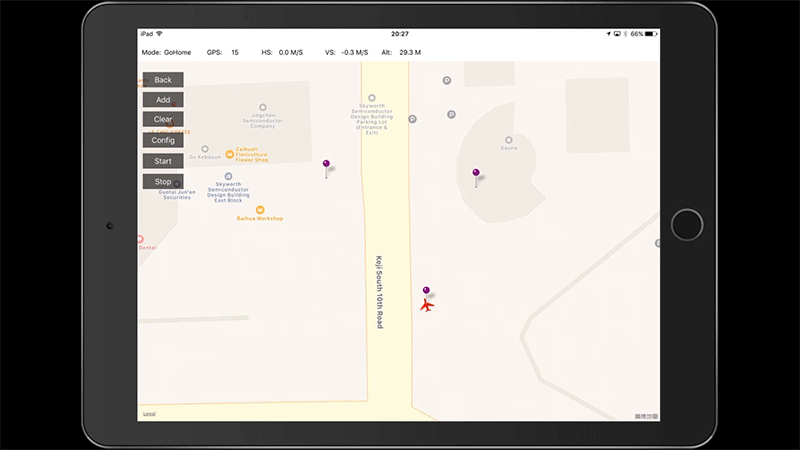
The remote controller will start beeping. Let's take a look at the DJI Assistant 2 Simulator now:
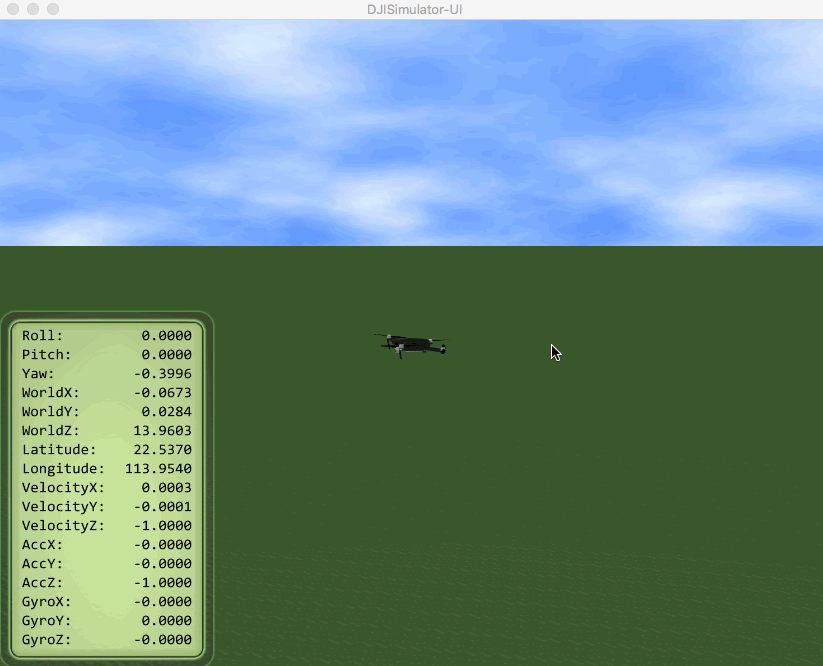
The Mavic Pro will eventually go home, land, and the beeping from the remote controller will stop. The application will go back to its normal status. If you press the Clear button, all the waypoints you previously set will be cleared. During the mission, if you'd ever like to stop the DJIWaypoint mission, you can do so by pressing the Stop button.
Summary
In this tutorial, you’ve learned how to setup and use the DJI Assistant 2 Simulator to test your waypoint mission application, upgrade your aircraft's firmware to the developer version, use the DJI Mobile SDK to create a simple map view, modify annotations of the map view, show the aircraft on the map view by using GPS data from the DJI Assistant 2 Simulator. Next, you learned how to configure DJIWaypoint parameters, how to add waypoints to DJIMutableWaypointMission. Moreover, you learned how to use DJIMissionControl to prepare, start and stop missions.
Congratulations! Now that you've finished the demo project, you can build on what you've learned and start to build your own waypoint mission application. You can improve the method which waypoints are added(such as drawing a line on the map and generating waypoints automatically), play around with the properties of a waypoint (such as heading, etc.), and adding more functionality. In order to make a cool waypoint mission application, you still have a long way to go. Good luck and hope you enjoy this tutorial!