Creating a Media Manager Application

2019-09-23v4.11Github

If you come across any mistakes or bugs in this tutorial, please let us know by sending emails to dev@dji.com. Please feel free to send us Github pull request and help us fix any issues.


In this tutorial, you will learn how to use the MediaManager to interact with the file system on the SD card of the aircraft's camera. By the end of this tutorial, you will have an app that you can use to preview photos, play videos, download or delete files and so on.

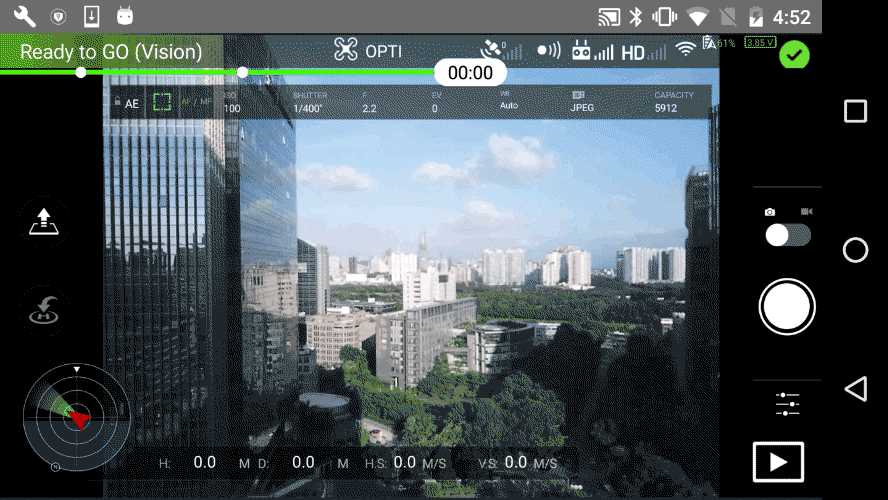
In order for our app to manage photos and videos, however, it must first be able to take and record them. Fortunately, by using DJI Android UX SDK, you can implement shooting photos and recording videos functionalities easily with standard DJI Go UIs.

You can download the tutorial's final sample project from this Github Page.

We use Mavic Pro and Nexus 5 as an example to make this demo. For more details of customizing the layouts for iPhone devices, please check the tutorial's Github Sample Project.

Application Activation and Aircraft Binding in China

For DJI SDK mobile application used in China, it's required to activate the application and bind the aircraft to the user's DJI account.

If an application is not activated, the aircraft not bound (if required), or a legacy version of the SDK (< 4.1) is being used, all camera live streams will be disabled, and flight will be limited to a zone of 100m diameter and 30m height to ensure the aircraft stays within line of sight.

To learn how to implement this feature, please check this tutorial Application Activation and Aircraft Binding.

Importing UX SDK Maven Dependency

Now, create a new project in Android Studio, open Android Studio and select File -> New -> New Project to create a new project, named 'MediaManagerDemo'. Enter the company domain and package name (Here we use "com.dji.mediaManagerDemo") you want and press Next. Set the minimum SDK version as API 19: Android 4.4 (KitKat) for "Phone and Tablet" and press Next. Then select "Empty Activity" and press Next. Lastly, leave the Activity Name as "MainActivity", and the Layout Name as "activity_main", press "Finish" to create the project.

Please check the Getting Started with UX SDK tutorial to learned how to import the DJI Android UX SDK Maven Dependency to your project. If you haven't read that previously, please take a look at it and implement the related features. Once you've done that, continue to implement the next features.

Implementing the UI of Application

Building the Default Layout using UX SDK

Now, create a new Empty Activity class with the name of "DefaultLayoutActivity" in the com.dji.mediaManagerDemo package. Replace the code with the following, remember to import the related classes as Android Studio suggested:

public class DefaultLayoutActivity extends AppCompatActivity implements View.OnClickListener{

private Button mMediaManagerBtn;

@Override
protected void onCreate(Bundle savedInstanceState) {
super.onCreate(savedInstanceState);
setContentView(R.layout.activity_default_layout);

mMediaManagerBtn = (Button)findViewById(R.id.btn_mediaManager);
mMediaManagerBtn.setOnClickListener(this);

}

@Override
public void onClick(View v) {

switch (v.getId()) {
case R.id.btn_mediaManager: {
Intent intent = new Intent(this, MainActivity.class);
startActivity(intent);
break;
}
default:
break;
}
}
}

In the code above, we create a Button variable mMediaManagerBtn and initialize it in the onCreate() method. Moreover, implement the onClick() method of the Button and invoke startActivity() method to start the MainActivity.

Next, continue to open the "activity_default_layout.xml" file, and replace the code with the following:

<?xml version="1.0" encoding="utf-8"?>
<RelativeLayout xmlns:android="http://schemas.android.com/apk/res/android"
xmlns:tools="http://schemas.android.com/tools"
xmlns:custom="http://schemas.android.com/apk/res-auto"
android:id="@+id/activity_main"
android:layout_width="match_parent"
android:layout_height="match_parent"
android:background="@color/background_blue"
android:orientation="horizontal"
tools:context=".MainActivity">

<!-- Widget to see first person view (FPV) -->
<dji.ux.widget.FPVWidget
android:layout_width="match_parent"
android:layout_height="match_parent"/>

<dji.ux.widget.FPVOverlayWidget
android:layout_width="match_parent"
android:layout_height="match_parent"/>

<!-- Widgets in top status bar -->
<LinearLayout
android:id="@+id/signal"
android:layout_width="match_parent"
android:layout_height="25dp"
android:background="@color/dark_gray"
android:orientation="horizontal">

<dji.ux.widget.PreFlightStatusWidget
android:id="@+id/status"
android:layout_width="238dp"
android:layout_height="25dp"/>

<dji.ux.widget.FlightModeWidget
android:layout_width="103dp"
android:layout_height="22dp"/>

<dji.ux.widget.GPSSignalWidget
android:layout_width="44dp"
android:layout_height="22dp"/>

<dji.ux.widget.VisionWidget
android:layout_width="22dp"
android:layout_height="22dp"/>

<dji.ux.widget.RemoteControlSignalWidget
android:layout_width="38dp"
android:layout_height="22dp"/>

<dji.ux.widget.VideoSignalWidget
android:layout_width="38dp"
android:layout_height="22dp"/>

<dji.ux.widget.WiFiSignalWidget
android:layout_width="32dp"
android:layout_height="25dp"/>

<dji.ux.widget.BatteryWidget
android:layout_width="96dp"
android:layout_height="22dp"
custom:excludeView="singleVoltage"/>

<dji.ux.widget.ConnectionWidget
android:layout_marginTop="3dp"
android:layout_width="18dp"
android:layout_height="18dp"/>
</LinearLayout>

<LinearLayout
android:id="@+id/camera"
android:layout_width="wrap_content"
android:layout_height="wrap_content"
android:layout_below="@id/signal"
android:layout_centerHorizontal="true"
android:layout_margin="12dp"
android:background="@color/dark_gray"
android:orientation="horizontal">

<dji.ux.widget.AutoExposureLockWidget
android:layout_width="25dp"
android:layout_height="25dp"/>

<dji.ux.widget.FocusExposureSwitchWidget
android:layout_width="25dp"
android:layout_height="25dp"/>

<dji.ux.widget.FocusModeWidget
android:layout_width="25dp"
android:layout_height="25dp"/>

<dji.ux.widget.config.CameraConfigISOAndEIWidget
android:layout_width="50dp"
android:layout_height="25dp"/>

<dji.ux.widget.config.CameraConfigShutterWidget
android:layout_width="50dp"
android:layout_height="25dp"/>

<dji.ux.widget.config.CameraConfigApertureWidget
android:layout_width="50dp"
android:layout_height="25dp"/>

<dji.ux.widget.config.CameraConfigEVWidget
android:layout_width="50dp"
android:layout_height="25dp"/>

<dji.ux.widget.config.CameraConfigWBWidget
android:layout_width="50dp"
android:layout_height="25dp"/>

<dji.ux.widget.config.CameraConfigStorageWidget
android:layout_width="108dp"
android:layout_height="25dp"/>

</LinearLayout>
<dji.ux.widget.RemainingFlightTimeWidget
android:layout_alignParentTop="true"
android:layout_marginTop="18dp"
android:layout_width="match_parent"
android:background="@color/transparent"
android:layout_height="20dp"/>

<LinearLayout
android:layout_width="match_parent"
android:layout_height="wrap_content"
android:layout_alignParentBottom="true"
android:orientation="horizontal"
android:padding="12dp">

<dji.ux.widget.dashboard.DashboardWidget
android:id="@+id/Compass"
android:layout_width="405dp"
android:layout_height="91dp"
android:layout_marginRight="12dp"/>

</LinearLayout>

<!--Take off and return home buttons on left -->
<LinearLayout
android:layout_width="40dp"
android:layout_height="wrap_content"
android:layout_centerVertical="true"
android:layout_marginStart="12dp"
android:orientation="vertical">

<dji.ux.widget.TakeOffWidget
android:layout_width="40dp"
android:layout_height="40dp"
android:layout_marginBottom="12dp"/>

<dji.ux.widget.ReturnHomeWidget
android:layout_width="40dp"
android:layout_height="40dp"
android:layout_marginTop="12dp"/>
</LinearLayout>


<dji.ux.widget.controls.CameraControlsWidget
android:id="@+id/CameraCapturePanel"
android:layout_width="50dp"
android:layout_height="213dp"
android:layout_alignParentRight="true"
android:layout_below="@id/camera" />


<dji.ux.panel.CameraSettingExposurePanel
android:id="@+id/CameraExposureMode"
android:layout_width="180dp"
android:layout_height="263dp"
android:layout_below="@id/camera"
android:layout_marginLeft="360dp"
android:layout_toLeftOf="@+id/CameraCapturePanel"
android:background="@color/transparent"
android:gravity="center"
android:visibility="invisible" />

<dji.ux.panel.CameraSettingAdvancedPanel
android:id="@+id/CameraAdvancedSetting"
android:layout_width="180dp"
android:layout_height="263dp"
android:layout_below="@id/camera"
android:layout_marginLeft="360dp"
android:layout_toLeftOf="@+id/CameraCapturePanel"
android:background="@color/transparent"
android:gravity="center"
android:visibility="invisible" />

<Button
android:id="@+id/btn_mediaManager"
android:layout_width="38dp"
android:layout_height="30dp"
android:layout_alignStart="@+id/CameraCapturePanel"
android:layout_below="@id/CameraCapturePanel"
android:background="@drawable/playback"
android:visibility="visible" />

<!-- Pre-flight checklist panel -->
<dji.ux.panel.PreFlightCheckListPanel
android:id="@+id/PreflightCheckView"
android:layout_width="400dp"
android:layout_height="wrap_content"
android:layout_below="@id/signal"
android:visibility="gone"/>

</RelativeLayout>

In the xml file above, we implement the UX SDK's default layout. For more details, please check the Getting Started with UX SDK tutorial.

Once you finished the steps above, open the "color.xml" file and replace the content with the following:

<?xml version="1.0" encoding="utf-8"?>
<resources>
<color name="colorPrimary">#3F51B5</color>
<color name="colorPrimaryDark">#303F9F</color>
<color name="colorAccent">#FF4081</color>
<color name="black_overlay">#000000</color>
<color name="colorWhite">#FFFFFF</color>
<color name="background_blue">#242d34</color>
<color name="transparent">#00000000</color>
<color name="dark_gray">#80000000</color>
</resources>

Moreover, open the "styles.xml" file and replace the content with the following:

<resources>
<!-- Base application theme. -->
<style name="AppTheme" parent="@style/Base.Theme.AppCompat.Light.NoActionBar">
</style>
</resources>

Working on the MainActivity Layout

Once you finished the steps above, let's open the "activity_main.xml" file, and replace the content with the following:

<?xml version="1.0" encoding="utf-8"?>
<RelativeLayout xmlns:android="http://schemas.android.com/apk/res/android"
xmlns:app="http://schemas.android.com/apk/res-auto"
xmlns:tools="http://schemas.android.com/tools"
android:layout_width="match_parent"
android:layout_height="match_parent"
tools:context="com.dji.mediaManagerDemo.MainActivity">

<Button
android:id="@+id/back_btn"
android:layout_width="60dp"
android:layout_height="40dp"
android:layout_alignParentStart="true"
android:layout_alignParentTop="true"
android:text="Back"
android:textSize="11sp" />

<Button
android:id="@+id/delete_btn"
android:layout_width="65dp"
android:layout_height="40dp"
android:layout_alignParentTop="true"
android:layout_toEndOf="@+id/back_btn"
android:text="Delete"
android:textSize="11sp" />

<Button
android:id="@+id/reload_btn"
android:layout_width="70dp"
android:layout_height="40dp"
android:layout_alignParentTop="true"
android:layout_toEndOf="@+id/delete_btn"
android:text="Reload"
android:textSize="11sp" />

<Button
android:id="@+id/download_btn"
android:layout_width="90dp"
android:layout_height="40dp"
android:layout_alignParentTop="true"
android:layout_toEndOf="@+id/reload_btn"
android:text="Download"
android:textSize="11sp" />

<Button
android:id="@+id/status_btn"
android:layout_width="75dp"
android:layout_height="40dp"
android:layout_alignParentTop="true"
android:layout_toEndOf="@+id/download_btn"
android:text="Status"
android:textSize="11sp" />

<Button
android:id="@+id/play_btn"
android:layout_width="60dp"
android:layout_height="40dp"
android:layout_alignParentStart="true"
android:layout_below="@+id/back_btn"
android:text="Play"
android:textSize="11sp" />

<Button
android:id="@+id/resume_btn"
android:layout_width="80dp"
android:layout_height="40dp"
android:layout_below="@+id/back_btn"
android:layout_toEndOf="@+id/play_btn"
android:text="Resume"
android:textSize="11sp" />

<Button
android:id="@+id/pause_btn"
android:layout_width="60dp"
android:layout_height="40dp"
android:layout_below="@+id/reload_btn"
android:layout_toEndOf="@+id/resume_btn"
android:text="Pause"
android:textSize="11sp" />

<Button
android:id="@+id/stop_btn"
android:layout_width="60dp"
android:layout_height="40dp"
android:layout_below="@+id/reload_btn"
android:layout_toEndOf="@+id/pause_btn"
android:text="Stop"
android:textSize="11sp" />

<Button
android:id="@+id/moveTo_btn"
android:layout_width="75dp"
android:layout_height="40dp"
android:layout_below="@+id/reload_btn"
android:layout_toEndOf="@+id/stop_btn"
android:text="MoveTo"
android:textSize="11sp" />

<!-- Widget to see first person view (FPV) -->
<dji.ux.widget.FPVWidget
android:layout_width="match_parent"
android:layout_height="match_parent"
android:layout_below="@+id/play_btn"
android:layout_toStartOf="@+id/pointing_drawer_sd"
android:id="@+id/FPVWidget" />

<ImageView
android:id="@+id/imageView"
android:layout_width="match_parent"
android:layout_height="match_parent"
android:layout_below="@+id/play_btn"
android:layout_marginTop="0dp"
android:layout_toStartOf="@+id/pointing_drawer_sd"
android:background="@color/black_overlay"
android:visibility="invisible" />

<android.support.v7.widget.RecyclerView
android:id="@+id/filelistView"
android:layout_width="250dp"
android:layout_height="match_parent"
android:layout_marginLeft="0dp"
android:layout_toEndOf="@+id/FPVWidget" />

<SlidingDrawer
android:id="@+id/pointing_drawer_sd"
android:layout_width="230dp"
android:layout_height="match_parent"
android:layout_alignParentRight="true"
android:content="@+id/pointing_drawer_content"
android:handle="@+id/pointing_handle"
android:orientation="horizontal">

<ImageView
android:id="@id/pointing_handle"
android:layout_width="wrap_content"
android:layout_height="wrap_content" />

<RelativeLayout
android:id="@+id/pointing_drawer_content"
android:layout_width="250dp"
android:layout_height="match_parent"
android:layout_centerVertical="true"
android:layout_marginLeft="340dp"
android:background="@color/black_overlay">

<ScrollView
android:layout_width="250dp"
android:layout_height="fill_parent"
android:layout_alignParentEnd="true"
android:layout_alignParentRight="true"
android:layout_centerVertical="true"
android:clickable="false"
android:scrollbars="vertical">

<TextView
android:id="@+id/pointing_push_tv"
style="@style/status_text"
android:layout_width="200dp"
android:layout_height="wrap_content"
android:layout_marginLeft="30dp"
android:scrollbars="vertical"
android:text="@string/push_info" />
</ScrollView>
</RelativeLayout>
</SlidingDrawer>
</RelativeLayout>

In the xml above, we define the following UI elements:

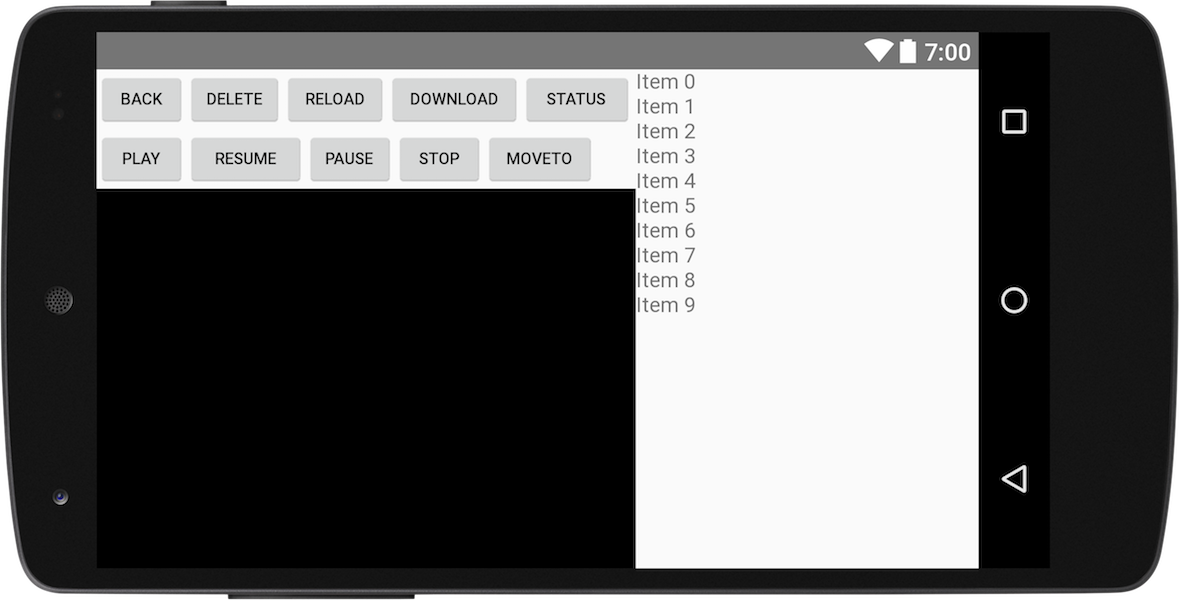
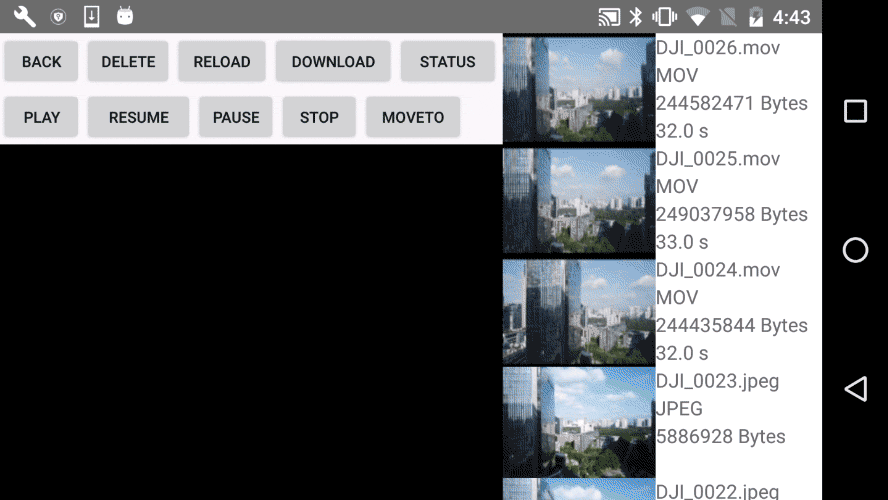
  1. Create 10 Buttons with the names of "BACK", "DELETE", "RELOAD", "DOWNLOAD", "STATUS", "PLAY", "RESUME", "PAUSE", "STOP" and "MOVETO" on the upper left corner.
  2. Create a FPVWidget widget below the Buttons to show the live camera video stream.
  3. Create an ImageView to show the downloaded photo and overlay it over the FPVWidget.
  4. Create a RecyclerView on the right side to show the info of media files list.
  5. Lastly, create a ScrollView with a TextView to show the video playback state info.

Here is a screenshot of the implemented UI of MainActivity:

mainActivity_UI

Initializing the UI Elements in MainActivity

Once you finished the steps above, let's open the "MainActivity.java" file and replace the code with the following:


public class MainActivity extends Activity implements View.OnClickListener {

private static final String TAG = MainActivity.class.getName();
private static MainActivity activity;

private Button mBackBtn, mDeleteBtn, mReloadBtn, mDownloadBtn, mStatusBtn;
private Button mPlayBtn, mResumeBtn, mPauseBtn, mStopBtn, mMoveToBtn;
private RecyclerView listView;
private SlidingDrawer mPushDrawerSd;
private ImageView mDisplayImageView;
private TextView mPushTv;

@Override
protected void onCreate(Bundle savedInstanceState) {
super.onCreate(savedInstanceState);
setContentView(R.layout.activity_main);
initUI();
}

@Override
protected void onResume() {
super.onResume();
}

@Override
protected void onPause() {
super.onPause();
}

@Override
protected void onStop() {
super.onStop();
}

@Override
protected void onDestroy() {
super.onDestroy();
}

void initUI() {

//Init RecyclerView
listView = (RecyclerView) findViewById(R.id.filelistView);
LinearLayoutManager layoutManager = new LinearLayoutManager(MainActivity.this, OrientationHelper.VERTICAL,false);
listView.setLayoutManager(layoutManager);

mPushDrawerSd = (SlidingDrawer)findViewById(R.id.pointing_drawer_sd);
mPushTv = (TextView)findViewById(R.id.pointing_push_tv);
mBackBtn = (Button) findViewById(R.id.back_btn);
mDeleteBtn = (Button) findViewById(R.id.delete_btn);
mDownloadBtn = (Button) findViewById(R.id.download_btn);
mReloadBtn = (Button) findViewById(R.id.reload_btn);
mStatusBtn = (Button) findViewById(R.id.status_btn);
mPlayBtn = (Button) findViewById(R.id.play_btn);
mResumeBtn = (Button) findViewById(R.id.resume_btn);
mPauseBtn = (Button) findViewById(R.id.pause_btn);
mStopBtn = (Button) findViewById(R.id.stop_btn);
mMoveToBtn = (Button) findViewById(R.id.moveTo_btn);
mDisplayImageView = (ImageView) findViewById(R.id.imageView);
mDisplayImageView.setVisibility(View.VISIBLE);

mBackBtn.setOnClickListener(this);
mDeleteBtn.setOnClickListener(this);
mDownloadBtn.setOnClickListener(this);
mReloadBtn.setOnClickListener(this);
mDownloadBtn.setOnClickListener(this);
mStatusBtn.setOnClickListener(this);
mPlayBtn.setOnClickListener(this);
mResumeBtn.setOnClickListener(this);
mPauseBtn.setOnClickListener(this);
mStopBtn.setOnClickListener(this);
mMoveToBtn.setOnClickListener(this);

}

@Override
public void onClick(View v) {
switch (v.getId()) {
case R.id.back_btn: {
break;
}
case R.id.delete_btn:{
break;
}
case R.id.reload_btn: {
break;
}
case R.id.download_btn: {
break;
}
case R.id.status_btn: {
break;
}
case R.id.play_btn: {
break;
}
case R.id.resume_btn: {
break;
}
case R.id.pause_btn: {
break;
}
case R.id.stop_btn: {
break;
}
case R.id.moveTo_btn: {
break;
}
default:
break;
}
}
}

In the code above, we implement the following:

  1. Create variables for Button, RecyclerView, SlidingDrawer, ImageView and TextView.
  2. Next, create an initUI() method to initialize the UI elements and invoke the setOnClickListener method of Buttons to set MainActivity as the listener. Then invoke the initUI() method in the onCreate() method.
  3. Lastly, implement the onClick() method for all the Buttons.

Registering the Application

After you finish the above steps, let's register our application with the App Key you apply from DJI Developer Website. If you are not familiar with the App Key, please check the Get Started.

Moreover, please check the Creating an Camera Application tutorial and the sample project of this tutorial for the detailed implementations of the MApplication, DemoApplication and ConnectionActivity

Now let's build and run the project and install it to your Android device. If everything goes well, you should see the "Register Success" textView like the following screenshot when you register the app successfully.

Refreshing Media File List

Initializing MediaManager

Now, continue to work on the "MainActivity.java" file. Firstly, add the following codes at the beginning of the MainActivity class:

private FileListAdapter mListAdapter;
private List<MediaFile> mediaFileList = new ArrayList<MediaFile>();
private MediaManager mMediaManager;
private MediaManager.FileListState currentFileListState = MediaManager.FileListState.UNKNOWN;
private ProgressDialog mLoadingDialog;
private FetchMediaTaskScheduler scheduler;
private int lastClickViewIndex =-1;
private View lastClickView;

In the code above, we create variables for the FileListAdapter, List<MediaFile>, MediaManager, FetchMediaTaskScheduler and so on.

Next, improve the onDestroy() method with the following:

@Override
protected void onDestroy() {
lastClickView = null;
DemoApplication.getCameraInstance().setMode(SettingsDefinitions.CameraMode.SHOOT_PHOTO, new CommonCallbacks.CompletionCallback() {
@Override
public void onResult(DJIError mError) {
if (mError != null){
setResultToToast("Set Shoot Photo Mode Failed" + mError.getDescription());
}
}
});

if (mediaFileList != null) {
mediaFileList.clear();
}
super.onDestroy();
}

Here, we implement the following:

  1. Invoke the setMode() method of Camera and set camera mode as SHOOT_PHOTO mode and show toast if there is any error in the completion callback.
  2. Then invoke the clear() method of List<MediaFile> to reset the mediaFileList.

Moveover, add the following code in the initUI() method:

//Init FileListAdapter
mListAdapter = new FileListAdapter();
listView.setAdapter(mListAdapter);

//Init Loading Dialog
mLoadingDialog = new ProgressDialog(MainActivity.this);
mLoadingDialog.setMessage("Please wait");
mLoadingDialog.setCanceledOnTouchOutside(false);
mLoadingDialog.setCancelable(false);

In the code above, we firstly initialize the mListAdapter and invoke the setAdapter() method of RecyclerView to set it as listView's adapter. Then initialize the mLoadingDialog to show messages.

Furthermore, implement the following two methods to show and hide the mLoadingDialog dialog:

private void showProgressDialog() {
runOnUiThread(new Runnable() {
public void run() {
if (mLoadingDialog != null) {
mLoadingDialog.show();
}
}
});
}

private void hideProgressDialog() {
runOnUiThread(new Runnable() {
public void run() {
if (null != mLoadingDialog && mLoadingDialog.isShowing()) {
mLoadingDialog.dismiss();
}
}
});
}

Lastly, continue to implement the methods as shown below:

private MediaManager.FileListStateListener updateFileListStateListener = new MediaManager.FileListStateListener() {
@Override
public void onFileListStateChange(MediaManager.FileListState state) {
currentFileListState = state;
}
};

private void initMediaManager() {
if (DemoApplication.getProductInstance() == null) {
mediaFileList.clear();
mListAdapter.notifyDataSetChanged();
DJILog.e(TAG, "Product disconnected");
return;
} else {
if (null != DemoApplication.getCameraInstance() && DemoApplication.getCameraInstance().isMediaDownloadModeSupported()) {
mMediaManager = DemoApplication.getCameraInstance().getMediaManager();
} else if (null != DemoApplication.getCameraInstance()
&& !DemoApplication.getCameraInstance().isMediaDownloadModeSupported()) {
setResultToToast("Media Download Mode not Supported");
}
}
return;
}

In the code above, we implement the following features:

  1. Firslty, initialize the updateFileListStateListener and update the value of currentFileListState variable inside the onFileListStateChange callback method.

  2. Next, in the initMediaManager() method, check if the product is connected, if not, reset the mediaFileList and invoke the notifyDataSetChanged() method of FileListAdapter to update the listView.

  3. If the product is connected, initialize the mMediaManager by invoking the getMediaManager() method of Camera.

Fetching Media File List

Once we have finished the steps above, we can start to fetch the media files list from the Camera SD card and show them on the listView.

Implement the following methods as shown below:

private void getFileList() {
mMediaManager = DemoApplication.getCameraInstance().getMediaManager();
if (mMediaManager != null) {

if ((currentFileListState == MediaManager.FileListState.SYNCING) || (currentFileListState == MediaManager.FileListState.DELETING)){
DJILog.e(TAG, "Media Manager is busy.");
}else{

mMediaManager.refreshFileListOfStorageLocation(SettingsDefinitions.StorageLocation.SDCARD, new CommonCallbacks.CompletionCallback() {

@Override
public void onResult(DJIError djiError) {
if (null == djiError) {
hideProgressDialog();

//Reset data
if (currentFileListState != MediaManager.FileListState.INCOMPLETE) {
mediaFileList.clear();
lastClickViewIndex = -1;
lastClickView = null;
}

mediaFileList = mMediaManager.getSDCardFileListSnapshot();
Collections.sort(mediaFileList, new Comparator<MediaFile>() {
@Override
public int compare(MediaFile lhs, MediaFile rhs) {
if (lhs.getTimeCreated() < rhs.getTimeCreated()) {
return 1;
} else if (lhs.getTimeCreated() > rhs.getTimeCreated()) {
return -1;
}
return 0;
}
});
scheduler.resume(new CommonCallbacks.CompletionCallback() {
@Override
public void onResult(DJIError error) {
if (error == null) {
getThumbnails();
}
}
});
} else {
hideProgressDialog();
setResultToToast("Get Media File List Failed:" + djiError.getDescription());
}
}
});
}
}
}

private void getThumbnailByIndex(final int index) {
FetchMediaTask task = new FetchMediaTask(mediaFileList.get(index), FetchMediaTaskContent.THUMBNAIL, taskCallback);
scheduler.moveTaskToEnd(task);
}

private void getThumbnails() {
if (mediaFileList.size() <= 0) {
setResultToToast("No File info for downloading thumbnails");
return;
}
for (int i = 0; i < mediaFileList.size(); i++) {
getThumbnailByIndex(i);
}
}

private FetchMediaTask.Callback taskCallback = new FetchMediaTask.Callback() {
@Override
public void onUpdate(MediaFile file, FetchMediaTaskContent option, DJIError error) {
if (null == error) {
if (option == FetchMediaTaskContent.PREVIEW) {
runOnUiThread(new Runnable() {
public void run() {
mListAdapter.notifyDataSetChanged();
}
});
}
if (option == FetchMediaTaskContent.THUMBNAIL) {
runOnUiThread(new Runnable() {
public void run() {
mListAdapter.notifyDataSetChanged();
}
});
}
} else {
DJILog.e(TAG, "Fetch Media Task Failed" + error.getDescription());
}
}
};

In the code above, we implement the following features:

  1. In the getFileList() method, we fetch the latest mMediaManager object and check if it's not null. Then check the value of the currentFileListState variable. If the state is neither SYNCING nor DELETING, invoke the refreshFileListOfStorageLocation() method of MediaManager to refresh the file list from the SD card.

  2. In the onResult() callback method, if there is no error, then check if the currentFileListState value is not equal to MediaManager.FileListState.INCOMPLETE and reset the mediaFileList list, the lastClickViewIndex and the lastClickView variables.

  3. Invoke the getSDCardFileListSnapshot() method of MediaManager to get the current file list and store it in the mediaFileList variable.

  4. Sort the media files in the mediaFileList based on the created time. Then invoke the resume() method of FetchMediaTaskScheduler to resume the scheduler and invoke the getThumbnails() method in the onResult() callback method. If there is an error, invoke the hideProgressDialog() method to hide the progress dialog.

  5. Next, create the getThumbnailByIndex() method to initialize the FetchMediaTask tasks for FetchMediaTaskContent.THUMBNAIL, and then move the tasks to the end of FetchMediaTaskScheduler.

  6. After that, create the getThumbnails() method to go through the files in the mediaFileList and invoke the getThumbnailByIndex() method to initialize the FetchMediaTask tasks.

  7. Lastly, initialize the taskCallback variable and implement the onUpdate() callback method. If there is no error, check the value of the option variable. If the value is equal to either FetchMediaTaskContent.PREVIEW or FetchMediaTaskContent.THUMBNAIL, invoke the notifyDataSetChanged() method of the FileListAdapter in the UI thread to update the listView.

Once you finish the steps above, continue to insert the following code below the mMediaManager = DemoApplication.getCameraInstance().getMediaManager(); in the initMediaManager() method:

if (null != mMediaManager) {
mMediaManager.addUpdateFileListStateListener(this.updateFileListStateListener);
DemoApplication.getCameraInstance().setMode(SettingsDefinitions.CameraMode.MEDIA_DOWNLOAD, new CommonCallbacks.CompletionCallback() {
@Override
public void onResult(DJIError error) {
if (error == null) {
DJILog.e(TAG, "Set cameraMode success");
showProgressDialog();
getFileList();
} else {
setResultToToast("Set cameraMode failed");
}
}
});
if (mMediaManager.isVideoPlaybackSupported()) {
DJILog.e(TAG, "Camera support video playback!");
} else {
setResultToToast("Camera does not support video playback!");
}
scheduler = mMediaManager.getScheduler();
}

In the code above, we implement the following features:

  1. Check if the mMediaManager is not null, then invoke the addUpdateFileListStateListener() method of mMediaManager to add listener for file list state update.

  2. Invoke the setMode() method of Camera and set the CameraMode to MEDIA_DOWNLOAD. In the completion block, if there is no error, invoke the showProgressDialog() method to show the fetch file progress and invoke the getFileList() method to fetch the media file list. Lastly, initialize the FetchMediaTaskScheduler to schedule the fetch media file task.

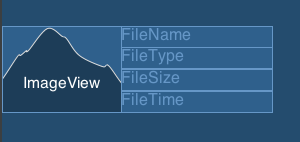
Furthermore, create a new XML Layout file and name it as "media_info_item.xml" in the layout folder, replace the code with the following:

<?xml version="1.0" encoding="utf-8"?>
<RelativeLayout xmlns:android="http://schemas.android.com/apk/res/android"
android:id="@+id/parent"
android:layout_width="250dp"
android:layout_height="wrap_content"
android:background="@drawable/background_selector"
android:orientation="horizontal">

<ImageView
android:id="@+id/filethumbnail"
android:layout_width="110dp"
android:layout_height="80dp"
android:layout_alignParentStart="true"
android:layout_alignParentTop="true"
android:minHeight="150dp"
android:minWidth="250dp"
android:scaleType="fitXY" />

<TextView
android:id="@+id/filename"
android:layout_width="140dp"
android:layout_height="20dp"
android:layout_alignParentTop="true"
android:layout_toEndOf="@+id/filethumbnail"
android:clickable="false"
android:text="FileName" />

<TextView
android:id="@+id/filetype"
android:layout_width="140dp"
android:layout_height="20dp"
android:layout_below="@+id/filename"
android:layout_toEndOf="@+id/filethumbnail"
android:clickable="false"
android:text="FileType" />

<TextView
android:id="@+id/fileSize"
android:layout_width="140dp"
android:layout_height="20dp"
android:layout_below="@+id/filetype"
android:layout_toEndOf="@+id/filethumbnail"
android:clickable="false"
android:text="FileSize" />

<TextView
android:id="@+id/filetime"
android:layout_width="140dp"
android:layout_height="20dp"
android:layout_below="@+id/fileSize"
android:layout_toEndOf="@+id/filethumbnail"
android:clickable="false"
android:text="FileTime" />

</RelativeLayout>

In the code above, we define the layout of the ItemHolder in listView. Add one ImageView on the left side and four TextViews on the right side as shown below:

ItemHolder

Lastly, continue to implement the following methods to show fetched media files in the listView:

private class ItemHolder extends RecyclerView.ViewHolder {
ImageView thumbnail_img;
TextView file_name;
TextView file_type;
TextView file_size;
TextView file_time;

public ItemHolder(View itemView) {
super(itemView);
this.thumbnail_img = (ImageView) itemView.findViewById(R.id.filethumbnail);
this.file_name = (TextView) itemView.findViewById(R.id.filename);
this.file_type = (TextView) itemView.findViewById(R.id.filetype);
this.file_size = (TextView) itemView.findViewById(R.id.fileSize);
this.file_time = (TextView) itemView.findViewById(R.id.filetime);
}
}

private class FileListAdapter extends RecyclerView.Adapter<ItemHolder> {
@Override
public int getItemCount() {
if (mediaFileList != null) {
return mediaFileList.size();
}
return 0;
}

@Override
public ItemHolder onCreateViewHolder(ViewGroup parent, int viewType) {
View view = LayoutInflater.from(parent.getContext()).inflate(R.layout.media_info_item, parent, false);
return new ItemHolder(view);
}

@Override
public void onBindViewHolder(ItemHolder mItemHolder, final int index) {

final MediaFile mediaFile = mediaFileList.get(index);
if (mediaFile != null) {
if (mediaFile.getMediaType() != MediaFile.MediaType.MOV && mediaFile.getMediaType() != MediaFile.MediaType.MP4) {
mItemHolder.file_time.setVisibility(View.GONE);
} else {
mItemHolder.file_time.setVisibility(View.VISIBLE);
mItemHolder.file_time.setText(mediaFile.getDurationInSeconds() + " s");
}
mItemHolder.file_name.setText(mediaFile.getFileName());
mItemHolder.file_type.setText(mediaFile.getMediaType().name());
mItemHolder.file_size.setText(mediaFile.getFileSize() + " Bytes");
mItemHolder.thumbnail_img.setImageBitmap(mediaFile.getThumbnail());
mItemHolder.thumbnail_img.setOnClickListener(ImgOnClickListener);
mItemHolder.thumbnail_img.setTag(mediaFile);
mItemHolder.itemView.setTag(index);

if (lastClickViewIndex == index) {
mItemHolder.itemView.setSelected(true);
} else {
mItemHolder.itemView.setSelected(false);
}
mItemHolder.itemView.setOnClickListener(itemViewOnClickListener);

}
}
}

private View.OnClickListener itemViewOnClickListener = new View.OnClickListener() {
@Override
public void onClick(View v) {
lastClickViewIndex = (int) (v.getTag());

if (lastClickView != null && lastClickView != v) {
lastClickView.setSelected(false);
}
v.setSelected(true);
lastClickView = v;
}
};

private View.OnClickListener ImgOnClickListener = new View.OnClickListener() {
@Override
public void onClick(View v) {
MediaFile selectedMedia = (MediaFile) v.getTag();
if (selectedMedia != null && mMediaManager != null) {
addMediaTask(selectedMedia);
}
}
};

private void addMediaTask(final MediaFile mediaFile) {
final FetchMediaTaskScheduler scheduler = mMediaManager.getScheduler();
final FetchMediaTask task =
new FetchMediaTask(mediaFile, FetchMediaTaskContent.PREVIEW, new FetchMediaTask.Callback() {
@Override
public void onUpdate(final MediaFile mediaFile, FetchMediaTaskContent fetchMediaTaskContent, DJIError error) {
if (null == error) {
if (mediaFile.getPreview() != null) {
runOnUiThread(new Runnable() {
@Override
public void run() {
final Bitmap previewBitmap = mediaFile.getPreview();
mDisplayImageView.setVisibility(View.VISIBLE);
mDisplayImageView.setImageBitmap(previewBitmap);
}
});
} else {
setResultToToast("null bitmap!");
}
} else {
setResultToToast("fetch preview image failed: " + error.getDescription());
}
}
});

scheduler.resume(new CommonCallbacks.CompletionCallback() {
@Override
public void onResult(DJIError error) {
if (error == null) {
scheduler.moveTaskToNext(task);
} else {
setResultToToast("resume scheduler failed: " + error.getDescription());
}
}
});
}

The code above implements:

  1. Define the ItemHolder class, which extends from the RecyclerView.ViewHolder. Inside the class, define one ImageView and four TextViews and initialize them by invoking the findViewById() method.

  2. Define the FileListAdapter class and extend it from RecyclerView.Adapter<ItemHolder>. In this class, Override the getItemCount() method and return the size of the mediaFileList.

  3. Moreover, in the onCreateViewHolder method, we define the layout of the ItemHolder in listView using the "media_info_item.xml" file.

  4. In the onBindViewHolder method, get the mediaFile variable from the mediaFileList by using the index value. Then update the infos of the ItemHolder with this mediaFile, like file_name, file_type, thumbnail_img, etc. Set the mediaFile as the tag of thumbnail_img and set the tag of itemView as the index value. We will use them later. Also, invoke the setOnClickListener() method of ImageView to register the callback to be invoked when the thumbnail_img is clicked.

  5. Furthermore, if the current ItemHolder is selected, invoke the setSelected() method of its itemView variable and pass true to it. Then, invoke the setOnClickListener() method and pass the itemViewOnClickListener variable to register the callback to be invoked when the itemView is clicked.

  6. Next, initialize the itemViewOnClickListener and ImgOnClickListener variables and override their onClick() methods. When the itemView is clicked, update the value of lastClickViewIndex and the selected state of lastClickView. When the thumbnail_img is clicked, create the selectedMedia variable by invoking the getTag() method of the selected thumbnail_img and then check if the selectedMedia and mMediaManager variables are null. If not, invode the addMediaTask() method and pass the selectedMedia variable to get the preview image.

  7. Lastly, implement the addMediaTask() method to fetch the MediaFile and show its preview image in the mDisplayImageView variable. In the onUpdate() callback method, invoke the getPreview() method of MediaFile to get the preview image.

For more details of the implementation, please check the sample code of this tutorial on Github.

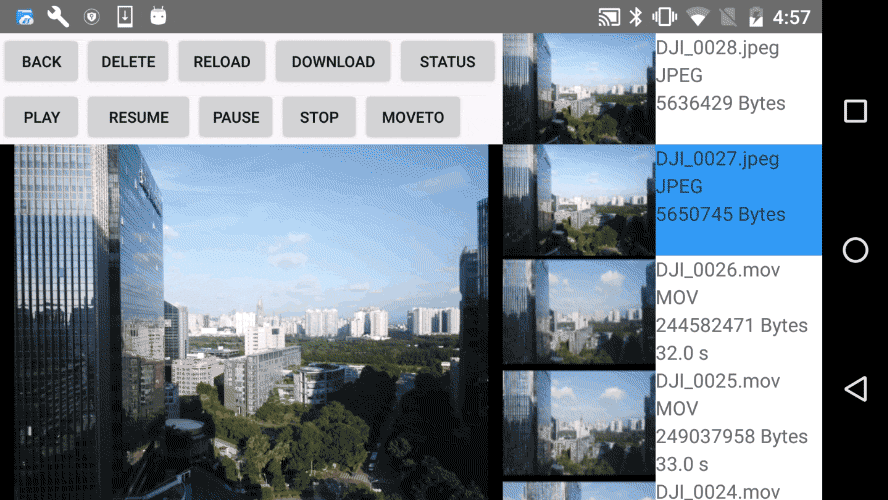
So far, we have finished implementing refreshing the media file list, and show them in the RecyclerView listView. Also, you can select a specific media file and preview the image.

Now, build and run the project and install it to your Android device. If everything goes well, you should see something similar to the following gif animation:

Downloading and Editing the Media Files

Once you finish the steps above, continue to add the following codes at the beginning of the MainActivity class:

private ProgressDialog mDownloadDialog;
File destDir = new File(Environment.getExternalStorageDirectory().getPath() + "/MediaManagerDemo/");
private int currentProgress = -1;

In the code above, we define the mDownloadDialog, destDir and currentProgress variables for media files downloading.

Moveover, add the following code in the initUI() method:

//Init Download Dialog
mDownloadDialog = new ProgressDialog(MainActivity.this);
mDownloadDialog.setTitle("Downloading file");
mDownloadDialog.setIcon(android.R.drawable.ic_dialog_info);
mDownloadDialog.setProgressStyle(ProgressDialog.STYLE_HORIZONTAL);
mDownloadDialog.setCanceledOnTouchOutside(false);
mDownloadDialog.setCancelable(true);
mDownloadDialog.setOnCancelListener(new DialogInterface.OnCancelListener() {
@Override
public void onCancel(DialogInterface dialog) {
if (mMediaManager != null) {
mMediaManager.exitMediaDownloading();
}
}
});

Here, we initialize the mDownloadDialog and configure different settings for it. Also, override the onCancel() callback method of OnCancelListener and invoke the exitMediaDownloading() method of MediaManager to stop the media fil downloading process when the cancel button is pressed.

Next, implement the following methods to show and hide the download mDownloadDialog:

private void ShowDownloadProgressDialog() {
if (mDownloadDialog != null) {
runOnUiThread(new Runnable() {
public void run() {
mDownloadDialog.incrementProgressBy(-mDownloadDialog.getProgress());
mDownloadDialog.show();
}
});
}
}

private void HideDownloadProgressDialog() {

if (null != mDownloadDialog && mDownloadDialog.isShowing()) {
runOnUiThread(new Runnable() {
public void run() {
mDownloadDialog.dismiss();
}
});
}
}

Once you finish the work above, continue to implement the following two methods:

private void downloadFileByIndex(final int index){
if ((mediaFileList.get(index).getMediaType() == MediaFile.MediaType.PANORAMA)
|| (mediaFileList.get(index).getMediaType() == MediaFile.MediaType.SHALLOW_FOCUS)) {
return;
}

mediaFileList.get(index).fetchFileData(destDir, null, new DownloadListener<String>() {
@Override
public void onFailure(DJIError error) {
HideDownloadProgressDialog();
setResultToToast("Download File Failed" + error.getDescription());
currentProgress = -1;
}

@Override
public void onProgress(long total, long current) {
}

@Override
public void onRateUpdate(long total, long current, long persize) {
int tmpProgress = (int) (1.0 * current / total * 100);
if (tmpProgress != currentProgress) {
mDownloadDialog.setProgress(tmpProgress);
currentProgress = tmpProgress;
}
}

@Override
public void onStart() {
currentProgress = -1;
ShowDownloadProgressDialog();
}

@Override
public void onSuccess(String filePath) {
HideDownloadProgressDialog();
setResultToToast("Download File Success" + ":" + filePath);
currentProgress = -1;
}
});
}

private void deleteFileByIndex(final int index) {
ArrayList<MediaFile> fileToDelete = new ArrayList<MediaFile>();
if (mediaFileList.size() > index) {
fileToDelete.add(mediaFileList.get(index));
mMediaManager.deleteFiles(fileToDelete, new CommonCallbacks.CompletionCallbackWithTwoParam<List<MediaFile>, DJICameraError>() {
@Override
public void onSuccess(List<MediaFile> x, DJICameraError y) {
DJILog.e(TAG, "Delete file success");
runOnUiThread(new Runnable() {
public void run() {
MediaFile file = mediaFileList.remove(index);

//Reset select view
lastClickViewIndex = -1;
lastClickView = null;

//Update recyclerView
mListAdapter.notifyItemRemoved(index);
}
});
}

@Override
public void onFailure(DJIError error) {
setResultToToast("Delete file failed");
}
});
}
}

In the code above, we implement the following features:

  1. In the downloadFileByIndex() method, we firstly check if the media type is either PANORAMA or SHALLOW_FOCUS by invoking the getMediaType() method of MediaFile, if not, continue to execute.

  2. Invoke the fetchFileData() method of MediaFile to fetch the media files' full resolution data from the SD card. In the onFailure() method, invoke the HideDownloadProgressDialog() method to hide the mDownloadDialog, also reset the value of the currentProgress variable to -1.

  3. In the onRateUpdate() method, we calculate the current download progress and save it to the tmpProgress variable. Then update the mDownloadDialog and currentProgress based on this variable. In the onStart() method, reset the currentProgress variable and invoke the ShowDownloadProgressDialog() method to show the mDownloadDialog.

  4. In the onSuccess() method, invoke the HideDownloadProgressDialog() method to hide the mDownloadDialog and reset the currentProgress variable.

  5. Moreover, in the deleteFileByIndex() method, we firstly create an ArrayList variable fileToDelete, then check if the size of the mediaFileList is bigger than the index. Next, invoke the add() method of ArrayList and to add the selected media file you want to delete. Invoke the deleteFiles() method of MediaManager() and pass the fileToDelete variable to delete media files from SD card. In the completion block, we override the onSuccess() method to reset the selected view, and update the listView with the removed item.

Lastly, implement the onClick() method of delete_btn, reload_btn and download_btn buttons as shown below:

case R.id.delete_btn:{
deleteFileByIndex(lastClickViewIndex);
break;
}
case R.id.reload_btn: {
getFileList();
break;
}
case R.id.download_btn: {
downloadFileByIndex(lastClickViewIndex);
break;
}

For more details of the implementation, please check the sample code of this tutorial on Github.

Now, we can test the features we have implemented so far. Build and run the project and install it to your Android device. If everything goes well, you should see something similar to the following gif animation:

Working on the Video Playback

Now, continue to implement the video playback feature of MediaManager. In the onDestroy() method, insert the following code below the lastClickView = null; :

if (mMediaManager != null) {
mMediaManager.stop(null);
mMediaManager.removeFileListStateCallback(this.updateFileListStateListener);
mMediaManager.removeMediaUpdatedVideoPlaybackStateListener(updatedVideoPlaybackStateListener);
mMediaManager.exitMediaDownloading();
if (scheduler!=null) {
scheduler.removeAllTasks();
}
}

Here, we invoke the stop() method of MediaManager to stop the playing video. Then invoke the removeMediaUpdatedVideoPlaybackStateListener() method to remove the listener. Moreover, invoke the removeFileListStateCallback() method to remove the file list state callback. Next, invoke the exitMediaDownloading() method to exit the MEDIA_DOWNLOAD mode and enter the SHOOT_PHOTO mode. Lastly, if the scheduler is not null, invoke the removeAllTasks() method to remove all the existing media tasks.

Next, insert the following code below the mMediaManager.addUpdateFileListStateListener(this.updateFileListStateListener); in the initMediaManager() method:

mMediaManager.addMediaUpdatedVideoPlaybackStateListener(this.updatedVideoPlaybackStateListener);

In the code above, invoke the addMediaUpdatedVideoPlaybackStateListener() method and pass the updatedVideoPlaybackStateListener variable to add the listener for video playback state update.

Furthermore, initialize the updatedVideoPlaybackStateListener variable and implement the updateStatusTextView() and addLineToSB() methods as shown below:

private MediaManager.VideoPlaybackStateListener updatedVideoPlaybackStateListener =
new MediaManager.VideoPlaybackStateListener() {
@Override
public void onUpdate(MediaManager.VideoPlaybackState videoPlaybackState) {
updateStatusTextView(videoPlaybackState);
}
};

private void updateStatusTextView(MediaManager.VideoPlaybackState videoPlaybackState) {
final StringBuffer pushInfo = new StringBuffer();

addLineToSB(pushInfo, "Video Playback State", null);
if (videoPlaybackState != null) {
if (videoPlaybackState.getPlayingMediaFile() != null) {
addLineToSB(pushInfo, "media index", videoPlaybackState.getPlayingMediaFile().getIndex());
addLineToSB(pushInfo, "media size", videoPlaybackState.getPlayingMediaFile().getFileSize());
addLineToSB(pushInfo,
"media duration",
videoPlaybackState.getPlayingMediaFile().getDurationInSeconds());
addLineToSB(pushInfo, "media created date", videoPlaybackState.getPlayingMediaFile().getDateCreated());
addLineToSB(pushInfo,
"media orientation",
videoPlaybackState.getPlayingMediaFile().getVideoOrientation());
} else {
addLineToSB(pushInfo, "media index", "None");
}
addLineToSB(pushInfo, "media current position", videoPlaybackState.getPlayingPosition());
addLineToSB(pushInfo, "media current status", videoPlaybackState.getPlaybackStatus());
addLineToSB(pushInfo, "media cached percentage", videoPlaybackState.getCachedPercentage());
addLineToSB(pushInfo, "media cached position", videoPlaybackState.getCachedPosition());
pushInfo.append("\n");
setResultToText(pushInfo.toString());
}
}

private void addLineToSB(StringBuffer sb, String name, Object value) {
if (sb == null) return;
sb.
append((name == null || "".equals(name)) ? "" : name + ": ").
append(value == null ? "" : value + "").
append("\n");
}

private void setResultToText(final String string) {
if (mPushTv == null) {
setResultToToast("Push info tv has not be init...");
}
MainActivity.this.runOnUiThread(new Runnable() {
@Override
public void run() {
mPushTv.setText(string);
}
});
}

Here, we implement the following features:

  1. When intialize the updatedVideoPlaybackStateListener, we override the onUpdate() method. Then invoke the updateStatusTextView() method by passing the videoPlaybackState variable as param to update the video playback status info in the mPushTv TextView.

  2. In the updateStatusTextView() method, we create the pushInfo variable firstly and invoke the addLineToSB() method to append video playback state info. Then invoke the setResultToText() method to show it it the mPushTv TextView.

Moreover, continue to implement the following methods:

private void playVideo() {
mDisplayImageView.setVisibility(View.INVISIBLE);
MediaFile selectedMediaFile = mediaFileList.get(lastClickViewIndex);
if ((selectedMediaFile.getMediaType() == MediaFile.MediaType.MOV) || (selectedMediaFile.getMediaType() == MediaFile.MediaType.MP4)) {
mMediaManager.playVideoMediaFile(selectedMediaFile, new CommonCallbacks.CompletionCallback() {
@Override
public void onResult(DJIError error) {
if (null != error) {
setResultToToast("Play Video Failed" + error.getDescription());
} else {
DJILog.e(TAG, "Play Video Success");
}
}
});
}
}

private void moveToPosition(){

LayoutInflater li = LayoutInflater.from(this);
View promptsView = li.inflate(R.layout.prompt_input_position, null);
AlertDialog.Builder alertDialogBuilder = new AlertDialog.Builder(this);
alertDialogBuilder.setView(promptsView);
final EditText userInput = (EditText) promptsView.findViewById(R.id.editTextDialogUserInput);
alertDialogBuilder.setCancelable(false).setPositiveButton("OK", new DialogInterface.OnClickListener() {
public void onClick(DialogInterface dialog, int id) {
String ms = userInput.getText().toString();
mMediaManager.moveToPosition(Integer.parseInt(ms),
new CommonCallbacks.CompletionCallback() {
@Override
public void onResult(DJIError error) {
if (null != error) {
setResultToToast("Move to video position failed" + error.getDescription());
} else {
DJILog.e(TAG, "Move to video position successfully.");
}
}
});
}
})
.setNegativeButton("Cancel", new DialogInterface.OnClickListener() {
public void onClick(DialogInterface dialog, int id) {
dialog.cancel();
}
});
AlertDialog alertDialog = alertDialogBuilder.create();
alertDialog.show();

}

Here, we implement the following features:

  1. In the playVideo() method, we firstly hide the mDisplayImageView image view. Then initialize the selectedMediaFile variable and check if the media type is either MOV or MP4. If so, invoke the playVideoMediaFile() method of MediaManager and pass the selectedMediaFile variable as the param to start the video playback. In the completion block, override the onResult() method to show toast message to inform users if there is any error.

  2. In the moveToPosition() method, we firstly create the promptsView from the layout of prompt_input_position. Then initialize the alertDialogBuilder and set its view as promptsView. After that, initialize the userInput variable from the promptsView. Invoke the setCancelable() method to set dialog as not cancelable. Also invoke the setPositiveButton() method to set a listener to be invoked when the positive button of the dialog is pressed. Moreover, override the onClick() method and invoke the moveToPosition() method of MediaManager to skip to the new position in seconds from the start of the video.

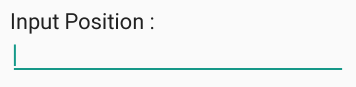
Furthermore, create a new XML Layout file and name it as "prompt_input_position.xml" in the layout folder, replace the code with the following:

<?xml version="1.0" encoding="utf-8"?>
<LinearLayout xmlns:android="http://schemas.android.com/apk/res/android"
android:id="@+id/layout_prompt"
android:layout_width="fill_parent"
android:layout_height="fill_parent"
android:orientation="vertical"
android:padding="10dp" >

<TextView
android:id="@+id/textView1"
android:layout_width="wrap_content"
android:layout_height="wrap_content"
android:text="Input Position : "
android:textAppearance="?android:attr/textAppearanceLarge" />

<EditText
android:id="@+id/editTextDialogUserInput"
android:layout_width="match_parent"
android:layout_height="wrap_content"
android:inputType="number">

<requestFocus />

</EditText>

</LinearLayout>

In the code above, we create a TextView and a EditText as shown below:

Lastly, let's implement the onClick() method of status_btn, play_btn, resume_btn, pause_btn, stop_btn and moveTo_btn as shown below:

case R.id.status_btn: {
if (mPushDrawerSd.isOpened()) {
mPushDrawerSd.animateClose();
} else {
mPushDrawerSd.animateOpen();
}
break;
}
case R.id.play_btn: {
playVideo();
break;
}
case R.id.resume_btn: {
mMediaManager.resume(new CommonCallbacks.CompletionCallback() {
@Override
public void onResult(DJIError error) {
if (null != error) {
setResultToToast("Resume Video Failed" + error.getDescription());
} else {
DJILog.e(TAG, "Resume Video Success");
}
}
});
break;
}
case R.id.pause_btn: {
mMediaManager.pause(new CommonCallbacks.CompletionCallback() {
@Override
public void onResult(DJIError error) {
if (null != error) {
setResultToToast("Pause Video Failed" + error.getDescription());
} else {
DJILog.e(TAG, "Pause Video Success");
}
}
});
break;
}
case R.id.stop_btn: {
mMediaManager.stop(new CommonCallbacks.CompletionCallback() {
@Override
public void onResult(DJIError error) {
if (null != error) {
setResultToToast("Stop Video Failed" + error.getDescription());
} else {
DJILog.e(TAG, "Stop Video Success");
}
}
});
break;
}
case R.id.moveTo_btn: {
moveToPosition();
break;
}

In the code above, we implement the following features:

  1. In the case of status_btn button, invoke the isOpened() method of the mPushDrawerSd variable to check if it's open, if so, invoke the animateClose() method of it to close the drawer with an animation. Otherwise, invoke the animateOpen() method of it to open the drawer with an animation.

  2. In the case of play_btn button, invoke the playVideo() method to start the video playback.

  3. In the case of resume_btn button, invoke the resume() method of MediaManager to resume the paused video and override the onResult() method and show toast message to inform user if there is any error.

  4. In the case of pause_btn button, invoke the pause() method of MediaManager to pause the playing video and override the onResult() method and show toast message to inform user if there is any error.

  5. In the case of stop_btn button, invoke the stop() method of MediaManager to stop the playing video and override the onResult() method and show toast message to inform user if there is any error.

  6. Lastly, for the case of moveTo_btn button, invoke the moveToPosition() method to skip to the new position in seconds from the start of the video.

We have gone through a long way in this tutorial, now let's build and run the project, connect the demo application to your Mavic Pro (Please check Run Application for more details) and check all the features we have implemented so far.

If everything goes well, you should see something similar to the following gif animations like this:

Summary

In this tutorial, you have learned how to use MediaManager to preview photos, play videos, download or delete files, you also learn how to get and show the video playback status info. By using the MediaManager, the users can get the metadata for all the multimedia files, and has access to each individual multimedia file. Hope you enjoy it!