Creating a Media Manager Application
If you come across any mistakes or bugs in this tutorial, please let us know by sending emails to dev@dji.com. Please feel free to send us Github pull request and help us fix any issues.
In this tutorial, you will learn how to use the DJIMediaManager to interact with the file system on the SD card of the aircraft's camera. By the end of this tutorial, you will have an app that you can use to preview photos, play videos, download or delete files and so on.
In order for our app to manage photos and videos, however, it must first be able to take and record them. Fortunately, by using DJI iOS UX SDK, you can implement shooting photos and recording videos functionalities easily with standard DJI Go UIs.
You can download the tutorial's final sample project from this Github Page.
We use Mavic Pro and iPad Air as an example to make this demo. For more details of customizing the layouts for iPhone devices, please check the tutorial's Github Sample Project.
Application Activation and Aircraft Binding in China
For DJI SDK mobile application used in China, it's required to activate the application and bind the aircraft to the user's DJI account.
If an application is not activated, the aircraft not bound (if required), or a legacy version of the SDK (< 4.1) is being used, all camera live streams will be disabled, and flight will be limited to a zone of 100m diameter and 30m height to ensure the aircraft stays within line of sight.
To learn how to implement this feature, please check this tutorial Application Activation and Aircraft Binding.
Implementing DJI Go Style Default Layout
Importing DJI SDK and UX SDK with CocoaPods
To create a new project in Xcode, choose Single View Application template for your project and press "Next", then enter "MediaManagerDemo" in the Product Name field and keep the other default settings. Once the project is created, import the DJI SDK and DJI UX SDK.
You can check Getting Started with DJI UX SDK tutorial to learn how to import the DJISDK.framework and DJIUXSDK.framework into your Xcode project.
Importing the DJIWidget
You can check Creating a Camera Application tutorial to learn how to download and import the DJIWidget into your Xcode project.
Working on the MainViewController and DefaultlayoutViewController
You can check this tutorial's Github Sample Code to learn how to implement the MainViewController to do SDK registration and update UIs and show alert views to inform users when DJI product is connected and disconnected. Also, you can learn how to implement shooting photos and recording videos functionalities with standard DJI Go UIs by using DUXDefaultLayoutViewcontroller of DJI UX SDK from the Getting Started with DJI UX SDK tutorial.
If everything goes well, you can see the live video feed and test the shoot photo and record video features like this:
Congratulations! We can move forward now.
Working on the UI of the Application
Now, to create a new file, choose the "Cocoa Touch Class" template and choose UIViewController as its subclass, name it as "MediaManagerViewController". We will use it to implement the Media Manager features.
Next, open the Main.storyboard file and drag and drop a new "View Controller" object from the Object Library and set its "Class" value as MediaManagerViewController.
Moreover, drag and drop a new "Container View" object in the MediaManagerViewController and set its ViewController's "Class" value as DUXFPVViewController, which contains a DUXFPVView and will show the video playback.
Furthermore, drag and drop a UIImageView object on top of the "Container View" and hide it as default, we will use it to show the downloaded photo. Moreover, drag and drop eleven UIButton objects, one UITextField, one UITableView and a UIActivityIndicatorView, place them in the following positions:
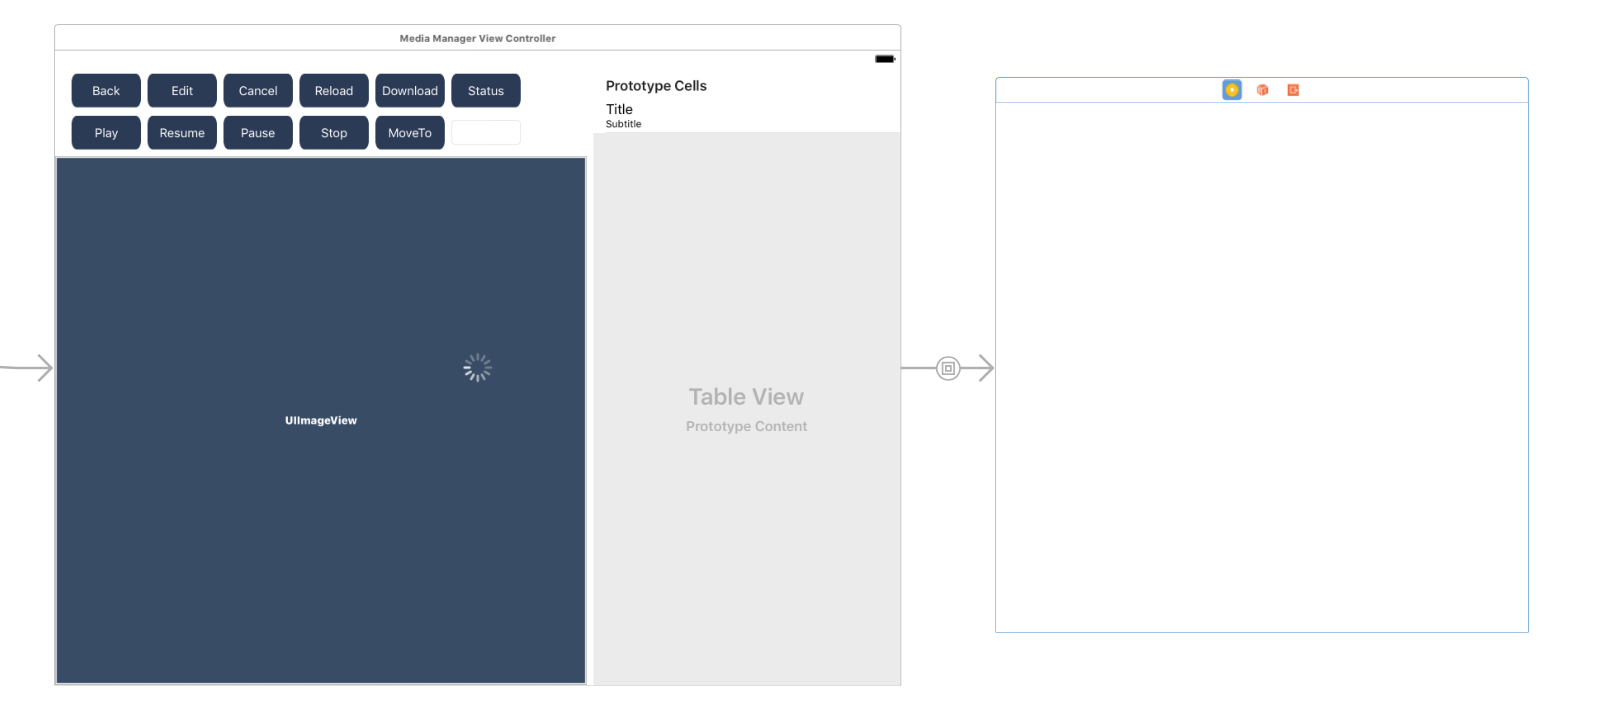
The layout of the UI elements is a bit complicated, for more details of the configuration, please check the Main.storyboard in this tutorial's Github Sample Project.
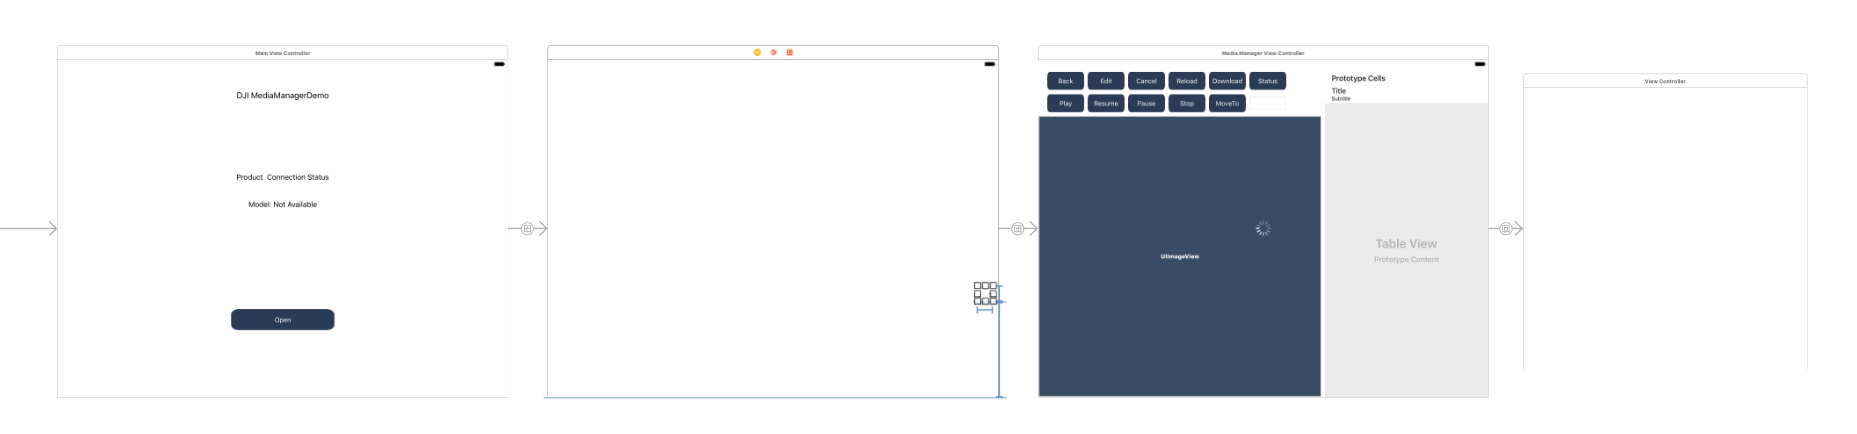
Lastly, drag and place a UIButton on the bottom right corner of the DefaultLayoutViewController view and create a segue to show the MediaManagerViewController when the user press the button.
If everything goes well, you should see the whole storyboard layout like this:
Once you finish the above steps, open the "DefaultLayoutViewController.m" file and replace the content with the followings:
|
In the code above, we create an IBOutlet property for the mediaDownloadBtn and set its image in the viewDidLoad method. You can get the "mediaDownload_icon.png" and "mediaDownload_icon_iPad.png" files from this tutorial's Github Sample Project.
Next, open the "MediaManagerViewController.m" file and replace the content with the followings:
|
In the code above, we implement the following things:
-
Firstly, we define the IBOutlet properties for the UI elements, like UIButton, UITableView, UITextField, etc.
-
Next, we implement the
viewDidLoadmethod, and invoke theinitDatamethod to disable thedeleteBtn,cancelBtn,reloadBtnandeditBtninitially. -
Lastly, we implement the IBAction methods for all the UIButtons. For the
backBtnActionmethod, we invoke thepopViewControllerAnimatedmethod of UINavigationController to go back to theDefaultLayoutViewController.
For the editBtnAction method, we make mediaTableView goes into editing mode by invoking setEditing:animated: method of UITableView. Then enable the deleteBtn and cancelBtn buttons, disable the editBtn button.
For the cancelBtnAction method, on contract, we disable the editing mode of mediaTableView and enable the editBtn button, also disable the deleteBtn and cancelBtn buttons. We will implement the other IBAction methods later.
Switching to Media Download Mode
In order to preview, edit or download the photos or videos files from the DJICamera, you need to use the DJIPlaybackManager or DJIMediaManager of DJICamera. Here, we use DJIMediaManager to demonstrate how to implement it.
Now, create a property of DJIMediaManager in the class extension part and implement the viewWillAppear: and viewWillDisappear: methods as shown below:
@property (nonatomic, weak) DJIMediaManager *mediaManager; |
- (void)viewWillAppear:(BOOL)animated |
In the code above, we implement the following things:
-
In the
viewWillAppearmethod, we firstly invoke thefetchCameramethod of DemoUtility class to fetch the DJICamera object. Then check if the camera is nil, if not set its delegate asMediaManagerViewController, also initialize themediaManagerand set its delegate asMediaManagerViewController. Furthermore, invoke thesetMode:withCompletion:method of DJICamera and pass theDJICameraModeMediaDownloadparam to switch the camera mode to media download mode. -
Similarly, in the
viewWillDisappearmethod, we also invoke thesetMode:withCompletion:method of DJICamera and pass theDJICameraModeShootPhotoparam to switch the camera mode to shoot photo mode. Then reset the delegates of DJICamera and DJIMediaManager. So when the user enter the MediaManagerViewController, the DJICamera will switch to media download mode automatically, when user exit back to the DefaultLayoutViewController, the DJICamera will switch to shoot photo mode.
Refreshing Media File List
Once we have finished the steps above, we can start to fetch the media files list from the Camera SD card and show them on the tableView.
Create the following properties in the class extension part and initialize it in the initData method:
@property(nonatomic, strong) NSMutableArray* mediaList; |
- (void)initData |
Next, create two new methods: loadMediaList and updateMediaList: and invoke the loadMediaList method at the bottom of viewWillAppear: method and reloadBtnAction: IBAction method:
- (void)viewWillAppear:(BOOL)animated |
The code above implements:
-
In the
loadMediaListmethod, we firstly show theloadingIndicatorand check thefileListStateenum value of theDJIMediaManager. If the value isDJIMediaFileListStateSyncingorDJIMediaFileListStateDeleting, we show an NSLog to inform users that the media manager is busy. For other values, we invoke therefreshFileListOfStorageLocation:method of theDJIMediaManagerto refresh the file list from the SD card. In the completion block, if there is no error, we should get a copy of the current file list by invoking thefileListSnapshotmethod ofDJIMediaManagerand initialize themediaFileListvariable. Then invoke theupdateMediaList:method and pass themediaFileList. Lastly, hide theloadingIndicatorsince the operation of refreshing the file list has finished. -
In the
updateMediaList:method, we firstly remove all the objects in themediaListarray and add new objects to it from themediaListarray. Next, create amediaTaskSchedulervariable and assign it with thetaskSchedulerproperty ofDJIMediaManager. Then, assignNOto thesuspendAfterSingleFetchTaskFailureproperty ofDJIFetchMediaTaskSchedulerto prevent from suspending the scheduler when an error occurs during the execution. Moreover, invoke theresumeWithCompletionmethod ofDJIFetchMediaTaskSchedulerto resume the scheduler, which will execute tasks in the queue sequentially.
Furthermore, create a for loop to loop through all the DJIMediaFile variables in the mediaList array and invoke the taskWithFile:content:andCompletion: method of DJIFetchMediaTaskScheduler by passing the file variable and DJIFetchMediaTaskContentThumbnail value to ask the scheduler to download the thumbnail of the media file.
In the completion block, we invoke the reloadData method of UITableView to reload everything in the table view. After that, invoke the moveTaskToEnd method to push the task to the back of the queue and be executed after the executing task is complete.
Lastly, we enable the reloadBtn and editBtn buttons.
Once you finish the steps above, you should implement the following UITableView methods:
- (NSInteger)numberOfSectionsInTableView:(UITableView *)tableView { |
In the code above, we implement the following features:
- Return
1as the section number of the table view. - Return the
countvalue of themediaListarray as the number of rows in section. - If the
UITableViewCellselected, set itsaccessoryTypeasUITableViewCellAccessoryCheckmarkto show a checkmark on the right side of the table view cell, otherwise, set theaccessoryTypeasUITableViewCellAccessoryNoneto hide the checkmark.
Next, get the DJIMediaFile object in the self.mediaList array by using the indexPath.row index. Lastly, update the textLabel, detailTextLabel and imageView properties of table view cell according to the DJIMediaFile object. For the "dji.png" file, you can get it from the tutorial's Github Sample project.
Now, to build and run the project, connect the demo application to a Mavic Pro (Please check the Run Application for more details) and enter the MediaManagerViewController, you should be able to see something similar to the following screenshot:
Downloading and Editing the Media Files
After showing all the media files in the table view, we can start to implement the features of downloading and deleting media files.
Now, continue to create the following properties in the class extension part:
@property(nonatomic, strong) DJIAlertView* statusAlertView; |
Next, initialize the properties in the initData method:
- (void)initData |
Moreover, implement the table View delegate method as shown below:
- (void)tableView:(UITableView *)tableView didSelectRowAtIndexPath:(NSIndexPath *)indexPath { |
In the code above, we assign the selectedCellIndexPath property with the indexPath value. Then get the current selected currentMedia object from the mediaList array using the indexPath param of this method. Moreover, check if the currentMedia object is the same as self.selectedMedia property.
If not, reset the previousOffset and fileData properties and update the self.selectedMedia object with the currentMedia. Lastly, invoke the reloadData method to reload everything in the table view.
Once you finish the steps above, we continue to implement the downloadBtnAction: method as shown below:
- (IBAction)downloadBtnAction:(id)sender { |
In the code above, we implement the following features:
-
We firstly create a BOOL variable
isPhotoand assign value to it by checking themediaTypeenum value of theDJIMediaFile. For more details of theDJIMediaTypeenum, please check the "DJIMediaFile.h" file. -
Next, if the
statusAlertViewis nil, we initialize it by invoking theshowAlertViewWithMessage:titles:action:method ofDJIAlertView. Here we create a alertView with one button named "Cancel". If user press on the "Cancel" button of the alertView, we invoke thestopFetchingFileDataWithCompletion:method ofDJIMediaFileto stop the fetch file task. -
Furthermore, invoke the
fetchFileDataWithOffset:updateQueue:updateBlock:method ofDJIMediaFileto fetch the media file's full resolution data from the SD card. The full resolution data could be either image or video. Inside the completion block, if there is an error, update message of thestatusAlertViewto inform users and dismiss the alert view after 2 seconds. If there is no error and the media file is a photo, initialize thefileDataproperty or appenddatato it by checking if it is nil.
Next, accumulate the value of the previousOffset property by adding the length of the data param. Calculate the percentage of the current download progress and assign the value to the progress variable. Also, update the message of the statusAlertView to inform users of the download progress. Furthermore, check if the download has completed and dismiss the alert view.
Lastly, check if the media file is a photo, and invoke the showPhotoWithData: and savePhotoWithData: methods to show the full resolution photo and save it to the iOS Photo Library.
You can check the implementations of the showPhotoWithData: and savePhotoWithData: methods below:
-(void) showPhotoWithData:(NSData*)data |
In the code above, we implement the following features:
-
In the
showPhotoWithData:method, we check if thedatais not nil and create aUIImageobject from it. Then check if the createdimageis not nil and show it on thedisplayImageViewobject. -
Similarly, in the
savePhotoWithData:method, we create aUIImageobject from thedataparam and invoke theUIImageWriteToSavedPhotosAlbum()method to save the image to the photos album. -
In the selector method, we firstly create a
NSStringobject and set its value by checking if there is an error. Next, show thestatusAlertViewto inform the users of the message and dismiss the alert view when the users press on the Dismiss button.
Once you have finished the steps above, we can continue to implement the feature of deleting media files. Here we should implement the delegate methods of UITableView as shown below:
-(BOOL)tableView:(UITableView *)tableView canEditRowAtIndexPath:(NSIndexPath *)indexPath |
The code above implements:
-
In the
tableView:canEditRowAtIndexPath:method, returnYESto allow the swipe gesture to delete the table view cell. -
In the
tableView:commitEditingStyle:forRowAtIndexPath:method, we get thecurrentMediaobject from themediaListarray firstly. Next, invoke thedeleteFiles:withCompletion:method ofDJIMediaManagerto delete the select media file. Inside the completion block, if there is an error, show an alert view to inform user of the error description. If not, remove the deleted media file from themediaListarray and invoke thedeleteRowsAtIndexPaths:withRowAnimation:method ofmediaTableViewto remove the table view cell too.
Now, to build and run the project, connect the demo application to a Mavic Pro and enter the MediaManagerViewController, try to download an image file from the SD card, display and save it to the photos album. Also, try to swipe right on the table view cell and delete the media file from the table view. If everything goes well, you should be able to see something similar to the following gif animation:
Working on the Video Playback
After you finish the steps above, you should know how to download and display the image media file using DJIMediaManager, we can continue to implement the Video Playback features.
Now, implement the following IBAction methods:
- (IBAction)playBtnAction:(id)sender { |
In the code above, we implement the following features:
-
In the
playBtnAction:method, we firstly hide thedisplayImageViewimage view. Then check themediaTypeenum value of theselectedMediaobject to see if the selected media file is a video. Furthermore, update theplaceholderstring of thepositionTextFieldwith the video duration and invoke theplayVideo:withCompletion:method ofDJIMediaManagerto start playing the video. -
In the
resumeBtnAction:method, we invoke theresumeWithCompletion:method ofDJIMediaManagerto resume the paused video. -
In the
pauseBtnAction:method, we invoke thepauseWithCompletion:method ofDJIMediaManagerto pause the playing video. -
In the
stopBtnAction:method, we call thestopWithCompletion:method ofDJIMediaManagerto stop the playing video. -
In the
moveToPositionAction:method, we get the text value of thepositionTextFieldand convert it to an NSUInteger valuesecond. Then invoke themoveToPosition:withCompletion:method ofDJIMediaManagerto skip to the input position in seconds from the start of the video. Inside the completion block, we clean up the text content of thepositionTextField.
Lastly, we can show the video playback state info by implementing the following methods:
- (void)initData |
In the code above, we implement the following features:
- At the bottom of the
initDatamethod, we initializestatusViewand hide it. For more details of theDJIScrollView, please check the "DJIScrollView.h" and "DJIScrollView.m" files in the tutorial's Github Sample project. - In the
showStatusBtnAction:method, show thestatusViewwhen the users press the Status button. - Implement the delegate method of
DJIMediaManagerDelegate. We create astateStrNSMutableString variable and append different string values to it. LikefileName,durationInSecondsandvideoOrientationof theDJIMediaFile, for more details, please check the "DJIMediaFile" class. Lastly, invoke thewriteStatusmethod ofDJIScrollViewto show thestateStrNSMutableString in thestatusTextViewofDJIScrollView. - In the
statusToString:andorientationToString:methods, return specific NSString values according to the values of theDJIMediaVideoPlaybackStatusandDJICameraOrientationenums.
Congratulations! You have finished all the features of this demo. Now build and run the project, connect the demo application to a Mavic Pro and enter the MediaManagerViewController, try to play with the Video Playback features. If everything goes well, you should be able to see something similar to the following gif animation:

Summary
In this tutorial, you have learned how to use DJIMediaManager to preview photos, play videos, download or delete files, you also learn how to get and show the video playback status info. By using the DJIMediaManager, the users can get the metadata for all the multimedia files, and has access to each individual multimedia file. Hope you enjoy it!