
AR Projection
1. Feature Overview
AR projection draws annotations onto the aircraft's live video feed in real time, letting the operator see target points, warning lines, no-fly zones, and other information directly in the first-person view. Every annotation is anchored to a real-world coordinate (latitude / longitude / altitude, WGS-84). The system projects it onto the corresponding pixel of the video feed based on gimbal attitude, lens focal length, and aircraft position, so annotations follow the viewpoint naturally.
There are two ways to overlay spatial annotations on Pilot: AR projection (this tutorial) draws annotations onto the video feed (first-person view, not persisted); the map widget draws annotations onto the map (top-down 2D, persistable, see the Map Widget documentation). The two target different views and can be used together. This tutorial focuses on AR projection.
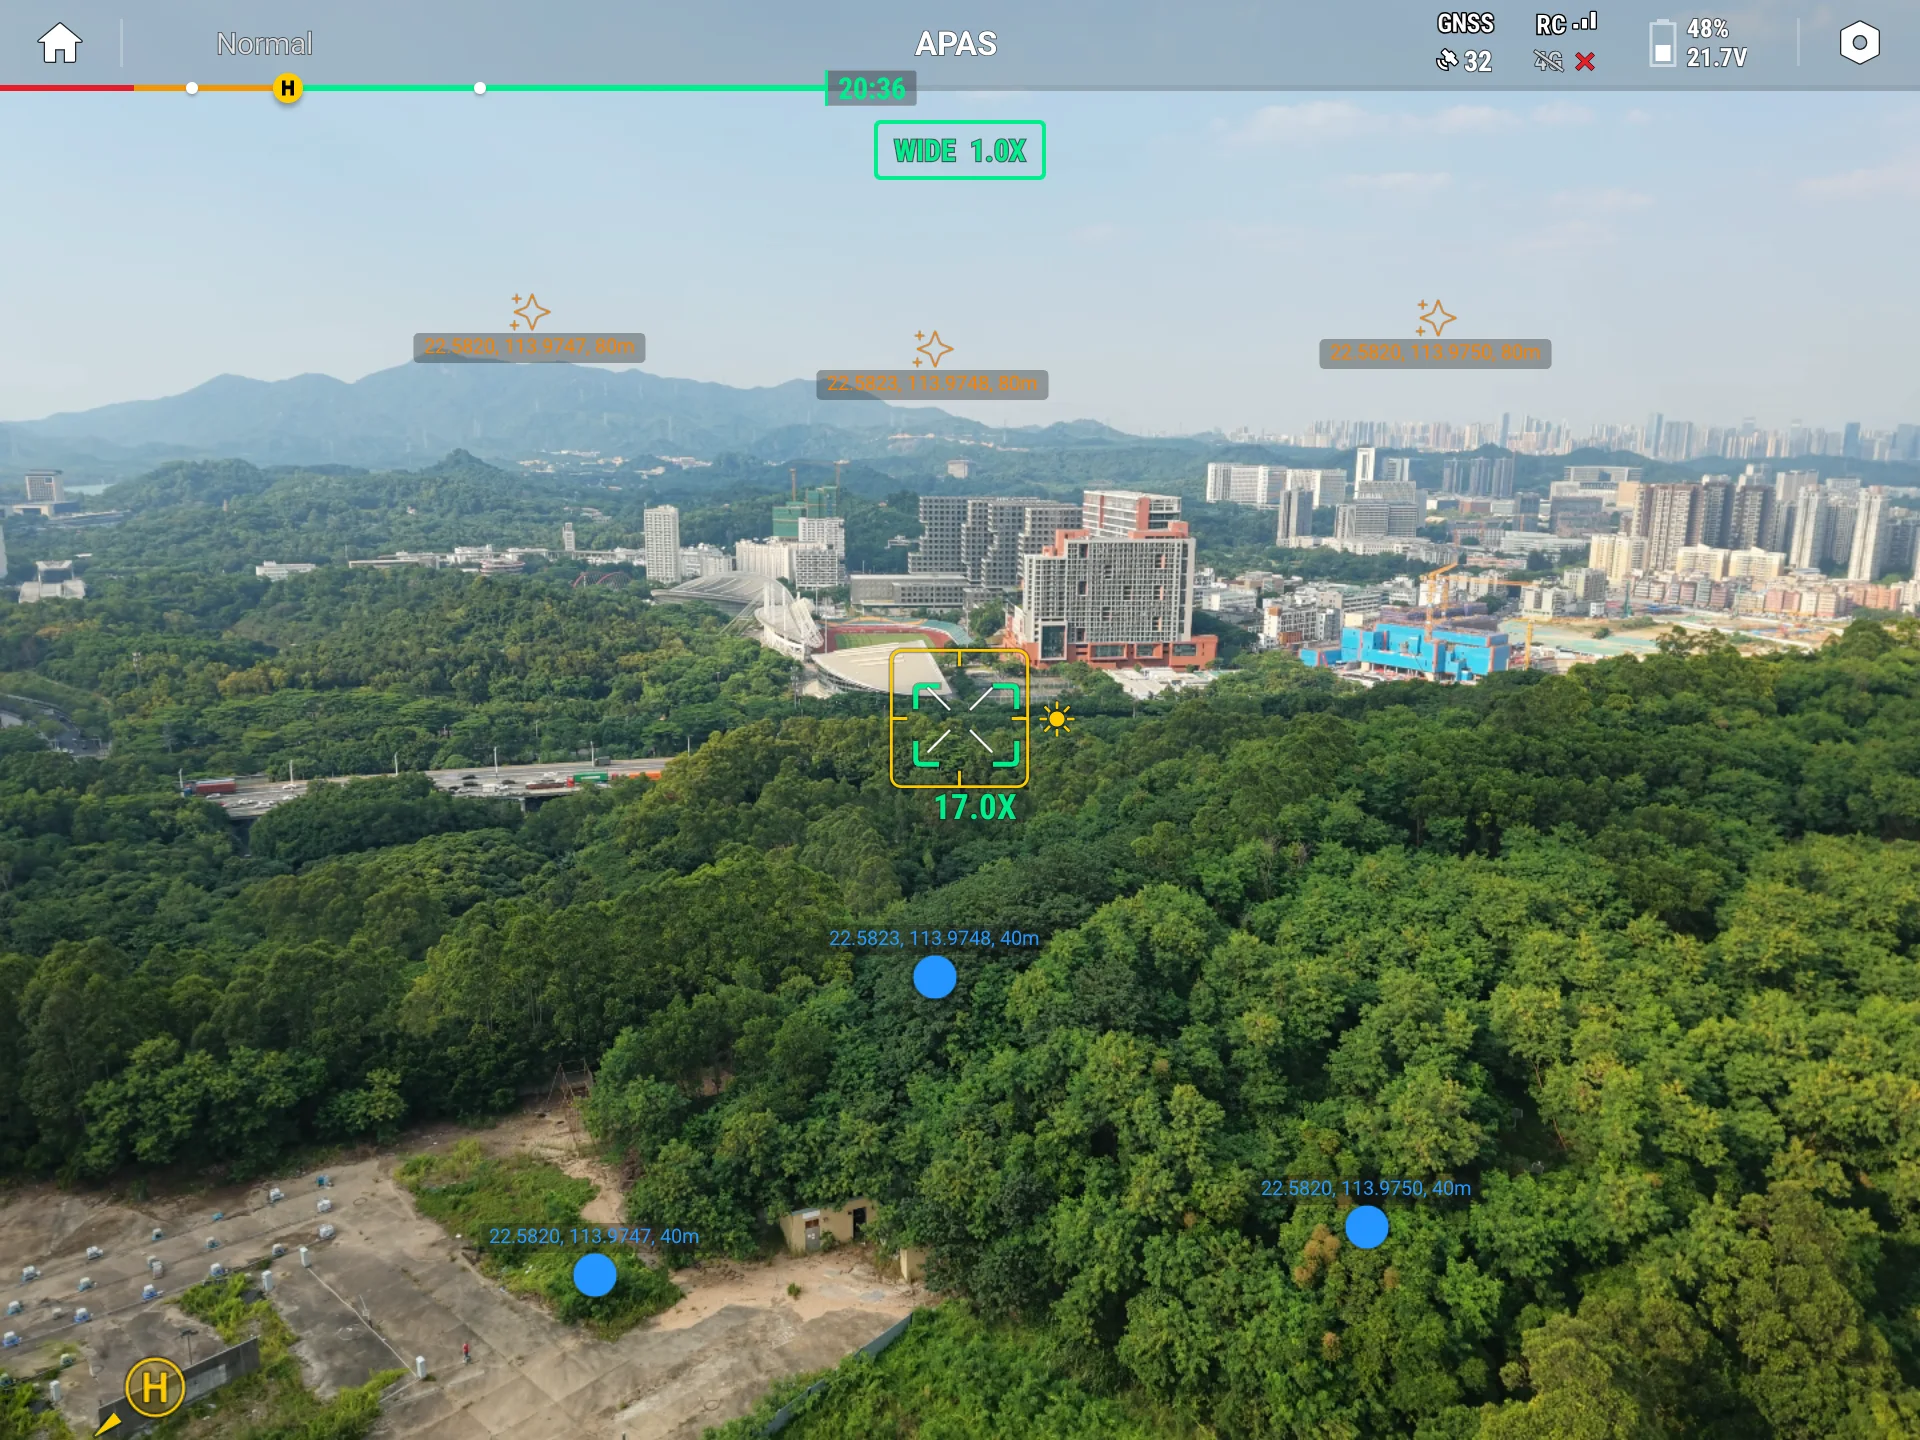
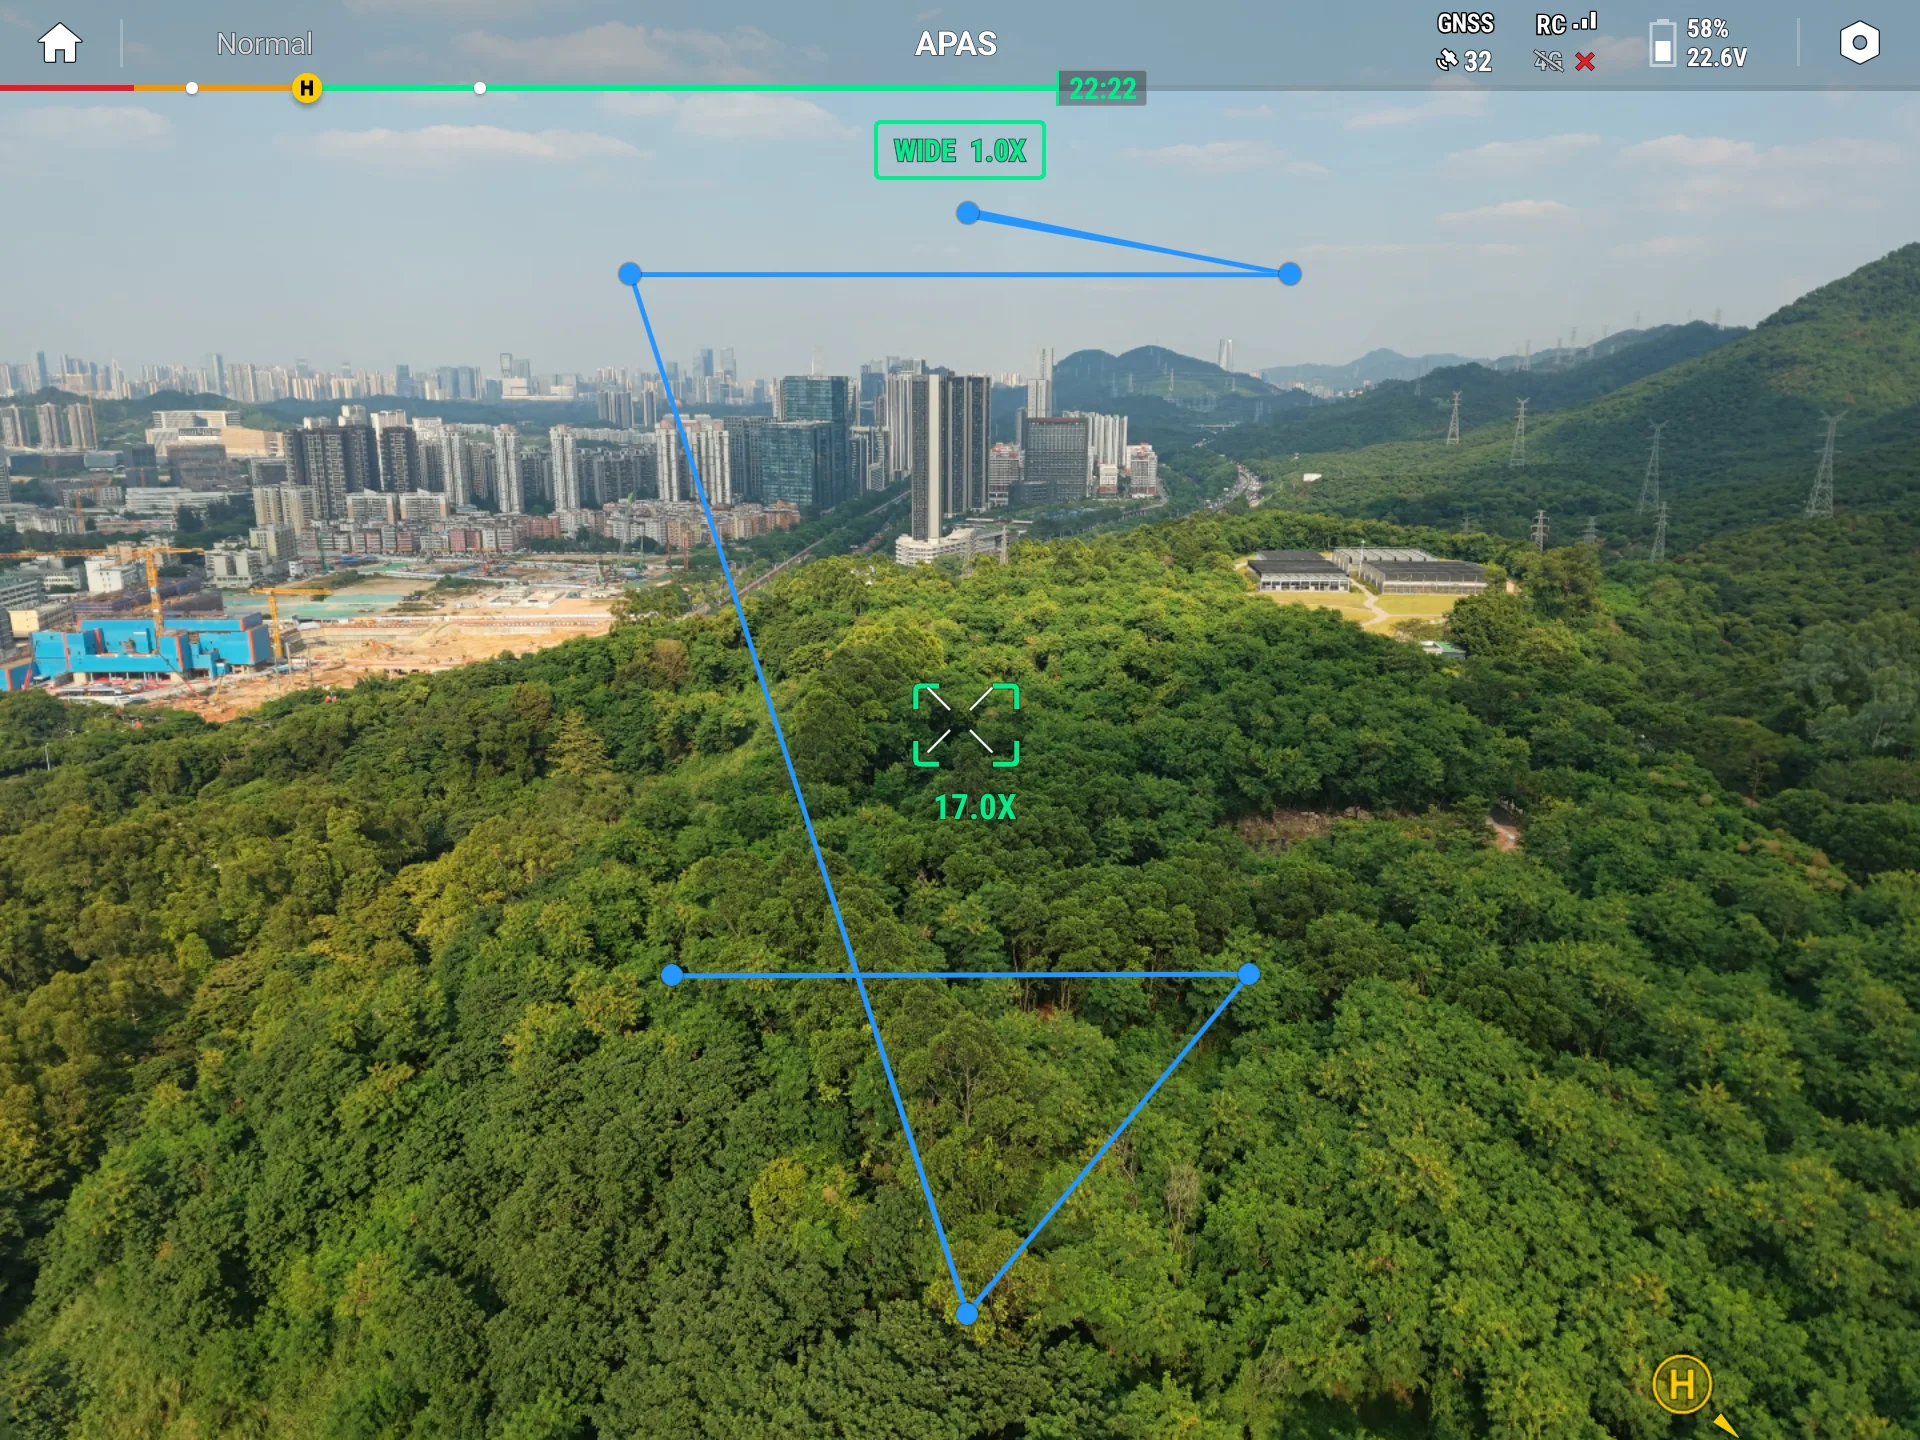
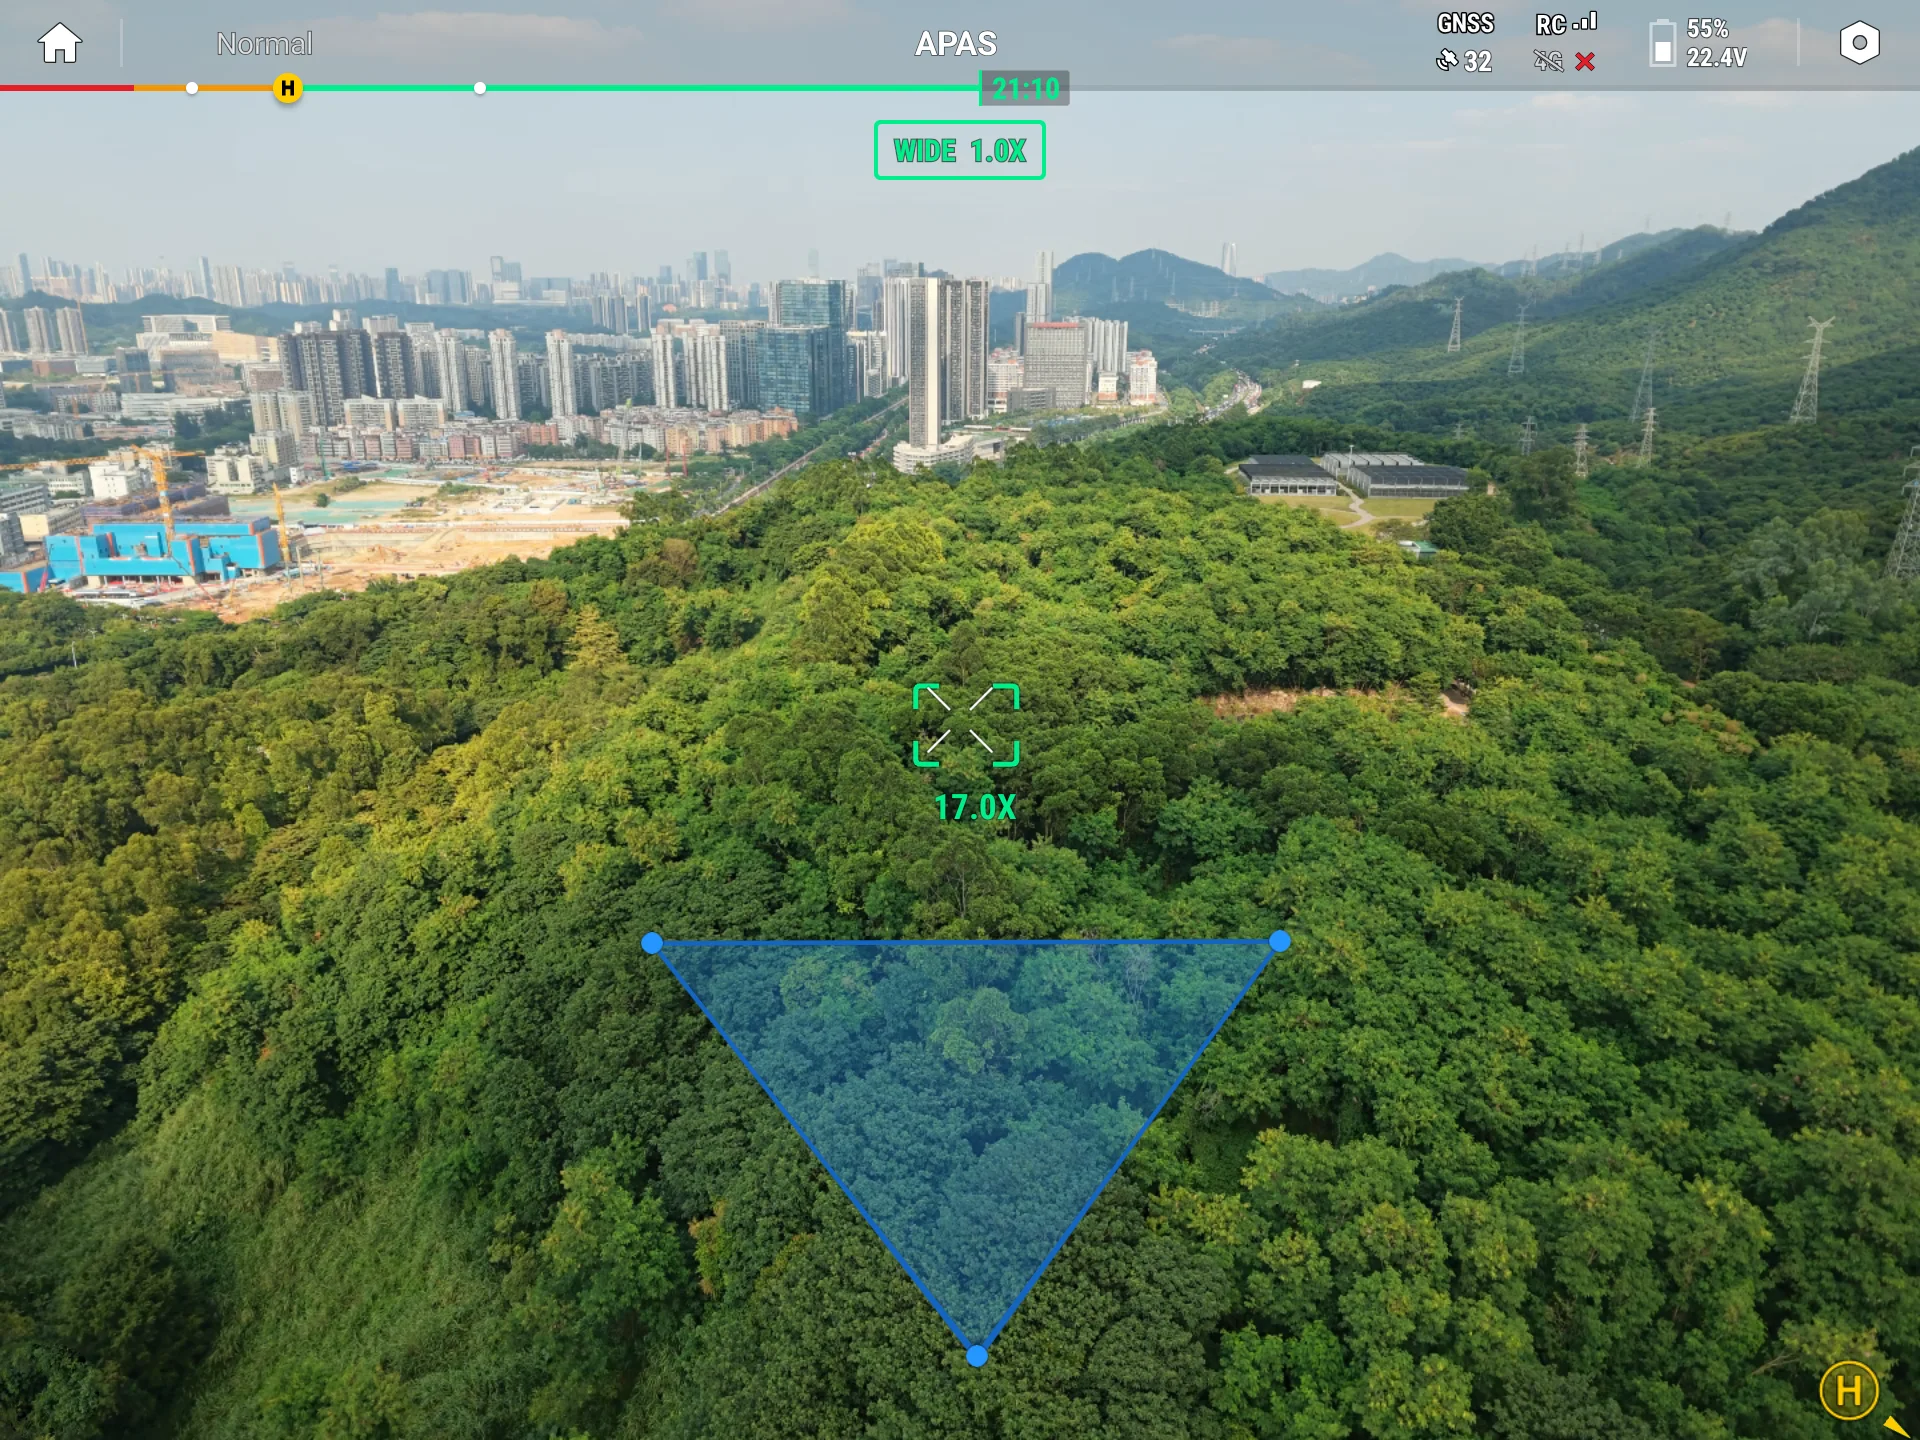
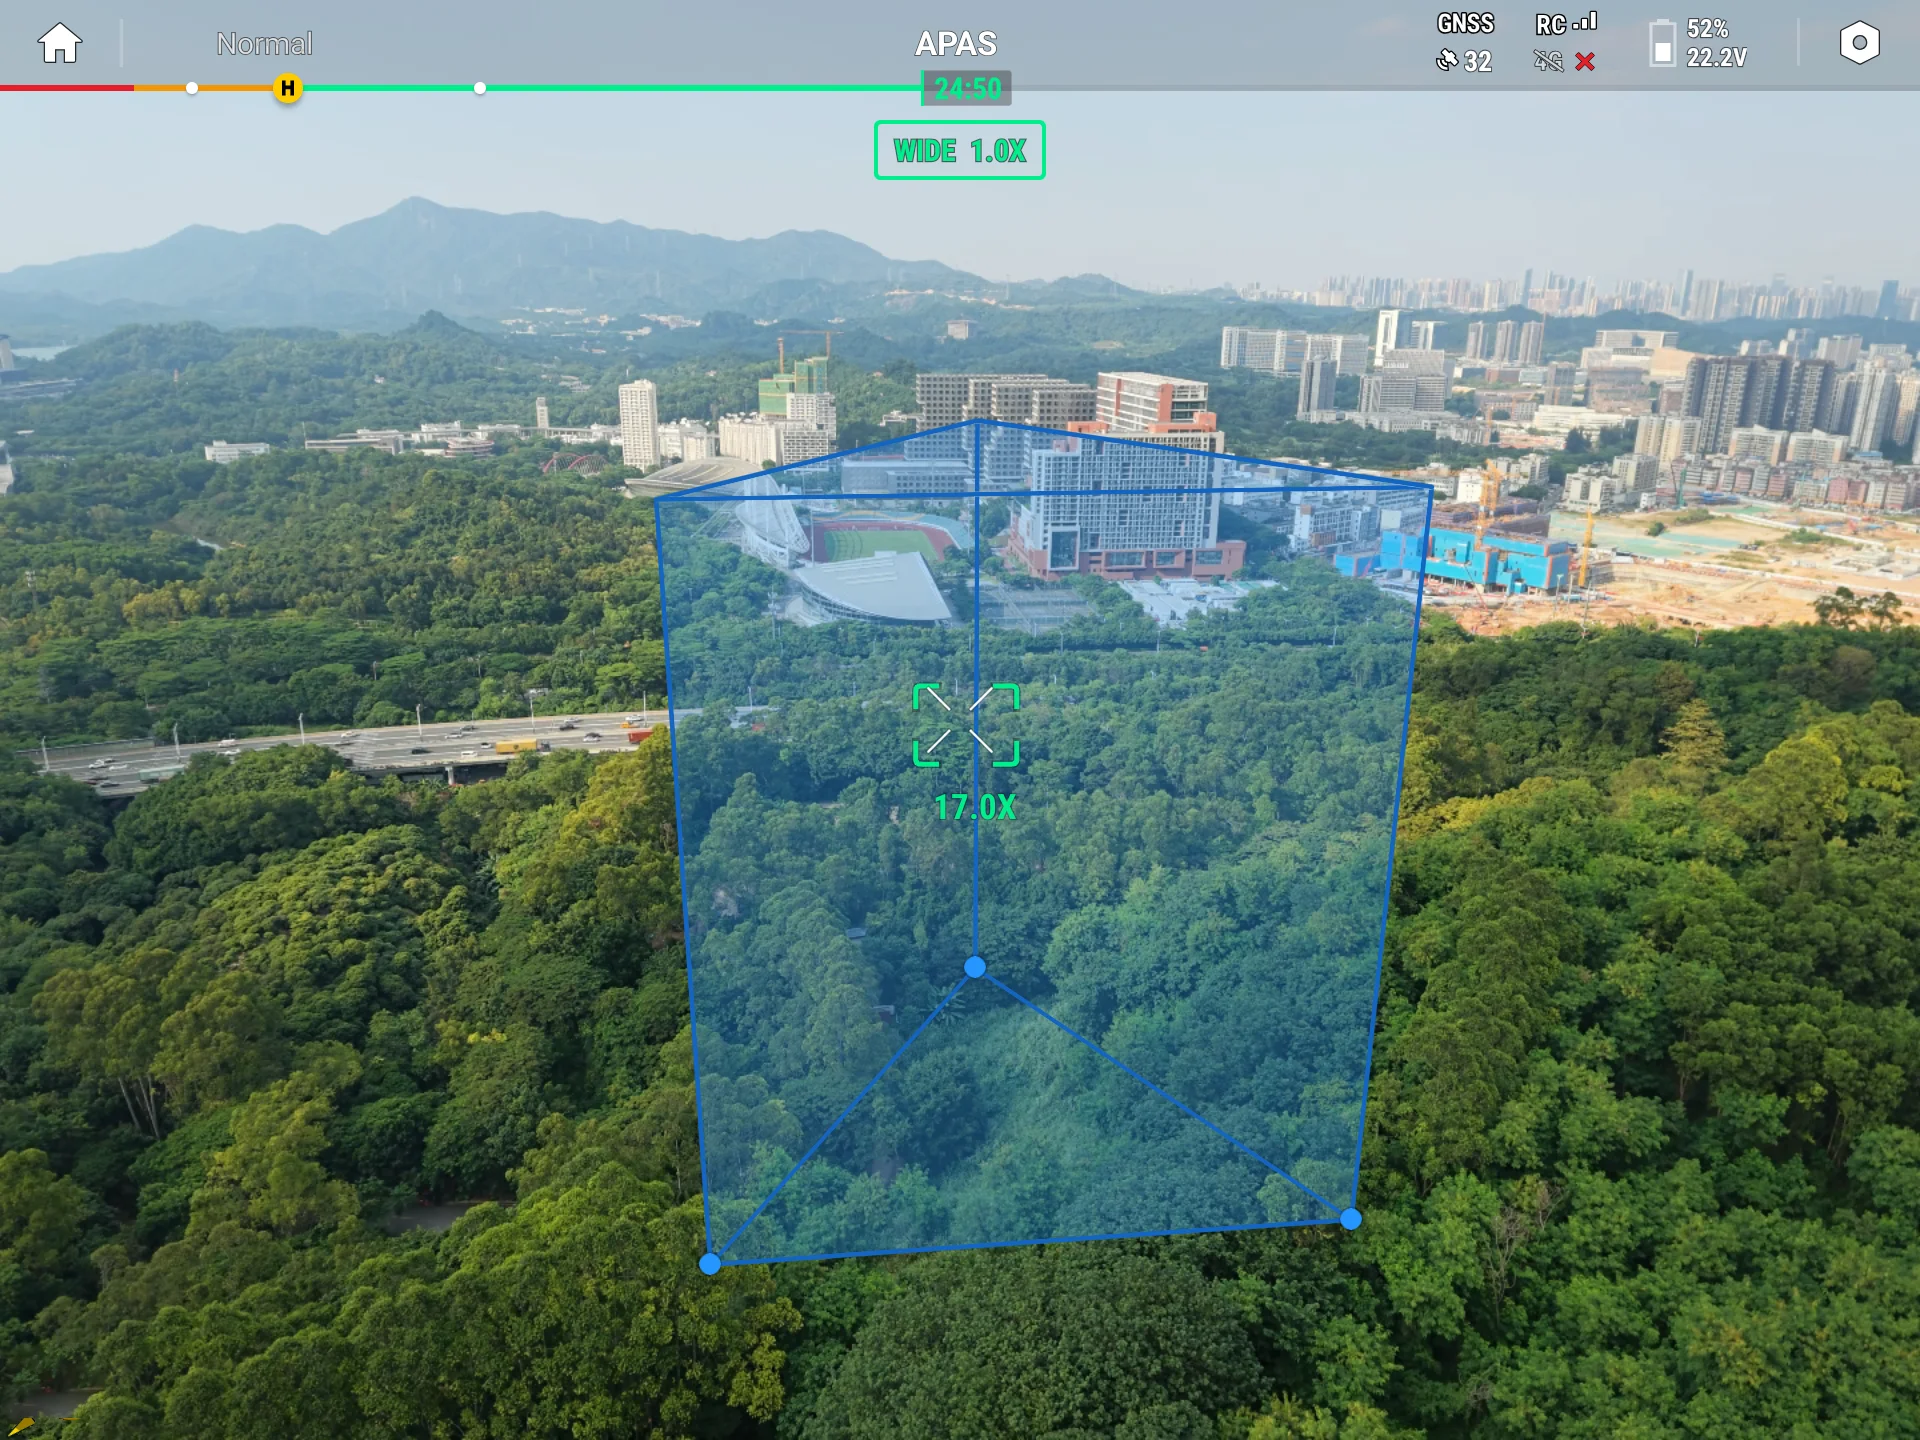
1.1 Capability Overview
| AR Capability | Description |
|---|---|
| AR point | Project an icon and text at a given location |
| AR line | Project a polyline with endpoints at given locations |
| AR polygon | Project a polygon face or an extruded prism |
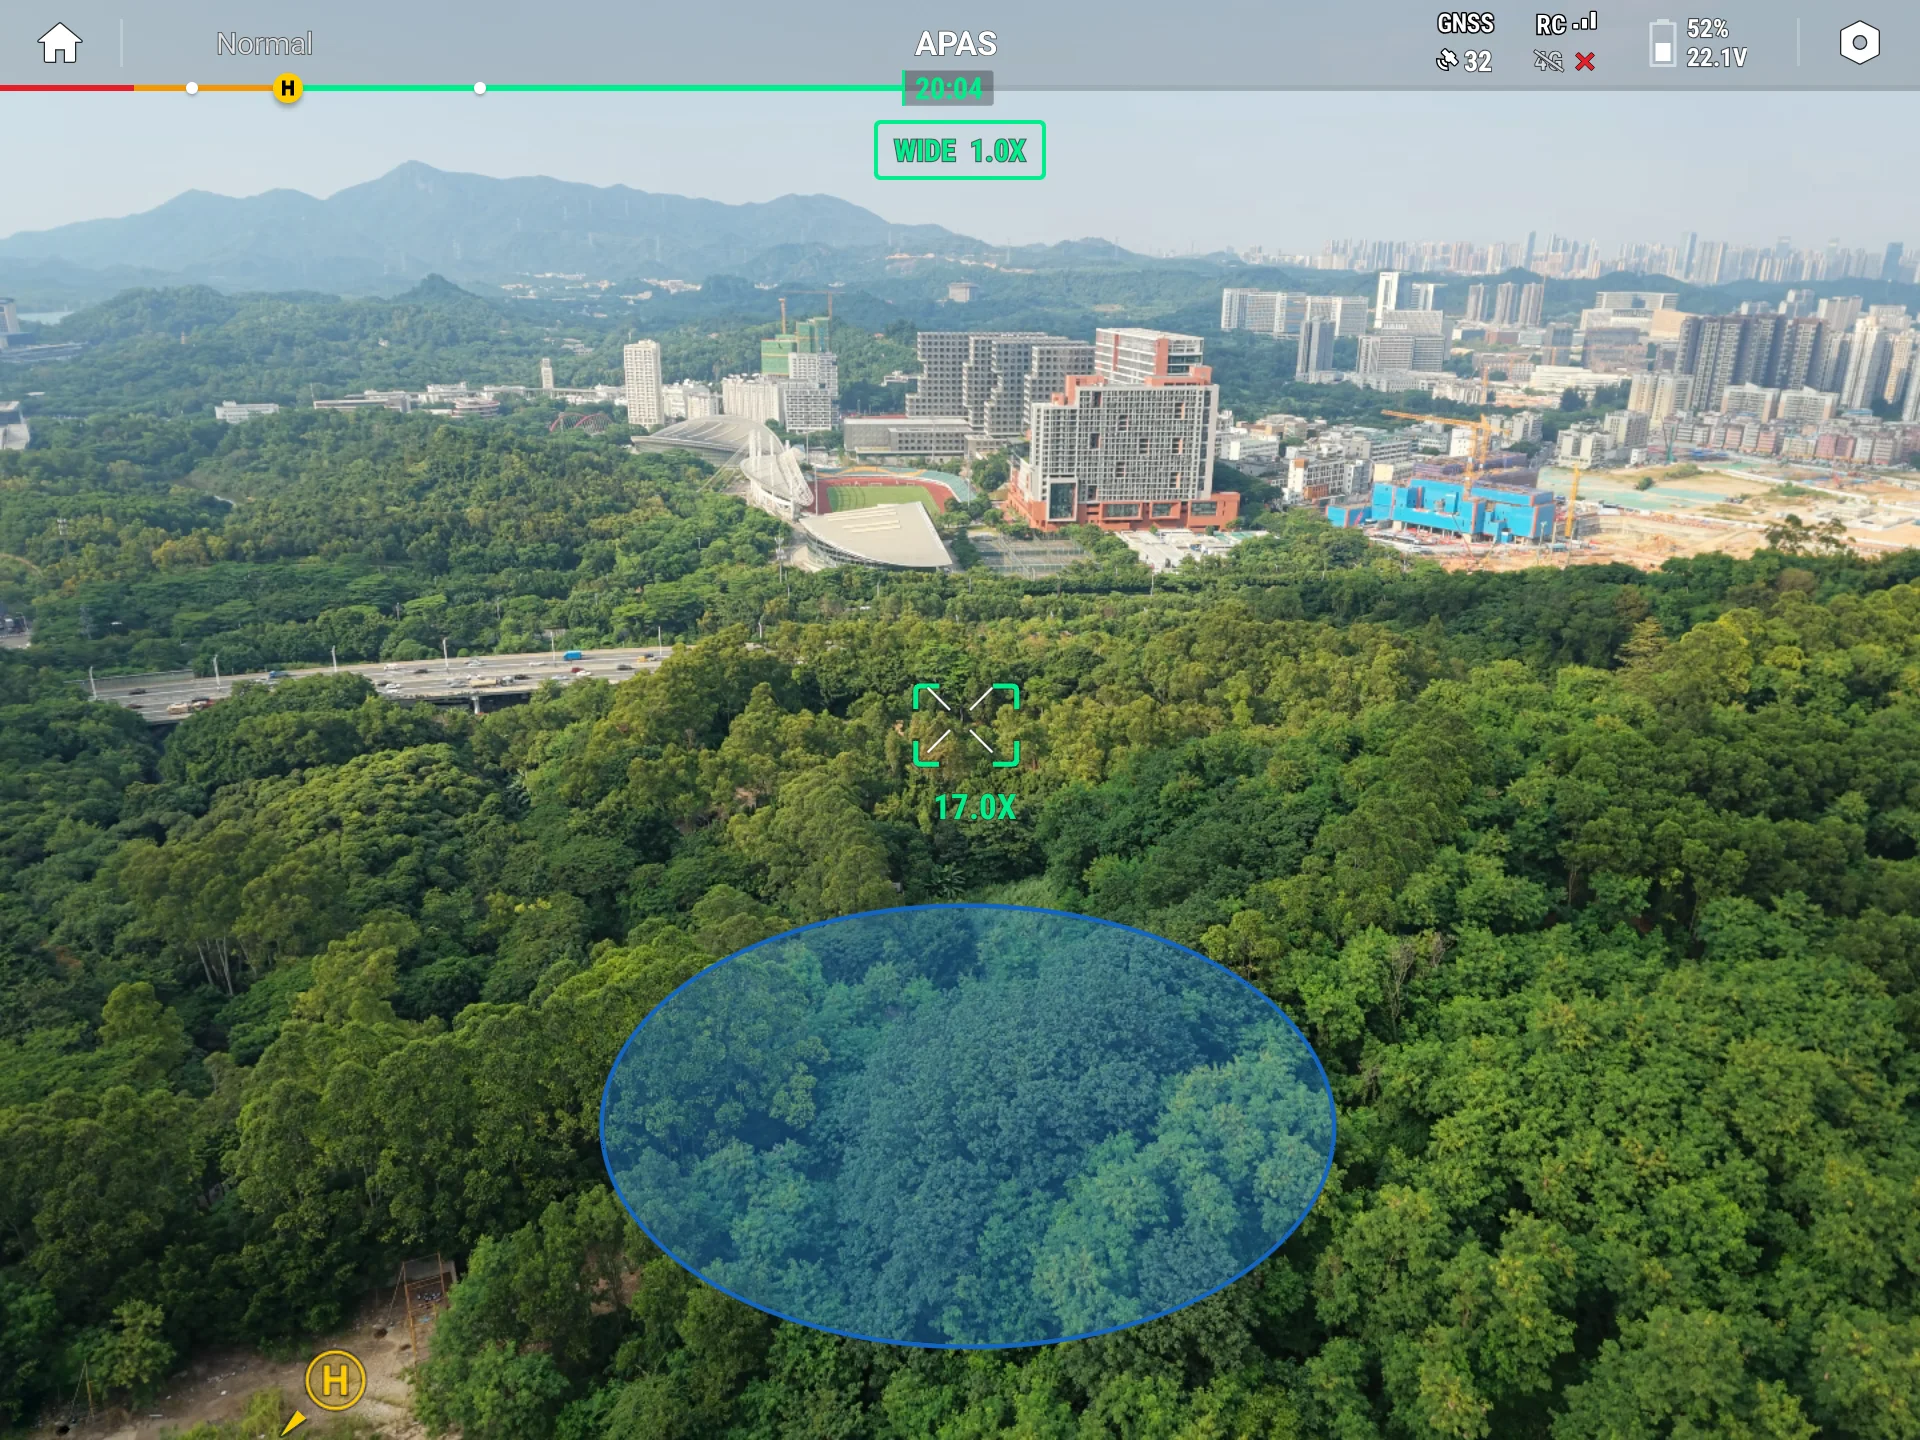
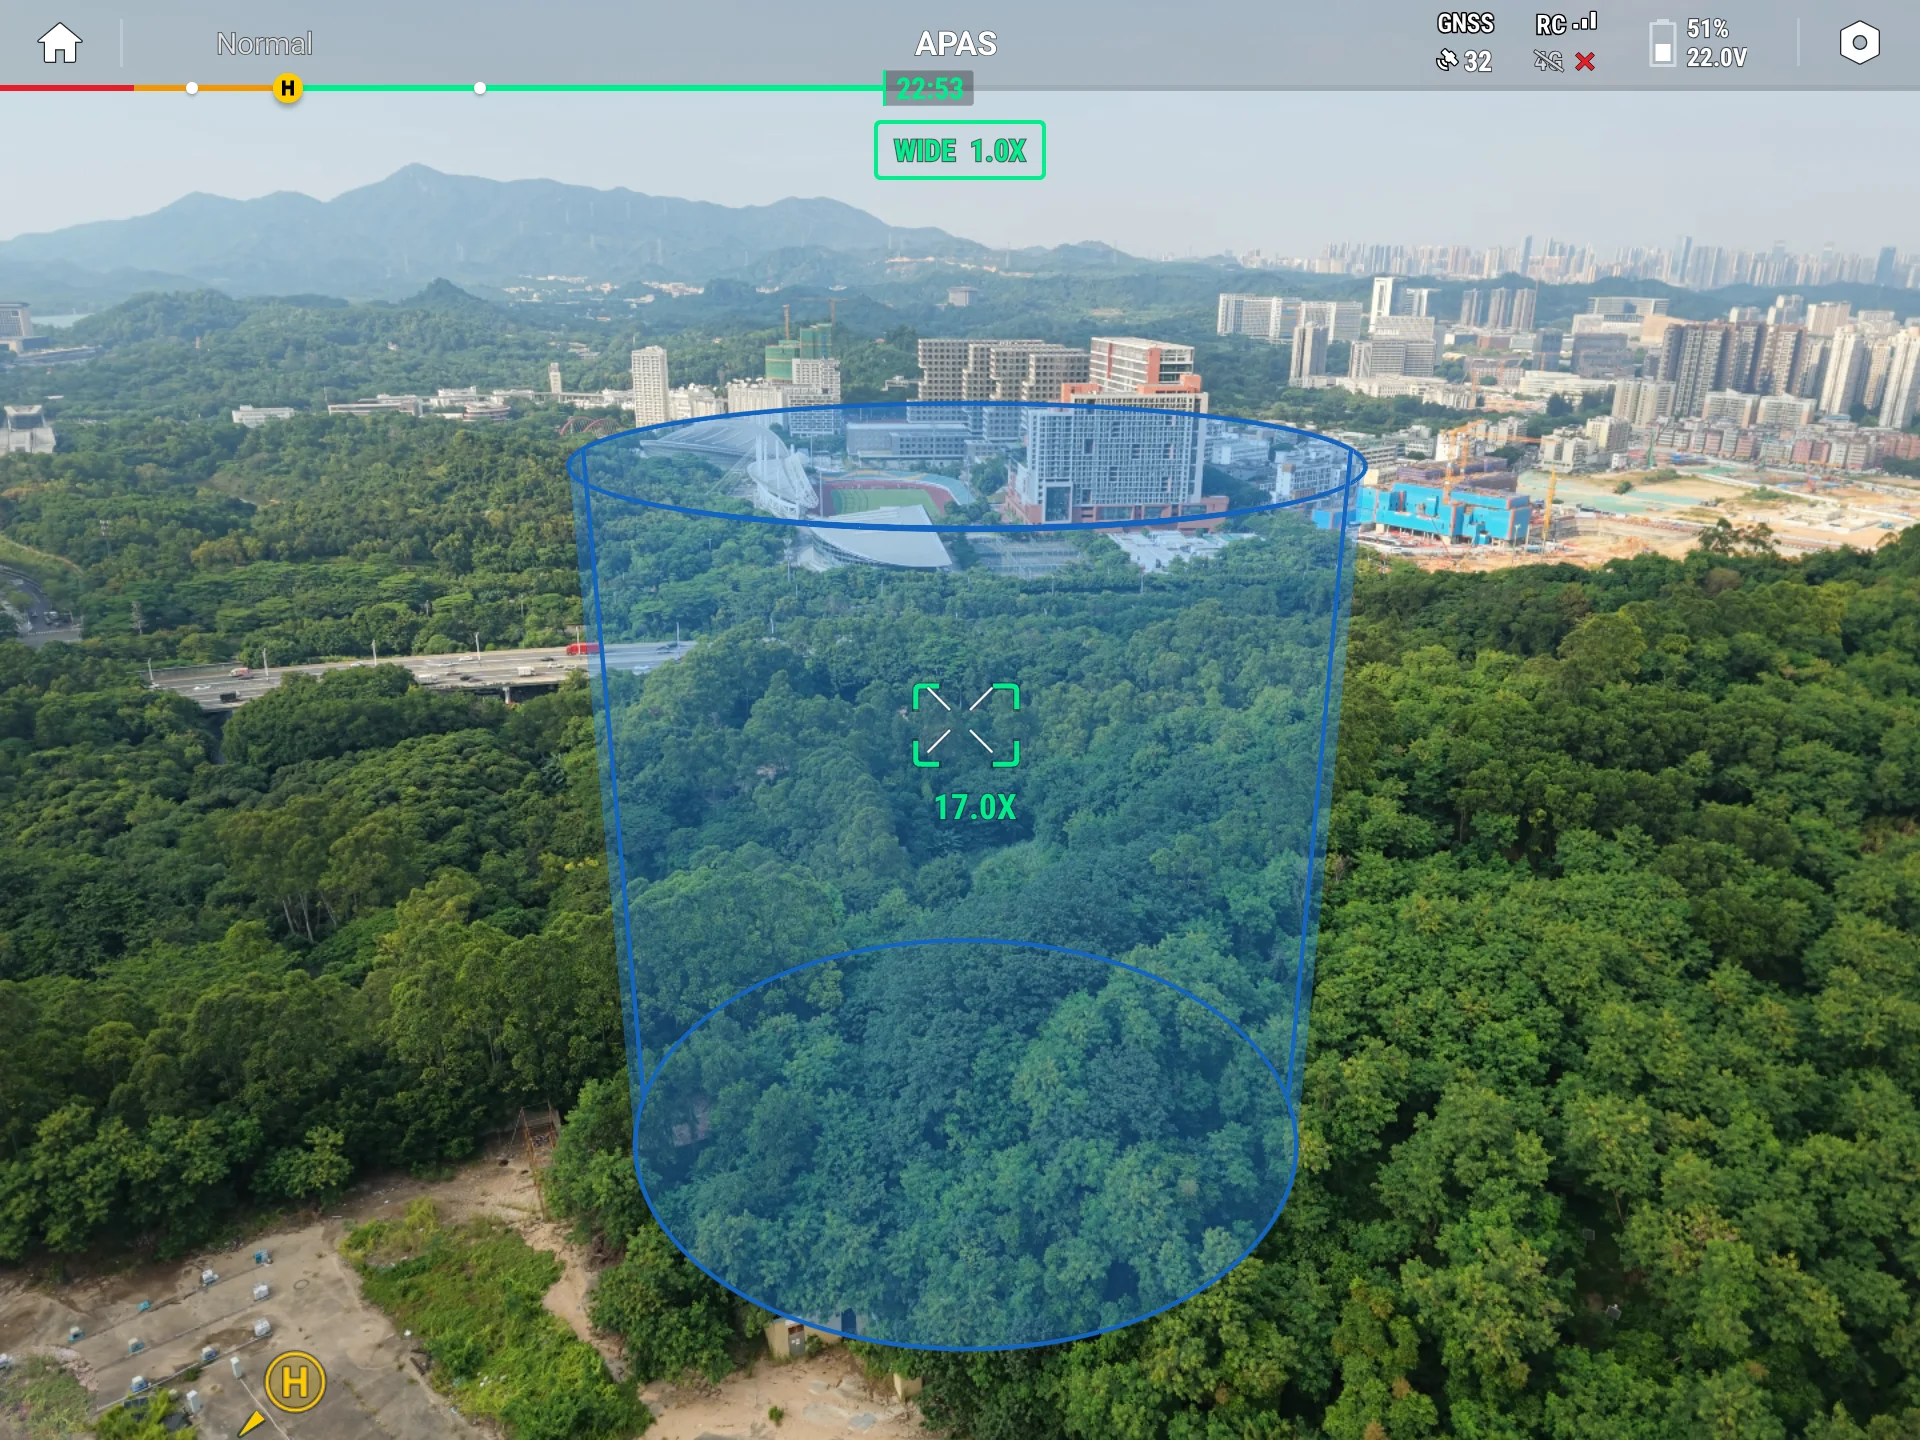
| AR circle | Project a circle or a cylinder |
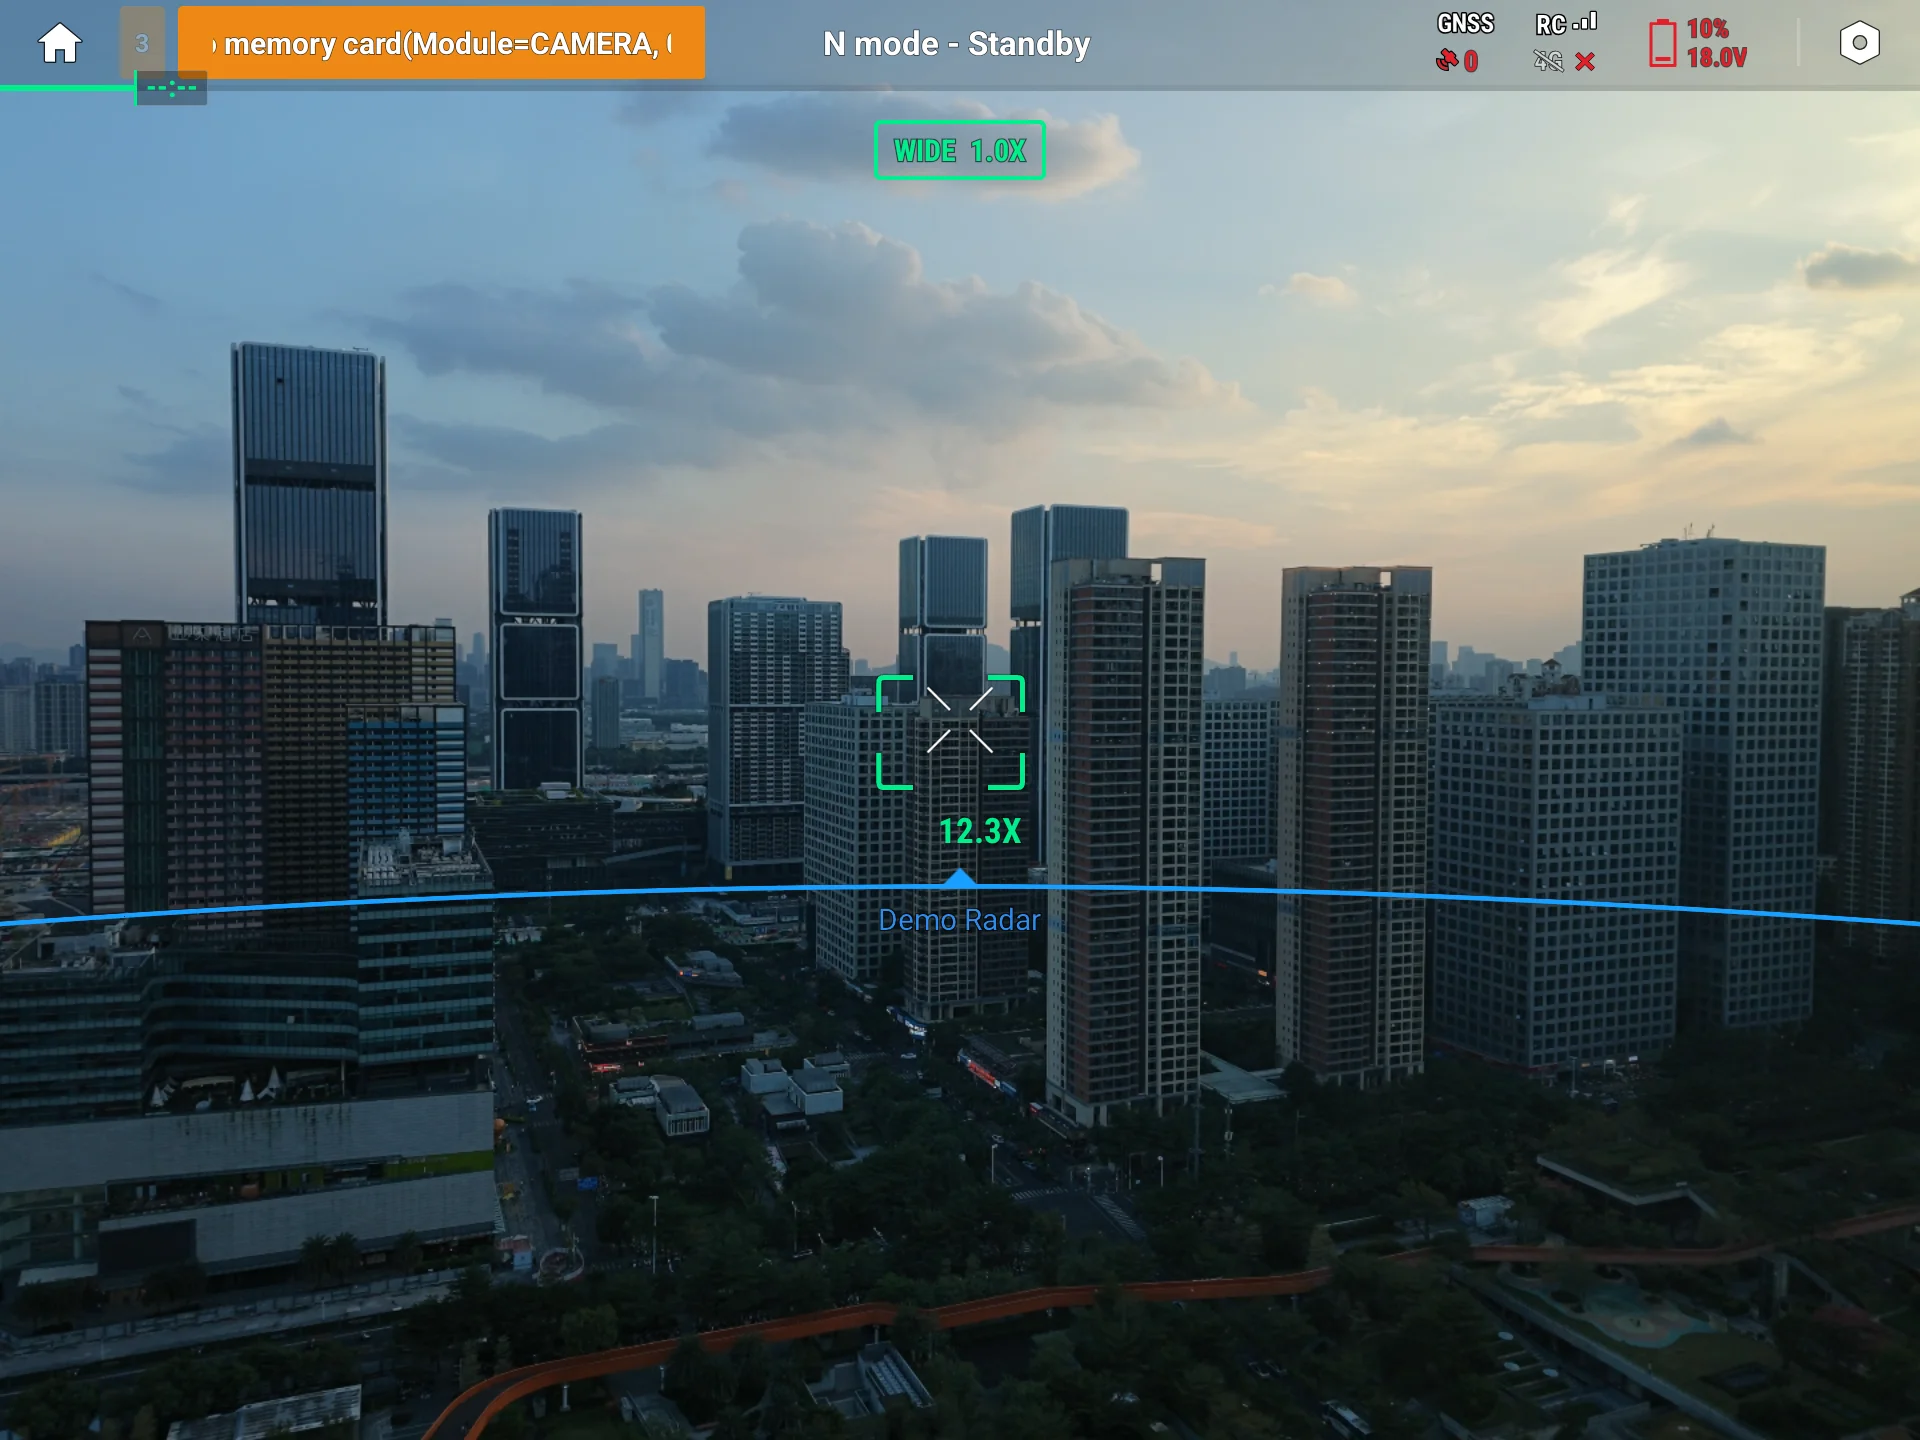
| AR radar scan range | Draw the aircraft's radar scan range on the video feed |
1.2 Use Cases
AR projection fits scenarios where spatial information must be overlaid on the video feed in real time, for example:
- Power line inspection: mark tower locations
- Forest fire monitoring: circle suspected hotspot areas
- Border patrol: draw the patrol route
- Construction site safety: mark temporary no-fly areas
2. Interface Call Examples
The examples below assume you have completed SDK initialization and the plugin is connected to Pilot.
2.0 Upload SVG Icons (prerequisite)
The SVG icons used by AR points must first be uploaded through IFileTransferManager; after upload, the file name serves as the server-side unique identifier (for example "star_max.svg" in later code). See the File Transfer documentation for the upload flow.
AR icons must be SVG. Before submitting, satisfy at least these must-have items:
- Use the SVG format; units may only be px or omitted.
- Every graphic element's
idcarries a state suffix (_normal/_select×_color/_bg); to support external dynamic tinting (withIconColor), theidmust contain_normal_color. - Use only
#RRGGBB/rgb()/ named colors; do not usecurrentColor(it renders gray and cannot be tinted).
<!-- ✅ Correct: supports tinting (id contains _normal_color, color uses #RRGGBB) -->
<g id="my_icon_normal_color">
  <path d="M12 2L2 22h20L12 2z" fill="#FF0000"/>
</g>

<!-- ❌ Wrong: id has no state suffix, falls into the fallback layer, cannot be tinted and disappears when selected -->
<g id="my_icon">...</g>
For the full requirements—format, canvas size, layer naming, color notation, hollow shapes—and the self-check list, see the AR Icon SVG Spec.
Later examples assume two icons, star_max.svg / star_min.svg, have been uploaded.
2.1 Add an AR Point (uploadARPointConfig + uploadARPointInfo)
An AR point uses a two-stage model: it is defined jointly by two objects, ARPointConfig and ARPointInfo. Think of it as a rubber stamp:
ARPointConfig(config) = the stamp template—the carved pattern and text style that decide "what each imprint looks like." One stamp can be pressed many times.ARPointInfo(info) = each individual imprint—it decides "where on the paper to press it and what text to put beside it." Each Info references a "stamp" through itsconfigId.
So the flow is naturally "carve the stamp first, then press it": you must upload the Config first, obtain the configId, then use it to build and upload the Info. The field structure of the two is shown below:
One Config can be reused by many Info objects (one stamp pressed in many places), so the flow below has two steps. (AR line / polygon / circle have only one Info object and no standalone config, but their endpoints are still AR points, so a config must be ready whenever endpoints are used.)
Step 1: Upload the Config ("what it looks like")
val arManager = ARManager.getInstance()                         // get the manager singleton

val config = ARPointConfig.Builder.builder()
    .withUseText(true)                                          // whether to overlay text
    .withTextConfig(
        ARTextConfig.Builder.builder()
            .withTextSize(40f)                                  // font size (dp)
            .withFontGravity(ARFontGravity.TOP)                 // text above the icon
            .build()
    )
    .withArProjectionType(ARIconProjectionType.PERSPECTIVE)     // scales with distance
    .withIconPerspectiveConfig(
        ARIconPerspectiveConfig.Builder.builder()
            .withRealSize(3f)                                   // real-world size (meters)
            .withMinSize(60f).withMaxSize(180f)                 // screen pixel bounds
            .withMaxIconFileName("star_max.svg")                // large icon at close range
            .withMinIconFileName("star_min.svg")                // small icon at far range
            .build()
    )
    .build()

arManager.uploadARPointConfig(config, object : CommonCallbacks.CompletionCallbackWithParam<String> {
    override fun onSuccess(configId: String) {
        // configId is the server-side id of this config; every ARPointInfo references it (see Step 2)
    }
    override fun onFailure(error: IDJIError) { /* error.errorCode() */ }
})
withArProjectionType sets the icon's projection. The available values are:
| Enum | Effect | Use case |
|---|---|---|
PERSPECTIVE | Scales with distance (perspective projection); pixel size changes with distance | Objects with real physical size: vehicles, people, buildings |
ORTHOGRAPHIC | Fixed pixel size (orthographic projection), unaffected by distance | Markers needing constant visual size: waypoints, target points |
NONE | No icon, text only | Text-only annotations |
If you choose ORTHOGRAPHIC, replace withIconPerspectiveConfig(...) above with withIconOrthographicConfig(...), which needs only withSize(80f) + withIconFileName("xxx.svg").
Step 2: Upload the Info with the configId ("where to draw")
After you get the configId from the Step 1 callback, use it to build an ARPointInfo and upload it:
val point = ARPointInfo.Builder.builder()
    .withConfigId(configId)                                     // configId from the Step 1 callback
    .withVisible(true).withIconVisible(true).withTextVisible(true)
    .withShowEdgeGuide(true)                                    // show a direction hint at screen edge when off-screen
    .withText("Target A")
    .withTextColor(0xFF2D8CF0.toInt())                          // blue
    .withIconColor(0xFFFFA500.toInt())                          // orange (needs _normal_color in the SVG to take effect)
    .withLocation(OpenLocation(0.0, 0.0, 60.0))                 // TODO: replace with your actual coordinate (lat, lng, altitude in meters)
    .build()

arManager.uploadARPointInfo(point, object : CommonCallbacks.CompletionCallbackWithParam<String> {
    override fun onSuccess(id: String) { /* server-assigned id, already synced to point.id */ }
    override fun onFailure(error: IDJIError) { /* error.errorCode() */ }
})
Caution: Keep the
pointobject reference; you will need it for later update / delete (see 2.6).
Preview:
2.2 Add an AR Line (uploadARLineInfo)
An AR line is formed by connecting several endpoints, each endpoint reusing an ARPointInfo (so a configId must be ready).
// 1. Prepare two endpoints (reuse the configId from 2.1)
val p1 = ARPointInfo.Builder.builder()
    .withConfigId(configId)
    .withVisible(true).withIconVisible(true).withTextVisible(true)
    .withText("A")
    .withLocation(OpenLocation(0.0, 0.0, 50.0))                 // TODO: replace with actual coordinate of endpoint A
    .build()

val p2 = ARPointInfo.Builder.builder()
    .withConfigId(configId)
    .withVisible(true).withIconVisible(true).withTextVisible(true)
    .withText("B")
    .withLocation(OpenLocation(0.0, 0.0, 50.0))                 // TODO: replace with actual coordinate of endpoint B
    .build()

// 2. Build the line style: color + distance-to-width mapping
val stroke = ARStrokeInfo.Builder.builder()
    .withColor(0xFF000000.toInt())                              // solid black line
    .withDistLineWidth(
        ARDistLineWidth.Builder.builder()
            .withMaxLineWidth(20f).withMaxWidthDist(30f)        // width 20 px within 30 m
            .withMinLineWidth(5f).withMinWidthDist(60f)         // width 5 px beyond 60 m
            .build()
    )
    .withIsDash(false)
    .build()

// 3. Assemble and upload
val line = ARLineInfo.Builder.builder()
    .withPoints(listOf(p1, p2))                                 // endpoint order is the connection order
    .withStrokeInfo(stroke)
    .withUseDepth(false)                                        // false = not occluded by terrain/objects
    .build()

arManager.uploadARLineInfo(line, object : CommonCallbacks.CompletionCallbackWithParam<String> {
    override fun onSuccess(id: String) { /* success; line.id is assigned */ }
    override fun onFailure(error: IDJIError) { /* error.errorCode() */ }
})
Common variations:
- The endpoint's
visible/iconVisible/textVisiblecontrol whether the endpoint itself is visible; the line body is always visible (styled bystrokeInfo). - Dashed line:
withIsDash(true). - Multi-segment line:
withPoints(listOf(p1, p2, p3, p4, ...)), connected in order.
Preview:
2.3 Add an AR Polygon (uploadARPolygonInfo)
An AR polygon consists of a polygon base of ≥3 endpoints + a prism extruded along the height direction, with three ARPolygonFace objects: top, side, and bottom.
// 1. Three vertices of a triangle (reuse the configId from 2.1)
val p1 = ARPointInfo.Builder.builder().withConfigId(configId)
    .withVisible(true).withIconVisible(false).withTextVisible(true).withText("A")
    .withLocation(OpenLocation(0.0, 0.0, 50.0))                 // TODO: vertex A
    .build()
val p2 = ARPointInfo.Builder.builder().withConfigId(configId)
    .withVisible(true).withIconVisible(false).withTextVisible(true).withText("B")
    .withLocation(OpenLocation(0.0, 0.0, 50.0))                 // TODO: vertex B
    .build()
val p3 = ARPointInfo.Builder.builder().withConfigId(configId)
    .withVisible(true).withIconVisible(false).withTextVisible(true).withText("C")
    .withLocation(OpenLocation(0.0, 0.0, 50.0))                 // TODO: vertex C
    .build()

// 2. Side-face fill (two colors for front/back); top/bottom use an empty Builder
val sideFace = ARPolygonFace.Builder.builder()
    .withVisible(true)
    .withFrontFaceColor(0x3374C0FC.toInt())                     // translucent blue (front)
    .withBackFaceColor(0x33FFFFFF.toInt())                      // translucent white (back)
    .build()
val emptyFace = ARPolygonFace.Builder.builder().withVisible(false).build()

// 3. Assemble and upload
val polygon = ARPolygonInfo.Builder.builder()
    .withPoints(listOf(p1, p2, p3))                             // at least 3 points
    .withExtrusionAnchor(OpenLocation(0.0, 0.0, 0.0))           // prism base anchor; (0,0,0) means no extra offset
    .withSideFace(sideFace)                                     // show side face only
    .withTopFace(emptyFace).withBottomFace(emptyFace)
    .withIs3dMesh(false)
    .build()

arManager.uploadARPolygonInfo(polygon, object : CommonCallbacks.CompletionCallbackWithParam<String> {
    override fun onSuccess(id: String) { /* success */ }
    override fun onFailure(error: IDJIError) { /* error.errorCode() */ }
})
Common variations:
- To fill the top / bottom faces too, replace
emptyFacewith a coloredARPolygonFace. - For face outlines (stroke), pass
withSideFaceStroke(ARFaceStroke.Builder.builder().withVisible(true).withStroke(strokeInfo).build()). withFaceDistAlpha(...)makes the face opacity vary with distance (clearer up close, fainter far away).
Preview:
2.4 Add an AR Circle (uploadARCircleInfo)
An AR circle is structured like an AR polygon, but its base is a circle instead of a polygon, needing only a center + radius.
// 1. Circle style: fill + stroke
val face = ARPolygonFace.Builder.builder()
    .withVisible(true)
    .withFrontFaceColor(0x3374C0FC.toInt())                     // translucent blue
    .withBackFaceColor(0x33FFFFFF.toInt())                      // translucent white
    .build()

val stroke = ARStrokeInfo.Builder.builder()
    .withColor(0xFF2D8CF0.toInt())                              // blue stroke
    .withDistLineWidth(
        ARDistLineWidth.Builder.builder()
            .withMaxLineWidth(12f).withMaxWidthDist(50f)
            .withMinLineWidth(3f).withMinWidthDist(100f)
            .build()
    )
    .withIsDash(false)
    .build()
val edge = ARFaceStroke.Builder.builder().withVisible(true).withStroke(stroke).build()

// 2. Distance-to-opacity mapping (more transparent far away to avoid blocking the view)
val distAlpha = ARDistAlpha.Builder.builder()
    .withEnable(true)
    .withMinDist(30f).withMinAlpha(0.3f)                        // alpha=0.3 within 30 m
    .withMaxDist(60f).withMaxAlpha(0.8f)                        // alpha=0.8 beyond 60 m
    .build()

// 3. Assemble and upload
val circle = ARCircleInfo.Builder.builder()
    .withCenter(OpenLocation(0.0, 0.0, 30.0))                   // TODO: replace with actual center coordinate
    .withRadius(20f)                                            // base radius 20 m
    .withExtrusionAnchor(OpenLocation(0.0, 0.0, 0.0))           // prism base anchor
    .withTopFace(face).withSideFace(face).withBottomFace(face)  // same color for all faces
    .withTopFaceStroke(edge).withSideFaceStroke(edge).withBottomFaceStroke(edge)
    .withFaceDistAlpha(distAlpha)
    .withFaceStrokeDistAlpha(distAlpha)
    .build()

arManager.uploadARCircleInfo(circle, object : CommonCallbacks.CompletionCallbackWithParam<String> {
    override fun onSuccess(id: String) { /* success */ }
    override fun onFailure(error: IDJIError) { /* error.errorCode() */ }
})
Common variations:
- Truncated-cone effect: additionally call
.withTRadius(30f); a value different fromradiusforms a cone; unset or≤0defaults toradius(a straight cylinder). - Draw a ring only: set the
visibleoftopFace/bottomFaceto false, keeping onlysideFace.
Preview:
2.5 Toggle the AR Radar (enableARRadar)
The radar shows the current gimbal's horizontal scan range (a sector) on the video feed; only one global configuration is in effect.
// Enable: enable=true; an empty label string shows no text label
val enable = ARRadarConfig.Builder.builder()
    .withEnable(true)
    .withLabel("Front Radar")
    .build()
arManager.enableARRadar(enable, object : CommonCallbacks.CompletionCallback {
    override fun onSuccess() { /* enabled */ }
    override fun onFailure(error: IDJIError) { /* error.errorCode() */ }
})

// Disable: same method, pass a config with enable=false
arManager.enableARRadar(
    ARRadarConfig.Builder.builder().withEnable(false).build(),
    object : CommonCallbacks.CompletionCallback {
        override fun onSuccess() { /* disabled */ }
        override fun onFailure(error: IDJIError) { /* error.errorCode() */ }
    }
)
Preview:
2.6 Query / Update / Delete (common CRUD pattern)
Sections 2.1–2.4 covered "create" (upload); this section covers the remaining query, update, delete. CRUD is fully isomorphic across the four geometry types (point / line / polygon / circle): just replace ARPolygon in the method names with ARPoint / ARLine / ARCircle and swap the data models accordingly. The examples below all use the AR polygon.
① Query (queryARPolygonInfo)
Query returns all current AR polygons on the server, commonly used to "get an object then update / delete it" or to restore state when rebuilding a page:
arManager.queryARPolygonInfo(object : CommonCallbacks.CompletionCallbackWithParam<List<ARPolygonInfo>> {
    override fun onSuccess(list: List<ARPolygonInfo>) {
        // every object's id in list is a valid server-side id, usable directly for later update / delete
    }
    override fun onFailure(error: IDJIError) { /* error.errorCode() */ }
})
② Update (updateARPolygonInfo)
The recommended flow is "query → change fields → update": modify the object you got from the server, then send it back. The server matches by id, and the remaining fields fully overwrite the old values (see Q4). The example below extrudes a flat polygon into a prism along the height direction—just change the height component of extrusionAnchor:
// 1. Fetch the current list from the server
arManager.queryARPolygonInfo(object : CommonCallbacks.CompletionCallbackWithParam<List<ARPolygonInfo>> {
    override fun onSuccess(list: List<ARPolygonInfo>) {
        // 2. Find the target object (matched by name here; you may also use id / other fields)
        val target = list.firstOrNull { it.name == "demo_polygon" } ?: return

        // 3. Change a field: extrude the base 40 m along height, flat polygon → prism
        target.extrusionAnchor = OpenLocation(0.0, 0.0, 40.0)   // the height component is the extrusion height (meters)

        // 4. Send back with update
        arManager.updateARPolygonInfo(target, object : CommonCallbacks.CompletionCallback {
            override fun onSuccess() { /* updated; the polygon becomes a prism on screen */ }
            override fun onFailure(error: IDJIError) { /* error.errorCode() */ }
        })
    }
    override fun onFailure(error: IDJIError) { /* error.errorCode() */ }
})
Changing the face fill / stroke / top-bottom visibility works the same way—just modify fields like target.topFace / target.sideFaceStroke and then update.
Caution: Do not
Builder.build()a new object and pass it to update—that generates a newid, the server finds no match, and the callback returnsAR_POLYGON_INFO_NOT_FOUND(see Q3).
③ Delete (deleteARPolygonInfo)
Delete locates the object by id only, so pass the object from query back as-is (other fields are ignored):
// target is an ARPolygonInfo returned by query
arManager.deleteARPolygonInfo(target, object : CommonCallbacks.CompletionCallback {
    override fun onSuccess() { /* deleted */ }
    override fun onFailure(error: IDJIError) { /* error.errorCode() */ }
})
The interface has no "delete all" batch method. To clear a type of element, iterate over the query result and call deleteXxxInfo one by one.
Preview (before/after: the polygon is extruded into a prism):
3. API Reference
For the full definitions of these interface methods (including parameter data models and enums), see the API documentation: IARManager.
Interface
IARManager is the entry point of the AR management interface, exposing the following methods:
| Item | Description |
|---|---|
IARManager | Entry point of the AR management interface |
queryARPointConfig | Query AR point configs |
uploadARPointConfig | Upload an AR point config (one config can map to many AR points) |
queryARPointInfo | Query AR point info |
uploadARPointInfo | Upload AR point info |
updateARPointInfo | Update AR point info |
deleteARPointInfo | Delete AR point info |
queryARLineInfo | Query AR line info |
uploadARLineInfo | Upload AR line info |
updateARLineInfo | Update AR line info |
deleteARLineInfo | Delete AR line info |
queryARPolygonInfo | Query AR polygon info |
uploadARPolygonInfo | Upload AR polygon info |
updateARPolygonInfo | Update AR polygon info |
deleteARPolygonInfo | Delete AR polygon info |
queryARCircleInfo | Query AR circle info |
uploadARCircleInfo | Upload AR circle info |
updateARCircleInfo | Update AR circle info |
deleteARCircleInfo | Delete AR circle info |
enableARRadar | Set the AR radar scan range config (enable=false to turn off) |
4. Sample Source Code
5. FAQ
Q1: Why must an AR point upload a Config before an Info?
ARPointConfig defines the appearance template (icon SVG, text style, projection), while ARPointInfo defines position and content. Splitting the two gives you:
- One Config reused by hundreds or thousands of Info objects (e.g., all power towers share the same star-icon Config), saving both network traffic and memory
- To change the icon of all points at once, update the Config once instead of iterating over every Info
AR line / polygon / circle have no standalone Config (line width, face fill, etc. are embedded directly in the Info), but their internal endpoints are still ARPointInfo, so whenever endpoints are used, a Config must exist first.
Q2: The SVG icon does not show, or the color has no effect?
Troubleshoot in this order:
- Was the SVG pushed to Pilot? You must first push the file via
IFileTransferManager.pushFileToRemote, then verify withqueryFileListFromRemote - Does the layer naming carry a state suffix? Every graphic element's
idmust carry a_normal/_select×_color/_bgsuffix; without a suffix it falls into the fallback layer, so it can neither be tinted nor shown when selected - Does tinting take effect? When tinting via
withIconColor, theidmust contain_normal_color, and the color must use a supported notation such as#RRGGBB. Do not usecurrentColor—it renders gray and cannot be tinted (see the AR Icon SVG Spec) - Does the file name match exactly (case-sensitive)? Pilot's file system is case-sensitive
Q3: update / delete returns AR_POINT_INFO_NOT_FOUND?
Root cause: the server matches objects by id, and this id is only meaningful after the first successful upload. If you Builder.build() a new object, you get a local temporary id the server has never seen, hence "not found."
// ❌ Wrong: a new Builder generates a new id the server cannot find
val newInfo = ARPointInfo.Builder.builder().withConfigId(cfg).withLocation(newLoc).build()
arManager.updateARPointInfo(newInfo, ...)   // AR_POINT_INFO_NOT_FOUND

// ✅ Correct: reuse the object from the upload success callback or from query
originalInfo.location = newLoc
arManager.updateARPointInfo(originalInfo, ...)
Recommended: always fetch the latest object from queryXxxInfo, change fields, then update / delete (see 2.6).
Q4: Do I need to pass all fields on update?
The server does a "full replace," not a "field merge": after update, what the server stores for that id is exactly all fields of the object you sent.
So the safest approach is: query the current object → change only what you want → send it back with update. Unmodified fields keep their original values and are not accidentally cleared.
Q5: When can ARManager.getInstance() be called?
The singleton can be obtained at any time, but its internal delegate is injected only after the SDK establishes an AIDL connection with Pilot. Calling any method before the connection is established immediately returns a REMOTE_DISCONNECTED error.
Recommendation: call AR-related interfaces after the Pilot connection-success event; or handle REMOTE_DISCONNECTED retries in each callback.
Q6: Upload succeeds, but no AR element appears on screen?
Troubleshoot in this order:
- Is
visibletrue? The triowithVisible(true)+withIconVisible(true)+withTextVisible(true) - Is the position outside the view frustum? If the gimbal lens does not face that direction, you cannot see it. Enable
withShowEdgeGuide(true)to check for a direction hint at the screen edge - Is
iconColorfully transparent (0)? Check whether the A channel of the ARGB is 0 (0x00000000) - Is distance-to-opacity set too strictly?
ARDistAlphahasenable=trueand the current camera distance makes the computed alpha near 0 - SVG not pushed (for missing icons): see Q2
Q7: Deleting one element vs. batch deletion—what fields does delete need?
deleteXxxInfo locates the server-side object by info.id only; other fields may be empty. The easiest way is to pass the object returned by queryXxxInfo back as-is.
To "clear a type of element," iterate over the query result and delete one by one; the interface itself has no "delete all" batch method.
Appendix: Error Code Quick Reference
The error codes below come from dji.open.pilot.base.error.RemoteError and the general CSDK errors:
| Error code constant | Trigger | Suggested handling |
|---|---|---|
REMOTE_DISCONNECTED | AIDL to Pilot not yet connected | Retry after Pilot is connected; see Q5 |
AR_POINT_CONFIG_EXIST | Uploading the same ARPointConfig object again | Check whether the configId is already cached locally to avoid duplicate calls |
AR_POINT_CONFIG_NOT_FOUND | configId invalid on uploadARPointInfo | Confirm the Config uploaded successfully; use the id from the callback |
AR_POINT_INFO_EXIST | Uploading the same ARPointInfo object again | The first upload already saved it on the server; no need to resend |
AR_POINT_INFO_NOT_FOUND | The info id for update / delete does not exist on the server | Ensure the object comes from an upload / query result; see Q3 |
AR_LINE_INFO_NOT_FOUND | Same as above, AR line | Same as above |
AR_POLYGON_INFO_NOT_FOUND | Same as above, AR polygon | Same as above |
AR_CIRCLE_INFO_NOT_FOUND | Same as above, AR circle | Same as above |