
Quick Start
1. Before You Start
This guide walks you through building a blank Pilot plugin project from scratch and getting the minimal path—"discovered by Pilot → connection established"—working. When done, you will have a plugin app that Pilot can recognize and connect to; calling the specific open capabilities is out of scope here—see the Module Example.
A plugin app is a standalone Android app installed on a remote controller with a screen. It runs in a separate process from Pilot and establishes an inter-process connection through the SDK. So building a plugin project = building an ordinary Android project + integrating MSDK 5.20 + declaring the plugin identity.
1.1 Recommended Environment
- Android Studio:
Narwhal 3 Feature Drop | 2025.1.3 - Java Runtime:
17 - Kotlin:
2.1.0 - Gradle:
8.12 - Android Gradle Plugin:
8.7.0 - NDK:
28.0.13004108 - minSdkVersion:
24 - targetSdkVersion:
35 - compileSdkVersion:
35
If you use non-recommended versions, you need to adapt the whole integration process to your actual versions. Android Studio Narwhal 3 Feature Drop bundles Java Runtime 17 by default, so no extra configuration is usually needed.
1.2 Register as a DJI Developer
Visit the DJI Developer registration page to register. During registration you need to provide an email and phone number for verification.
1.3 Generate an App Key
Every plugin app needs a unique App Key to activate the SDK. Create one in the DJI Developer Center:
- Click "Apps" in the left navigation bar.
- Click the "Create App" button on the right.
- Fill in App Type, App name, development platform, Package Name, and other information.
- After submitting, you will receive an app activation email. Once activated, return to the Developer Center to get your App Key.
Note: In the plugin scenario, four values must be identical: the project's
applicationId, the APK package name, the App Key's Package Name, and the plugin ID on the Pilot side. Pilot uses the APK package name directly as the plugin ID, so once the package name is set, do not change it—otherwise Pilot will treat it as a different plugin.
The rest of this guide uses com.example.pilotplugin as the example package name; replace it with the Package Name you filled in when applying for your App Key.
2. Create a Blank Project
2.1 Create the Project
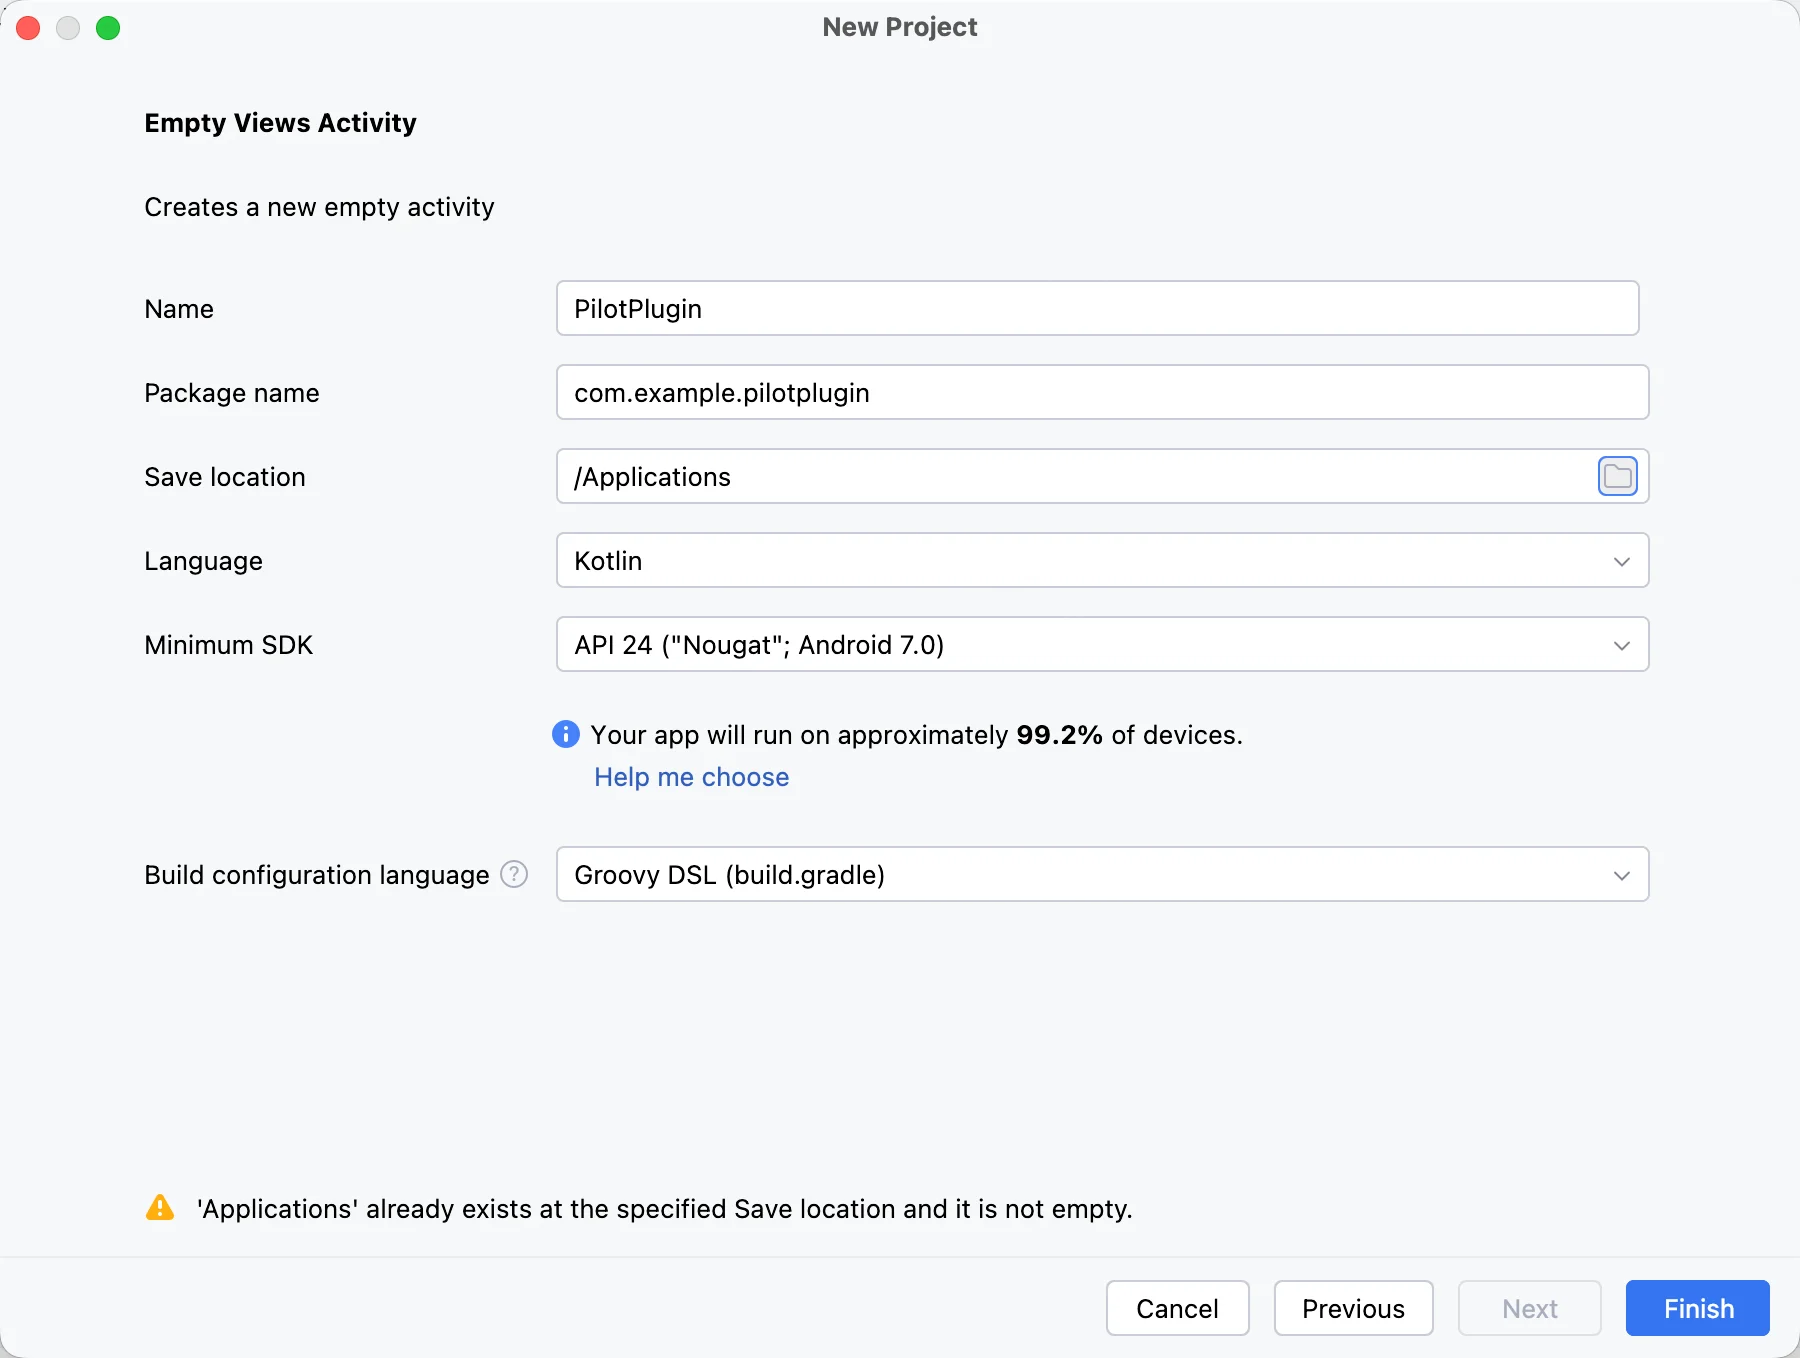
On the Android Studio start page, choose New Project > Phone and Tablet > Empty Views Activity, and create it with the following configuration:
- Name:
PilotPlugin - Package name:
com.example.pilotplugin - Minimum SDK:
24or higher - Build configuration language:
Groovy DSL (build.gradle)
2.2 Import the UXSDK Source Module
Capabilities such as the plugin's custom components and AR drawing are provided by the dji.v5.ux package, which must be imported as a source module.
- Get the
android-sdk-v5-uxsdkdirectory from the Mobile SDK V5 Sample project, and copy the whole directory to the project root, alongside theappfolder. - Edit
settings.gradleto include it in the project:
rootProject.name = "PilotPlugin"
include ':app'
include ':android-sdk-v5-uxsdk'
Even if you don't plan to use custom components for now, it's recommended to import it now. The plugin's drawing capabilities on Pilot's UI all depend on this module.
3. Configure Project Dependencies
3.1 Edit build.gradle (Project)
The DJI SDK is published on Maven Central; keeping mavenCentral() in the repository configuration is enough, with no need to add a private repository:
buildscript {
    repositories {
        google()
        mavenCentral()
    }
    dependencies {
        classpath "com.android.tools.build:gradle:8.7.0"
        classpath "org.jetbrains.kotlin:kotlin-gradle-plugin:$KOTLIN_VERSION"
    }
}

allprojects {
    repositories {
        google()
        mavenCentral()
    }
}
3.2 Edit build.gradle (Module: app)
apply plugin: 'com.android.application'
apply plugin: 'kotlin-android'

android {
    namespace 'com.example.pilotplugin'
    compileSdkVersion Integer.parseInt(project.ANDROID_COMPILE_SDK_VERSION)

    defaultConfig {
        applicationId "com.example.pilotplugin"          // must match the App Key's Package Name
        minSdkVersion Integer.parseInt(project.ANDROID_MIN_SDK_VERSION)
        targetSdkVersion Integer.parseInt(project.ANDROID_TARGET_SDK_VERSION)
        versionCode 1
        versionName "1.0"

        // Inject the App Key into the AndroidManifest placeholder to keep the key out of version control
        manifestPlaceholders["API_KEY"] = project.PLUGIN_API_KEY

        ndk {
            abiFilters 'arm64-v8a'                       // the SDK currently supports only the arm64-v8a architecture
        }
    }

    compileOptions {
        sourceCompatibility JavaVersion.VERSION_1_8
        targetCompatibility JavaVersion.VERSION_1_8
    }

    kotlinOptions {
        jvmTarget = JavaVersion.VERSION_1_8
        freeCompilerArgs += ["-Xjvm-default=all"]
    }

    buildFeatures {
        viewBinding true
    }

    packagingOptions {
        // Several aars pulled in by the SDK contain a so with the same name; just pick the first
        pickFirst 'lib/arm64-v8a/libc++_shared.so'
        pickFirst 'lib/armeabi-v7a/libc++_shared.so'
    }
}

dependencies {
    implementation "com.dji:dji-sdk-v5-aircraft:$SDK_VERSION"           // runtime implementation, includes so and resources
    compileOnly "com.dji:dji-sdk-v5-aircraft-provided:$SDK_VERSION"     // compile-time symbols, not packaged into the APK
    implementation project(':android-sdk-v5-uxsdk')                     // provides the dji.v5.ux capabilities

    implementation 'androidx.appcompat:appcompat:1.6.1'
    implementation 'androidx.constraintlayout:constraintlayout:2.1.4'
}
You don't need to declare networking libraries, Gson, RxJava, Room, etc. manually. The POM of dji-sdk-v5-aircraft already declares them as transitive dependencies, and Gradle pulls them automatically.
3.3 Edit gradle.properties
android.useAndroidX=true
android.enableJetifier=true
android.nonTransitiveRClass=false

ANDROID_MIN_SDK_VERSION=24
ANDROID_TARGET_SDK_VERSION=35
ANDROID_COMPILE_SDK_VERSION=35
KOTLIN_VERSION=2.1.0

# MSDK version; plugin capabilities require 5.20.1 or above
SDK_VERSION=5.20.1

# The App Key you obtained from the Developer Center
PLUGIN_API_KEY=Please add your app key here.
4. Declare the Plugin Identity
The first three sections are all generic work for integrating MSDK. This section is unique to a plugin project: only when the plugin identity is declared correctly can Pilot discover your APK during a scan.
Pilot discovers plugins by querying APKs in the system that declare the plugin registration service, then reads that APK's contract file to obtain the plugin's name, version, developer, and other information. The registration Service is already declared in the SDK's AndroidManifest.xml and is merged into your project automatically—you don't need to write any Service yourself, only provide the contract file.
4.1 Write the Plugin Contract XML
Create app/src/main/res/xml/dji_open_pilot_plugin.xml:
<?xml version="1.0" encoding="utf-8"?>
<plugin xmlns:dop="https://dji.com/open-pilot"
    dop:name="My Pilot Plugin"
    dop:version="1.0.0"
    dop:developer="Example Inc."
    dop:description="A blank plugin project built from the quick start guide." />
Meanings of the four attributes:
| Attribute | Meaning |
|---|---|
dop:name | Plugin display name, shown in Pilot's plugin list |
dop:version | Plugin version number |
dop:developer | Developer name |
dop:description | Plugin description |
The plugin ID is always the APK package name and cannot (and need not) be declared through the contract.
Note: All four attributes are required. If any one is missing, Pilot deems the contract invalid and skips the entire plugin: your app won't appear in the plugin list, with no error prompt at all.
4.2 Provide Multilingual Plugin Info
The dop:name, dop:developer, and dop:description in the contract XML are fallback values. If you define the following three fixed-name strings in strings.xml, Pilot uses them first and picks the translation matching the remote controller's current language:
<!-- res/values/strings.xml -->
<string name="dji_open_pilot_plugin_name">My Pilot Plugin</string>
<string name="dji_open_pilot_plugin_developer">Example Inc.</string>
<string name="dji_open_pilot_plugin_description">A blank plugin project built from the quick start guide.</string>
<!-- res/values-zh-rCN/strings.xml -->
<string name="dji_open_pilot_plugin_name">我的 Pilot 插件</string>
<string name="dji_open_pilot_plugin_developer">示例公司</string>
<string name="dji_open_pilot_plugin_description">按快速开始搭建的空白插件工程。</string>
The string names must match the above exactly; Pilot looks them up by fixed name, and renaming falls back to the fallback values in the contract XML.
4.3 Provide the Plugin Icon
| Icon | Source | Description |
|---|---|---|
| Plugin list icon | The APK's app icon (android:icon) | Extracted automatically by Pilot during the scan; no extra declaration needed |
| Toolbar icon | A drawable resource named dji_toolbar_icon | Optional; skipped when not provided |
If you need a Toolbar icon, place dji_toolbar_icon.png under res/drawable/.
4.4 Edit AndroidManifest.xml
<manifest xmlns:android="http://schemas.android.com/apk/res/android"
    package="com.example.pilotplugin">

    <!-- The first activation of the DJI SDK needs network access to the registration server -->
    <uses-permission android:name="android.permission.INTERNET" />

    <application
        android:name=".PluginApplication"
        android:icon="@mipmap/ic_launcher"
        android:label="@string/app_name"
        android:extractNativeLibs="true"
        android:theme="@android:style/Theme.NoTitleBar.Fullscreen">

        <!-- DJI SDK activation Key; value injected by manifestPlaceholders in build.gradle -->
        <meta-data
            android:name="com.dji.sdk.API_KEY"
            android:value="${API_KEY}" />

        <activity
            android:name=".MainActivity"
            android:configChanges="orientation|screenSize|keyboardHidden"
            android:exported="true"
            android:launchMode="singleTask"
            android:screenOrientation="landscape">
            <intent-filter>
                <action android:name="android.intent.action.MAIN" />
                <category android:name="android.intent.category.LAUNCHER" />
            </intent-filter>
        </activity>
    </application>
</manifest>
A remote controller with a screen is a landscape device, so it's recommended to declare android:screenOrientation="landscape" uniformly for plugin pages. Pilot launches plugin pages across processes, so the launched Activity must declare android:exported="true".
5. Initialize the Plugin SDK
5.1 Write the Application
Create PluginApplication.kt under com.example.pilotplugin, alongside MainActivity.kt:
package com.example.pilotplugin

import android.app.Application
import android.content.Context

class PluginApplication : Application() {

    override fun attachBaseContext(base: Context?) {
        super.attachBaseContext(base)
        // Load the SDK's decryption/hardening package; do not call any SDK interface before install
        com.cySdkyc.clx.Helper.install(this)
    }

    override fun onCreate() {
        super.onCreate()
        PluginSdkInitializer.init(this)
    }
}
Warning: Missing
Helper.install(this)causes the app to crash on startup with aClassNotFoundExceptionfor SDK-related classes. This step must be inattachBaseContextand before any SDK call.
5.2 Initialize the SDK and Establish the Connection
Create PluginSdkInitializer.kt:
package com.example.pilotplugin

import android.content.Context
import android.util.Log
import dji.open.pilot.base.manager.PluginAPPConfig
import dji.open.pilot.base.ui.NavigateAction
import dji.open.pilot.client.manager.ServerState
import dji.v5.common.error.IDJIError
import dji.v5.common.register.DJISDKInitEvent
import dji.v5.common.register.InitSettings
import dji.v5.common.register.SDKLinKMode
import dji.v5.manager.SDKManager
import dji.v5.manager.interfaces.SDKManagerCallback

object PluginSdkInitializer {

    private const val TAG = "PluginSdkInitializer"

    fun init(context: Context) {
        val settings = InitSettings(SDKLinKMode.REMOTE_PILOT).also {
            it.pluginAppConfig = PluginAPPConfig().apply {
                // Which plugin page to navigate back to when the user taps the plugin card in Pilot
                homePageOnClickAction = NavigateAction(
                    NavigateAction.Value.SELF_DEFINE,
                    "com.example.pilotplugin.MainActivity"  // TODO: replace with your Activity's fully qualified name
                )
            }
        }

        SDKManager.getInstance().init(context, settings, object : SDKManagerCallback {

            override fun onInitProcess(event: DJISDKInitEvent, totalProcess: Int) {
                if (event == DJISDKInitEvent.INITIALIZE_COMPLETE) {
                    SDKManager.getInstance().registerApp()   // activation can only start after init completes
                }
            }

            override fun onRegisterSuccess() {
                Log.i(TAG, "App Key activated successfully")
            }

            override fun onRegisterFailure(error: IDJIError) {
                Log.e(TAG, "App Key activation failed: ${error.errorCode()}")
            }

            override fun onRemoteServerStateUpdated(state: ServerState) {
                // Inter-process connection state with Pilot; CONNECTED means the plugin is ready
                Log.i(TAG, "Connection state with Pilot: $state")
            }

            override fun onRemoteServerCompatibleError(error: IDJIError) {
                Log.e(TAG, "Plugin and Pilot versions are incompatible: ${error.errorCode()}")
            }

            override fun onProductConnect(productId: Int) {}
            override fun onProductDisconnect(productId: Int) {}
            override fun onProductChanged(productId: Int) {}

            @Deprecated("Deprecated in SDKManagerCallback")
            override fun onDatabaseDownloadProgress(current: Long, total: Long) {}
        })
    }
}
Three key points:
SDKLinKMode.REMOTE_PILOTis the link mode for plugin mode, different from an ordinary MSDK app's link mode, and must be specified explicitly.- The connection is driven automatically by the SDK initialization flow; the plugin doesn't need to initiate it manually—just observe the result through
onRemoteServerStateUpdated. PluginAPPConfigonly needshomePageOnClickAction; the plugin version info is filled in automatically by the SDK.
ServerState has four values:
| Enum | Meaning |
|---|---|
UNINITIALIZED | Service not initialized |
CONNECTED | Connected; you can start calling the open capabilities |
DISCONNECT | Disconnected |
INCOMPATIBLE | Plugin and Pilot versions are incompatible |
Note:
setTitle,setDescription, andsetIconResFileNameonPluginAPPConfigare deprecated; the plugin's name, description, and icon are now provided by the contract XML and resource files (see Section 4).
6. Build, Install, and Verify
- In Android Studio, choose
Sync Nowto sync the project, then build. - Connect the remote controller with a screen to the computer via USB, enable the controller's developer options and USB debugging, select the device in Android Studio, and run to install the plugin app onto the controller.
- On first launch of the plugin app, keep the controller connected to the network and wait for App Key activation to complete.
- Open Pilot's plugin management page. If your plugin appears in the list with a connected status, the blank project is working.
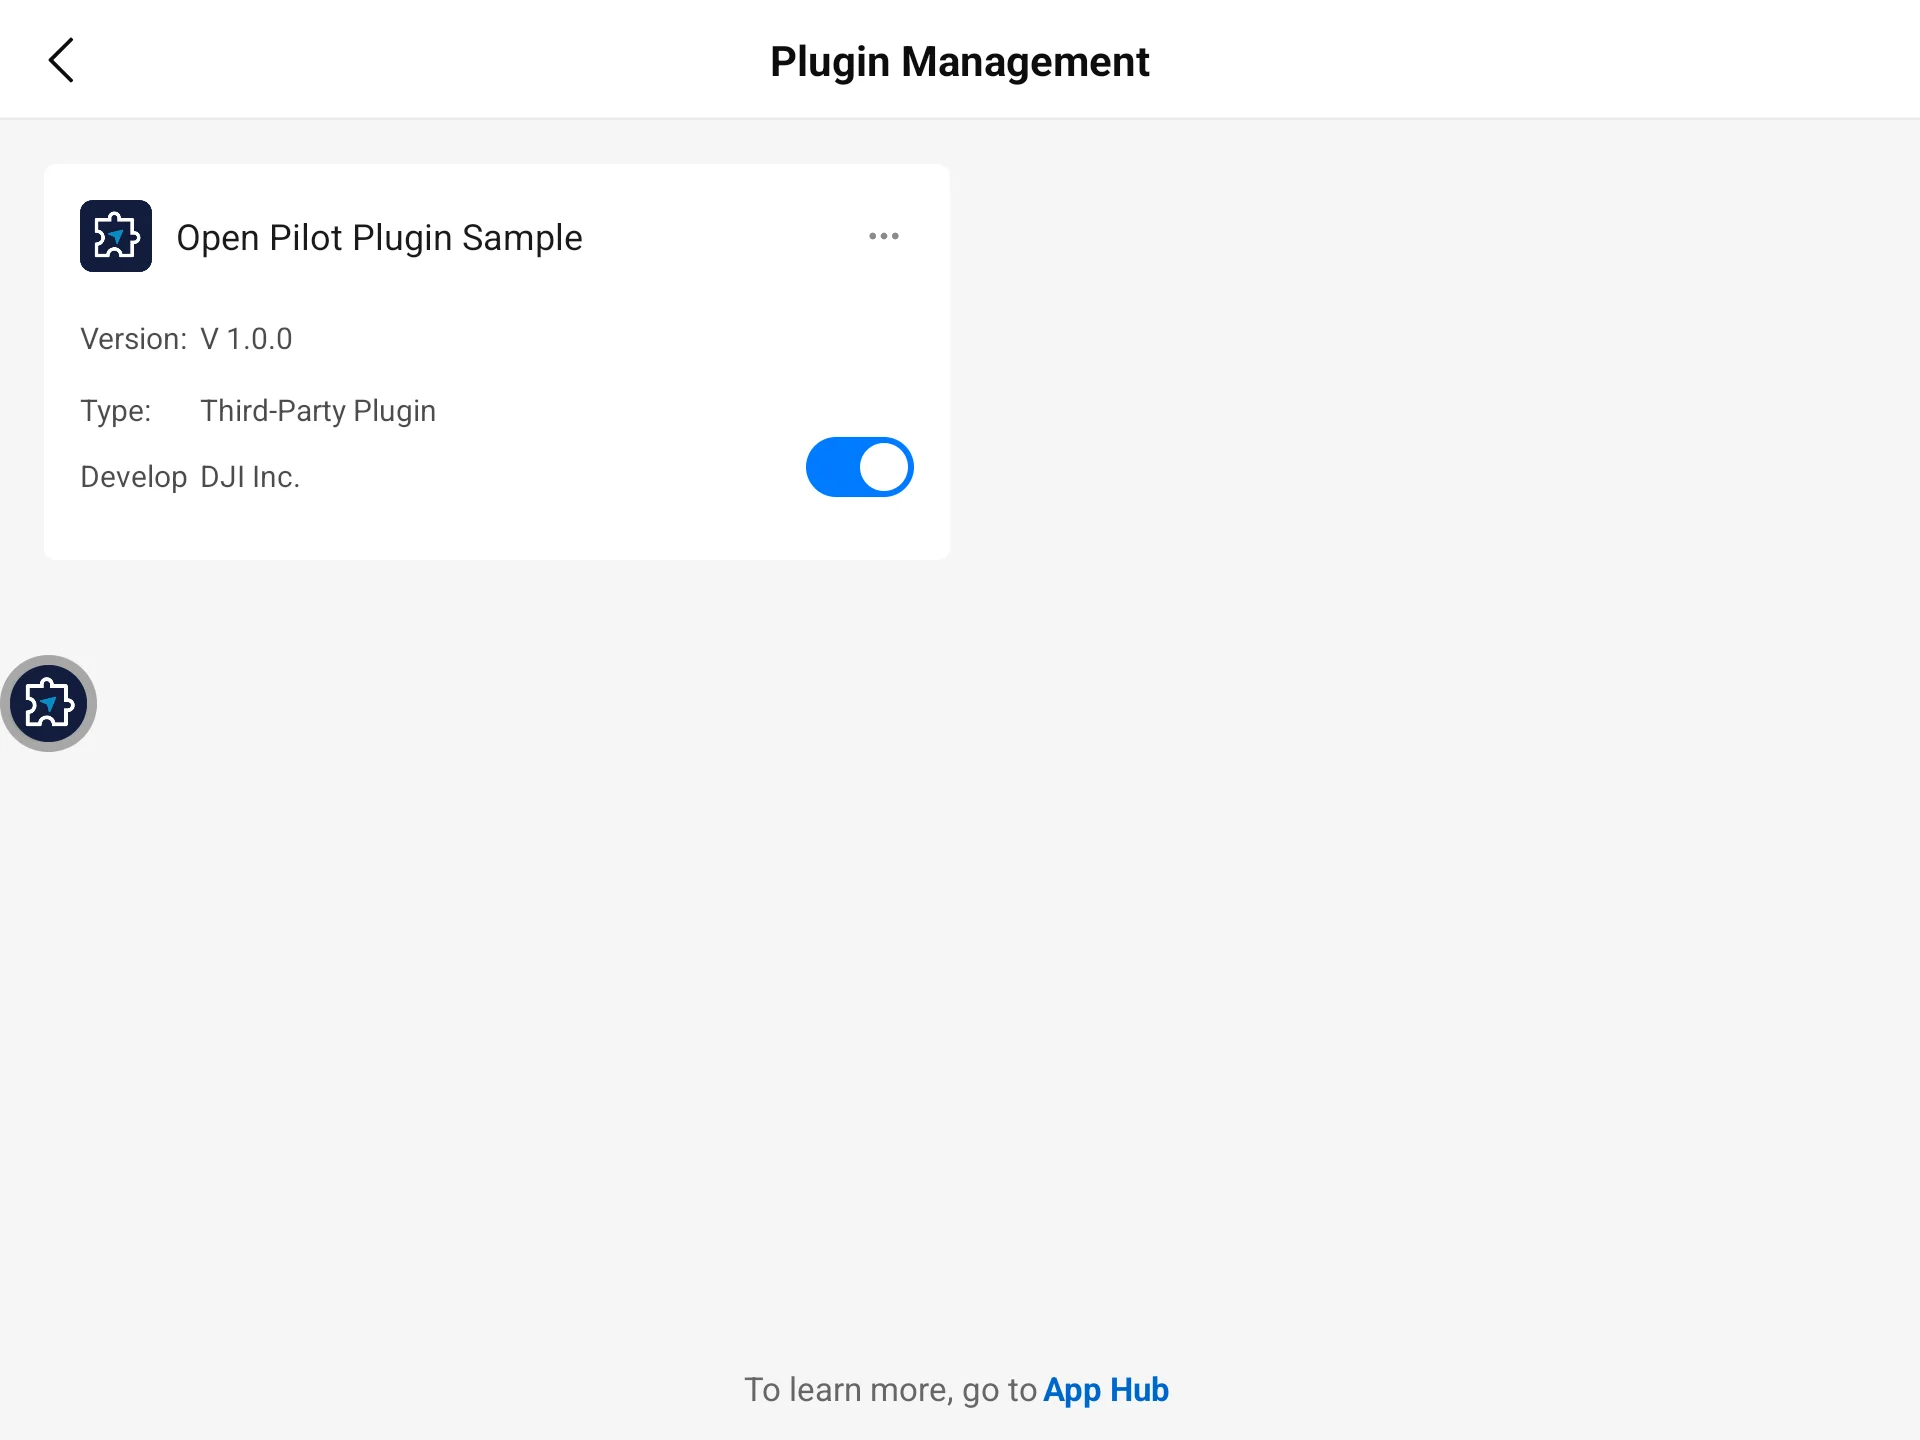
If the status on the plugin management page is not as expected, you can use logs to help locate the issue. Normally, logcat outputs the following in order:
PluginSdkInitializer: App Key activated successfully
PluginSdkInitializer: Connection state with Pilot: CONNECTED
7. Next Steps
After the blank project works, you can continue learning:
- Module Example: minimal runnable examples of each open capability module.
8. FAQ
My plugin doesn't appear in Pilot's plugin management page
Troubleshoot in the following order:
- Confirm
res/xml/dji_open_pilot_plugin.xmlexists and is underapp/src/main/res/xml/rather than some other directory. - Confirm all four items—
dop:name,dop:version,dop:developer,dop:description—are filled in the contract. If any one is missing, Pilot silently skips the entire plugin. - Confirm
xmlns:dopis set tohttps://dji.com/open-pilot; a mismatched namespace makes the attributes unreadable, which is equivalent to them being missing. - Confirm the plugin APK is installed successfully and the Pilot version supports plugin capabilities.
<!-- ❌ Missing dop:description; the entire plugin will be skipped -->
<plugin xmlns:dop="https://dji.com/open-pilot"
    dop:name="My Pilot Plugin"
    dop:version="1.0.0"
    dop:developer="Example Inc." />

<!-- ✅ All four items present -->
<plugin xmlns:dop="https://dji.com/open-pilot"
    dop:name="My Pilot Plugin"
    dop:version="1.0.0"
    dop:developer="Example Inc."
    dop:description="A blank plugin project." />
onRegisterFailure is called; App Key activation fails
- Confirm
PLUGIN_API_KEYingradle.propertiesis replaced with the real App Key and has been activated via email in the Developer Center. - Confirm the project's
applicationIdexactly matches the Package Name you filled in when applying for the App Key, including case. - Confirm the remote controller is connected to the network. The first activation needs to reach the DJI registration server, and the
INTERNETpermission cannot be omitted. - Get the specific error code via
error.errorCode()to locate the issue further.
Activation succeeds, but the connection state never becomes CONNECTED
Pilot initiates a registration to the plugin when establishing the connection; a registration timeout or failure causes the connection to drop:
| Error code constant | Trigger | Suggested handling |
|---|---|---|
PLUGIN_REGISTER_TIMEOUT | Registration doesn't call back within 5 seconds | Check whether time-consuming operations in Application.onCreate block the main thread |
PLUGIN_REGISTER_FAILED | The registration flow returns failure | Confirm the plugin process is alive and not killed by the system's power-saving policy |
onRemoteServerCompatibleError is called
The SDK version used by the plugin doesn't match the Pilot version on the remote controller. Align the two to mutually compatible versions per the error message: if the plugin version is too low, upgrade SDK_VERSION in gradle.properties; if the Pilot version is too low, upgrade Pilot on the controller.
The app crashes on startup with ClassNotFoundException
com.cySdkyc.clx.Helper.install(this) was omitted in Application.attachBaseContext, or an SDK interface was called before it.
// ❌ Wrong order; SDK is called before install
override fun attachBaseContext(base: Context?) {
    super.attachBaseContext(base)
    SDKManager.getInstance()
    com.cySdkyc.clx.Helper.install(this)
}

// ✅ install goes first
override fun attachBaseContext(base: Context?) {
    super.attachBaseContext(base)
    com.cySdkyc.clx.Helper.install(this)
}
Build error about duplicate so libraries
Add the pickFirst configuration in packagingOptions of build.gradle (Module: app); see "3. Configure Project Dependencies".