
Usage
After you install OPW by following the Quick Start, open your project in the AI tool and select the plugin development agent to start. This page covers the full day-to-day workflow.
Start a Project
Prepare the Project
Complete the preparation for your scenario.
New Pilot Plugin
Prepare an empty directory; you do not need to run any command. Describe the creation request in the AI tool, and the AI initializes the project.
Existing Pilot Plugin Project
If OPW generated the project, you do not need to run any command. Otherwise, run the following in the project root:
opw setup # Initialize OPW for the current project and write the configuration needed for AI development
Existing MSDK App to Migrate to a Pilot Plugin
Run the following in the root of the original project:
opw setup # Initialize OPW for the current project and write the configuration needed for AI development
To confirm that the OPW project configuration, Skills, and knowledge base are ready, you can run opw doctor in the project root. The command only checks and does not modify the project.
Caution: Before you run
opw setup, confirm that the current directory is the project root. Do not treat a document folder as the project root. OPW rejects a non-empty directory that is not an Android project.
Select the Plugin Development Agent
Open the project directory in the AI tool.
Switch to the
pilot-plugin-devagent. The method depends on the AI tool:AI tool How to switch OpenCode Press Tab to switch, or use @pilot-plugin-devin your messageClaude Code Run /output-style pilot-plugin-dev; run/output-style defaultto switch backCodex No switch is needed; invoke the opwSkillAlternatively, invoke the
opwSkill or a task Skill (such asopw-plugin-create) directly.Confirm it took effect, then describe your goal.
When you switch to pilot-plugin-dev or invoke the opw Skill, the AI first identifies the project type and then selects the matching task Skill. When you invoke a task Skill directly, you choose the task type yourself. Either way, the AI first confirms the project state and requirements, then presents a plan and waits for your approval. It does not start changing code immediately.
If pilot-plugin-dev cannot be found, see Troubleshooting.
Use OPW in Other AI Tools
OPW directly supports OpenCode, Claude Code, and Codex. If you use another AI tool, such as CodeBuddy or Trae, first install OPW as described in the Quick Start, and then let the AI in that tool adapt OPW by referring to the installed OPW content.
Start a new session in that tool and enter:
Adapt the Open Pilot Wizard (OPW) installed on this computer to the current AI tool. Requirements:

1. Run `opw --version` to confirm that OPW is installed. Use the actual location of the `opw` command or the output of `npm root -g` to find the `@open-pilot/wizard/assets/` directory. In it, `agents/pilot-plugin-dev.md` is the routing prompt, and each subdirectory of `skills/` is a Skill.
2. Install this content according to the official conventions of the current tool: install all Skills under `skills/` into the user-level Skill directory of the current tool. If the current tool supports custom agents, create an agent named `pilot-plugin-dev` from the body of `pilot-plugin-dev.md`; otherwise, use the `opw` Skill as the entry point.
3. Before writing the files, replace `{{OPW_GLOBAL_HOME}}` with the absolute path of my home directory (forward slashes, no trailing slash), and replace `{{OPW_HOST}}` with `unknown`.
4. The knowledge base, scripts, and templates are already installed in `.open-pilot-wizard/` under my home directory. Reference them directly; do not copy or modify them.
5. Do not modify the OPW installation directory or the configuration directories of Claude Code, OpenCode, and Codex.
6. When I need to choose from a few options, use the built-in question feature of the current tool if available; otherwise, ask in plain text.
7. When finished, list all files you wrote and tell me how to start using OPW in the current tool.
After the adaptation is complete, enter the pilot-plugin-dev agent or invoke the opw Skill as the AI instructs, and then describe your goal.
Caution: Content you adapt yourself is not managed by OPW. After you upgrade OPW, run the adaptation again so the AI replaces the old copies with the new content. When you uninstall OPW, delete these files manually. How well the adaptation works depends on how the tool supports Skills and custom agents; OPW has not been verified with these tools.
Five Steps of Working with AI
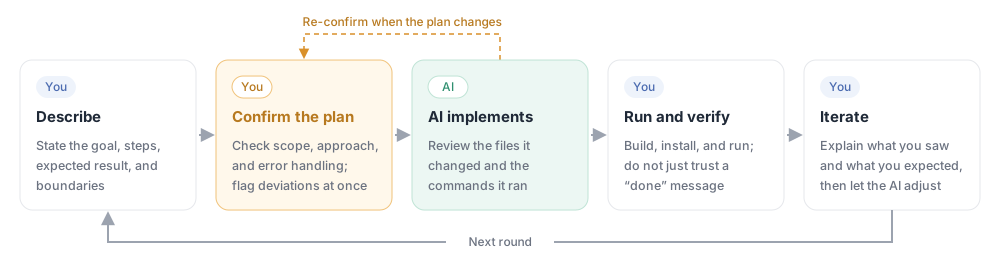
Typical Tasks: Route Assistant Example
This section uses one complete case to walk through the typical OPW tasks: creating a plugin, developing a feature, iterating, debugging, consulting on a capability, and migrating an existing app.
The goal of the case is to select a local KMZ route in the plugin, upload it to the aircraft, and view task progress through execution controls and a Pilot floating window:
- Select a local KMZ and show the file name and Waypoint count.
- Upload it to the aircraft and show progress, result, and failure reason.
- Show "Pending execution" after a successful upload; do not start automatically.
- Support start, pause, resume, and stop, and show Waypoint progress.
- Show a floating window in Pilot with task status and progress; tapping it returns to the plugin page.
Create a Plugin
Create the Route Assistant plugin by following Step 4 of the Quick Start, and confirm the base page opens in Pilot.
Develop a Feature
To add a feature, adjust the UI, fix an issue, or refactor an existing plugin, state the goal and the expectation, and ask the AI for a plan first:
Add KMZ route selection and upload to Route Assistant:
1. After selecting a local KMZ, show the file name and Waypoint count.
2. Show progress during upload, and show the reason with a retry option on failure.
3. Show "Pending execution" after a successful upload; do not start execution automatically.
Present the plan and verification steps first, and wait for my confirmation before changing code.
After implementation, verify in this order:
- Select a KMZ and confirm the file name and Waypoint count are correct.
- Trigger a failure and confirm the reason and retry entry are shown.
- Upload again and confirm the state becomes "Pending execution".
- Ask the AI to report the build, install, and runtime results separately.
Iterate
Build on the existing feature with a new request:
Add execution controls to Route Assistant:
- Support start, pause, resume, and stop.
- Show the current Waypoint progress.
- Show a floating window in Pilot with task status and progress, and return to the plugin page when tapped.
Explain how commands and state are synchronized first, and wait for my confirmation before implementing.
Debug an Issue
When something goes wrong, give the AI the operation, the expectation, and the actual result together, and ask it to locate the cause first:
Problem: After I tap "Start", the UI immediately shows the task as complete, but the aircraft does not execute it.
Operation: Select a KMZ, upload it successfully, then tap "Start".
Expected: The task enters the running state and updates progress by Waypoint.
Actual: The state changes to complete immediately.
Locate the state source first, explain the cause and the fix plan, and do not change code yet.
Fix it after confirming the cause, then verify again with the same sequence.
Consult on a Capability
When you only need to know how an API works or what an error code means, ask directly. The AI answers based on plugin development material only and does not modify your code:
Use OPW to answer: how does a Pilot plugin get the current aircraft connection state?
Provide a runnable code snippet and describe error handling.
Migrate an Existing MSDK App
If you already have an MSDK route app that is not yet a plugin, ask the AI to assess the migration first:
Assess migrating the existing MSDK route app to a Pilot plugin:
First explain which features can be kept, which need adjustment, and which cannot be migrated directly.
Wait for my confirmation before starting.
Acceptance
A successful build does not mean a successful install, and a successful install does not mean the business flow works. Confirm all three stages separately:
| Stage | What to check |
|---|---|
| Build | Gradle build passes and produces an APK |
| Install | The APK installs successfully on the target device |
| Runtime (Remote Controller only) | The page opens, KMZ selection, upload flow, and floating window behave correctly |
| Runtime (aircraft connected) | Real upload, execution controls, and state reporting work |
Resume After an Interruption
When a session is interrupted or you need to continue later, return to the same project and state that you want to continue:
Continue the Route Assistant development from last time. First summarize the current progress and the next step.
Do not create the project again.
Common Commands
| Command | Purpose |
|---|---|
opw doctor | Check whether the project and AI capabilities are ready |
opw update | Sync the installed OPW version to the current project; see Upgrade and Uninstall |