Creating a Camera Application

2016-12-15v3.5.1Github

If you come across any mistakes or bugs in this tutorial, please let us know using a Github issue or a post on the DJI forum. Please feel free to send us Github pull request and help us fix any issues.


This tutorial is designed for you to gain a basic understanding of the DJI Mobile SDK. It will implement the FPV view and two basic camera functionalities: Take Photo and Record video.

You can download the tutorial's final sample code project from this Github Page.

Preparation

Download the SDK

You can download the latest Android SDK from here: https://developer.dji.com/mobile-sdk/downloads.

Setup Android Development Environment

Throughout this tutorial we will be using Android Studio 2.1, which you can download from here: http://developer.android.com/sdk/index.html.

Implementing the UI of Application

In our previous tutorial Importing and Activating DJI SDK in Android Studio Project, you have learned how to import the DJI Android SDK into your Android Studio project and activate your application. If you haven't read that previously, please take a look at it. Once you've done that, let's continue to create the project.

Importing the Framework and Libraries

1. Open Android Studio and select File -> New -> New Project to create a new project, named 'FPVDemo'. Enter the company domain and package name (Here we use "com.dji.FPVDemo") you want and press Next. Set the minimum SDK version as API 19: Android 4.4 (KitKat) for "Phone and Tablet" and press Next. Then select "Empty Activity" and press Next. Lastly, leave the Activity Name as "MainActivity", and the Layout Name as "activity_main", Press "Finish" to create the project.

2. Unzip the Android SDK package downloaded from DJI Developer Website. Go to File -> New -> Import Module, enter the "API Library" folder location of the downloaded Android SDK package in the "Source directory" field. A "dJISDKLib" name will show in the "Module name" field. Press Next and Finish button to finish the settings.

importSDK

3. Next, double click on the "build.gradle(Module: app)" in the project navigator to open it and replace the content with the following:

apply plugin: 'com.android.application'
android {
compileSdkVersion 23
buildToolsVersion '23.0.2'
defaultConfig {
applicationId "com.dji.FPVDemo"
minSdkVersion 19
targetSdkVersion 23
versionCode 1
versionName "1.0"
}
buildTypes {
release {
minifyEnabled false
proguardFiles getDefaultProguardFile('proguard-android.txt'), 'proguard-rules.pro'
}
}
}
dependencies {
compile fileTree(include: ['*.jar'], dir: 'libs')
compile 'com.android.support:appcompat-v7:23.3.0'
compile 'com.android.support:design:23.3.0'
compile project(':dJISDKLIB')
}

In the code above, we modify its dependencies by adding compile project(':dJISDKLIB') in the "dependencies" part at the bottom, and change the compileSdkVersion, buildToolsVersion number, etc.

configureAndroidSDK

Then, select the Tools -> Android -> Sync Project with Gradle Files on the top bar and wait for Gradle project sync finish.

4. Let's right click on the 'app' module in the project navigator and click "Open Module Settings" to open the Project Structure window. Navigate to the "Dependencies" tab, you should find the "dJISDKLIB" appear in the list. Your SDK environmental setup should be ready now!

dependencies

5. Now, open the MainActivity.java file in com.dji.FPVDemo package and add import dji.sdk.sdkmanager.DJISDKManager; at the bottom of the import classes section as shown below:

package com.dji.FPVDemo;
import android.support.v7.app.AppCompatActivity;
import android.os.Bundle;
import dji.sdk.sdkmanager.DJISDKManager;

Wait for a few seconds and check if the words turn red, if they remain gray color, it means you can use DJI Android SDK in your project successfully now.

Building the Layouts of Activity

1. Creating FPVDemoApplication Class

Right-click on the package com.dji.FPVDemo in the project navigator and choose New -> Java Class, Type in "FPVDemoApplication" in the Name field and select "Class" as Kind field content.

Next, Replace the code of the "FPVDemoApplication.java" file with the following:

package com.dji.FPVDemo;
import android.app.Application;
public class FPVDemoApplication extends Application{
@Override
public void onCreate() {
super.onCreate();
}
}

Here, we override the onCreate() method. We can do some settings when the application is created here.

2. Implementing MainActivity Class

The MainActivity.java file is created by Android Studio by default. Let's replace the code of it with the following:

public class MainActivity extends Activity implements TextureView.SurfaceTextureListener, View.OnClickListener {
protected TextureView mVideoSurface = null;
private Button mCaptureBtn, mShootPhotoModeBtn, mRecordVideoModeBtn;
private ToggleButton mRecordBtn;
private TextView recordingTime;
@Override
protected void onCreate(Bundle savedInstanceState) {
super.onCreate(savedInstanceState);
setContentView(R.layout.activity_main);
initUI();
}
@Override
public void onResume() {
super.onResume();
}
@Override
public void onPause() {
super.onPause();
}
@Override
public void onStop() {
super.onStop();
}
public void onReturn(View view){
this.finish();
}
@Override
protected void onDestroy() {
super.onDestroy();
}
@Override
public void onSurfaceTextureAvailable(SurfaceTexture surface, int width, int height) {
}
@Override
public void onSurfaceTextureSizeChanged(SurfaceTexture surface, int width, int height) {
}
@Override
public boolean onSurfaceTextureDestroyed(SurfaceTexture surface) {
return false;
}
@Override
public void onSurfaceTextureUpdated(SurfaceTexture surface) {
}
private void initUI() {
// init mVideoSurface
mVideoSurface = (TextureView)findViewById(R.id.video_previewer_surface);
recordingTime = (TextView) findViewById(R.id.timer);
mCaptureBtn = (Button) findViewById(R.id.btn_capture);
mRecordBtn = (ToggleButton) findViewById(R.id.btn_record);
mShootPhotoModeBtn = (Button) findViewById(R.id.btn_shoot_photo_mode);
mRecordVideoModeBtn = (Button) findViewById(R.id.btn_record_video_mode);
if (null != mVideoSurface) {
mVideoSurface.setSurfaceTextureListener(this);
}
mCaptureBtn.setOnClickListener(this);
mRecordBtn.setOnClickListener(this);
mShootPhotoModeBtn.setOnClickListener(this);
mRecordVideoModeBtn.setOnClickListener(this);
recordingTime.setVisibility(View.INVISIBLE);
mRecordBtn.setOnCheckedChangeListener(new CompoundButton.OnCheckedChangeListener() {
@Override
public void onCheckedChanged(CompoundButton buttonView, boolean isChecked) {
}
});
}
@Override
public void onClick(View v) {
switch (v.getId()) {
case R.id.btn_capture:{
break;
}
case R.id.btn_shoot_photo_mode:{
break;
}
case R.id.btn_record_video_mode:{
break;
}
default:
break;
}
}
}

In the code shown above, we implement the following features:

1. Create the layout UI elements variables, including a TextureView mVideoSurface, three Buttons mCaptureBtn, mShootPhotoModeBtn, mRecordVideoModeBtn, one Toggle Button mRecordBtn and a TextView recordingTime.

2. Then invoke the initUI() method to initialize UI variables. And implement the setOnClickListener() method of Button for all the Buttons. Also implement the setOnCheckedChangeListener() method for Toggle Button.

3. Override the onClick() method to implement the three Buttons' click actions.

3. Implementing the MainActivity Layout

Open the activity_main.xml layout file and replace the code with the following:

<RelativeLayout xmlns:android="http://schemas.android.com/apk/res/android"
xmlns:tools="http://schemas.android.com/tools"
android:layout_width="match_parent"
android:layout_height="match_parent"
android:orientation="vertical">
<TextureView
android:id="@+id/video_previewer_surface"
android:layout_width="match_parent"
android:layout_height="match_parent"
android:layout_gravity="center"
android:layout_centerHorizontal="true"
android:layout_above="@+id/linearLayout" />
<LinearLayout
android:layout_width="match_parent"
android:layout_height="wrap_content"
android:orientation="horizontal"
android:layout_alignParentBottom="true"
android:id="@+id/linearLayout">
<Button
android:id="@+id/btn_capture"
android:layout_width="0dp"
android:layout_weight="1"
android:layout_gravity="center_vertical"
android:layout_height="wrap_content"
android:text="Capture"
android:textSize="12sp"/>
<ToggleButton
android:id="@+id/btn_record"
android:layout_width="0dp"
android:layout_height="wrap_content"
android:text="Start Record"
android:textOff="Start Record"
android:textOn="Stop Record"
android:layout_weight="1"
android:layout_gravity="center_vertical"
android:textSize="12dp"
android:checked="false" />
<Button
android:id="@+id/btn_shoot_photo_mode"
android:layout_width="0dp"
android:layout_weight="1"
android:layout_height="wrap_content"
android:layout_gravity="center_vertical"
android:text="Shoot Photo Mode"
android:textSize="12sp"/>
<Button
android:id="@+id/btn_record_video_mode"
android:layout_width="0dp"
android:layout_height="wrap_content"
android:text="Record Video Mode"
android:layout_weight="1"
android:layout_gravity="center_vertical" />
</LinearLayout>
<TextView
android:id="@+id/timer"
android:layout_width="150dp"
android:layout_weight="1"
android:layout_height="wrap_content"
android:layout_gravity="center_vertical"
android:layout_marginTop="23dp"
android:gravity="center"
android:textColor="#ffffff"
android:layout_alignTop="@+id/video_previewer_surface"
android:layout_centerHorizontal="true" />
</RelativeLayout>

In the xml file, we create a TextureView(id: video_previewer_surface) element to show the live video stream from the camera. Moreover, we implement a LinearLayout element to create the "Capture" Button(id: btn_capture), "Record" ToggleButton(id: btn_record), "Shoot Photo Mode" Button(id: btn_shoot_photo_mode) and "Record Video Mode" Button(id: btn_record_video_mode).

Lastly, we create a TextView(id: timer) element to show the record video time.

4. Implementing ConnectionActivity Class

To improve the user experience, we had better create an activity to show the connection status between the DJI Product and the SDK, once it's connected, the user can press the OPEN button to enter the MainActivity.

Now let's Right-click on the package com.dji.FPVDemo in the project navigator and choose New -> Activity -> Basic Activity, Type in "ConnectionActivity" in the "Activity Name" field and press "Finish" button.

Next, replace the code of the "ConnectionActivity.java" file with the following:

public class ConnectionActivity extends Activity implements View.OnClickListener {
private static final String TAG = ConnectionActivity.class.getName();
private TextView mTextConnectionStatus;
private TextView mTextProduct;
private Button mBtnOpen;
@Override
protected void onCreate(Bundle savedInstanceState) {
super.onCreate(savedInstanceState);
// When the compile and target version is higher than 22, please request the
// following permissions at runtime to ensure the
// SDK work well.
if (Build.VERSION.SDK_INT >= Build.VERSION_CODES.M) {
ActivityCompat.requestPermissions(this,
new String[]{Manifest.permission.WRITE_EXTERNAL_STORAGE, Manifest.permission.VIBRATE,
Manifest.permission.INTERNET, Manifest.permission.ACCESS_WIFI_STATE,
Manifest.permission.WAKE_LOCK, Manifest.permission.ACCESS_COARSE_LOCATION,
Manifest.permission.ACCESS_NETWORK_STATE, Manifest.permission.ACCESS_FINE_LOCATION,
Manifest.permission.CHANGE_WIFI_STATE, Manifest.permission.MOUNT_UNMOUNT_FILESYSTEMS,
Manifest.permission.READ_EXTERNAL_STORAGE, Manifest.permission.SYSTEM_ALERT_WINDOW,
Manifest.permission.READ_PHONE_STATE,
}
, 1);
}
setContentView(R.layout.activity_connection);
initUI();
}
@Override
public void onResume() {
Log.e(TAG, "onResume");
super.onResume();
}
@Override
public void onPause() {
Log.e(TAG, "onPause");
super.onPause();
}
@Override
public void onStop() {
Log.e(TAG, "onStop");
super.onStop();
}
public void onReturn(View view){
Log.e(TAG, "onReturn");
this.finish();
}
@Override
protected void onDestroy() {
Log.e(TAG, "onDestroy");
super.onDestroy();
}
private void initUI() {
mTextConnectionStatus = (TextView) findViewById(R.id.text_connection_status);
mTextProduct = (TextView) findViewById(R.id.text_product_info);
mBtnOpen = (Button) findViewById(R.id.btn_open);
mBtnOpen.setOnClickListener(this);
mBtnOpen.setEnabled(false);
}
@Override
public void onClick(View v) {
switch (v.getId()) {
case R.id.btn_open: {
break;
}
default:
break;
}
}
}

In the code shown above, we implement the following features:

  1. Create the layout UI elements variables, including two TextureViews mTextConnectionStatus, mTextProduct, and one Button mBtnOpen.

  2. In the onCreate() method, we request several permissions at runtime to ensure the SDK works well when the compile and target SDK version is higher than 22(Like Android Marshmallow 6.0 device and API 23). Then invoke the initUI() methods to initialize the UI elements.

  3. Next, implement the initUI() method to initialize the three TextViews and the Button. Then invoke setOnClickListener() method of mBtnOpen and pass this as the param.

  4. Lastly, override the onClick() method to implement the Button's click action.

5. Implementing the ConnectionActivity Layout

Open the activity_connection.xml layout file and replace the code with the following:

<?xml version="1.0" encoding="utf-8"?>
<RelativeLayout xmlns:android="http://schemas.android.com/apk/res/android"
xmlns:tools="http://schemas.android.com/tools"
android:layout_width="match_parent"
android:layout_height="match_parent"
android:orientation="vertical">
<TextView
android:id="@+id/text_connection_status"
android:layout_width="wrap_content"
android:layout_height="wrap_content"
android:gravity="center"
android:text="Status: No Product Connected"
android:textColor="@android:color/black"
android:textSize="20dp"
android:textStyle="bold"
android:layout_alignBottom="@+id/text_product_info"
android:layout_centerHorizontal="true"
android:layout_marginBottom="89dp" />
<TextView
android:id="@+id/text_product_info"
android:layout_width="wrap_content"
android:layout_height="wrap_content"
android:layout_centerHorizontal="true"
android:layout_marginTop="270dp"
android:text="@string/product_information"
android:textColor="@android:color/black"
android:textSize="20dp"
android:gravity="center"
android:textStyle="bold"
/>
<Button
android:id="@+id/btn_open"
android:layout_width="150dp"
android:layout_height="55dp"
android:layout_centerHorizontal="true"
android:layout_marginTop="350dp"
android:background="@drawable/round_btn"
android:text="Open"
android:textColor="@color/colorWhite"
android:textSize="20dp"
/>
<TextView
android:layout_width="wrap_content"
android:layout_height="wrap_content"
android:layout_centerHorizontal="true"
android:layout_marginTop="430dp"
android:text="@string/sdk_version"
android:textSize="15dp"
android:id="@+id/textView2" />
<TextView
android:layout_width="wrap_content"
android:layout_height="wrap_content"
android:textAppearance="?android:attr/textAppearanceSmall"
android:text="DJIFPVDemo"
android:id="@+id/textView"
android:layout_marginTop="58dp"
android:textStyle="bold"
android:textSize="20dp"
android:textColor="@color/colorBlack"
android:layout_alignParentTop="true"
android:layout_centerHorizontal="true" />
</RelativeLayout>

In the xml file, we create four TextViews and one Button within a RelativeLayout. We use the TextView(id: text_connection_status) to show the product connection status and use the TextView(id:text_product_info) to show the connected product name. The Button(id: btn_open) is used to open the MainActivity.

6. Configuring the Resource XMLs

Once you finish the above steps, let's copy all the images file from this Github sample project's drawable folder (app->src->main->res->drawable) to the same folder in your project.

imageFiles

Moreover, open the "colors.xml" file and update the content as shown below:

<?xml version="1.0" encoding="utf-8"?>
<resources>
<color name="colorWhite">#FFFFFF</color>
<color name="colorBlack">#000000</color>
<color name="colorPrimary">#3F51B5</color>
<color name="colorPrimaryDark">#303F9F</color>
<color name="colorAccent">#FF4081</color>
</resources>

Furthermore, open the "strings.xml" file and replace the content with the followings:

<?xml version="1.0" encoding="utf-8"?>
<resources>
<string name="app_name">DJI FPV Demo</string>
<string name="action_settings">Settings</string>
<string name="disconnected">Disconnected</string>
<string name="product_information">Product Information</string>
<string name="connection_loose">Status: No Product Connected</string>
<string name="sdk_version">DJI SDK Version: 3.3</string>
</resources>

Lastly, open the "styles.xml" file and replace the content with the followings:

<resources>
<!-- Base application theme. -->
<style name="AppTheme" parent="Theme.AppCompat.Light.DarkActionBar">
<!-- Customize your theme here. -->
<item name="colorPrimary">@color/colorPrimary</item>
<item name="colorPrimaryDark">@color/colorPrimaryDark</item>
<item name="colorAccent">@color/colorAccent</item>
</style>
</resources>

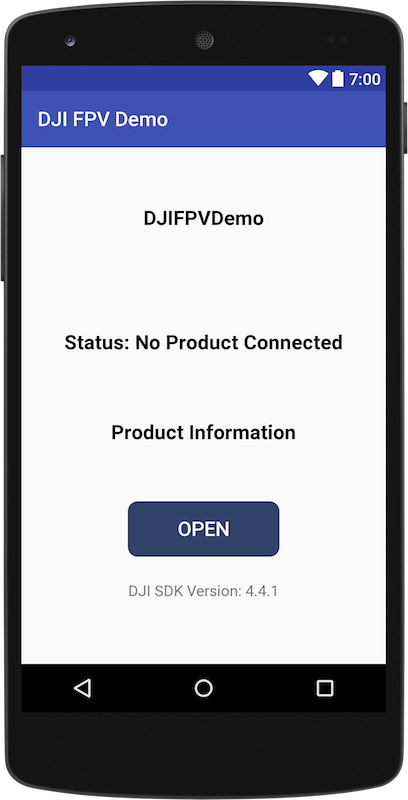
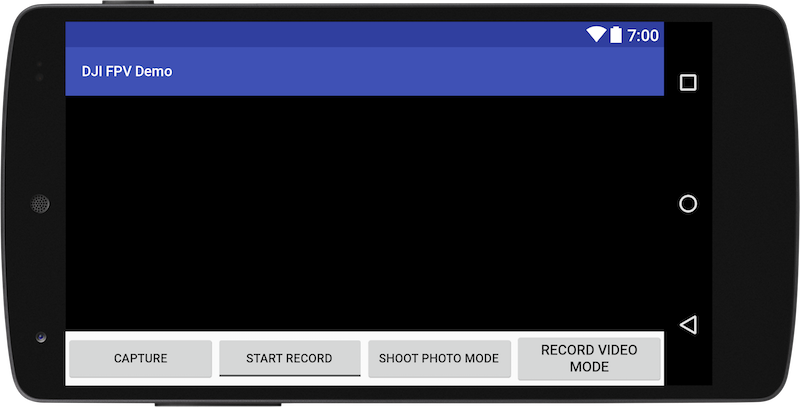
Now, if you open the activity_main.xml file, and click on the Design tab on the bottom left, you should see the preview screenshots of MainActivity and ConnectionActivity as shown below:

  • ConnectionActivity

ConnectionActivity

  • MainActivity

MainActivity

For more details, please check the Github source code of this tutorial.

Registering the Application

After you finish the above steps, let's register our application with the App Key you apply from DJI Developer Website. If you are not familiar with the App Key, please check the Get Started.

1. Let's open the AndroidManifest.xml file and add the following elements on top of the application element:

<uses-permission android:name="android.permission.BLUETOOTH" />
<uses-permission android:name="android.permission.BLUETOOTH_ADMIN" />
<uses-permission android:name="android.permission.VIBRATE" />
<uses-permission android:name="android.permission.INTERNET" />
<uses-permission android:name="android.permission.ACCESS_WIFI_STATE" />
<uses-permission android:name="android.permission.WAKE_LOCK" />
<uses-permission android:name="android.permission.ACCESS_COARSE_LOCATION" />
<uses-permission android:name="android.permission.ACCESS_NETWORK_STATE" />
<uses-permission android:name="android.permission.ACCESS_FINE_LOCATION" />
<uses-permission android:name="android.permission.CHANGE_WIFI_STATE" />
<uses-permission android:name="android.permission.MOUNT_UNMOUNT_FILESYSTEMS" />
<uses-permission android:name="android.permission.WRITE_EXTERNAL_STORAGE" />
<uses-permission android:name="android.permission.READ_EXTERNAL_STORAGE" />
<uses-permission android:name="android.permission.SYSTEM_ALERT_WINDOW" />
<uses-permission android:name="android.permission.READ_PHONE_STATE" />
<uses-feature android:name="android.hardware.camera" />
<uses-feature android:name="android.hardware.camera.autofocus" />
<uses-feature
android:name="android.hardware.usb.host"
android:required="false" />
<uses-feature
android:name="android.hardware.usb.accessory"
android:required="true" />

Here, we request permissions that the application must be granted in order for it to register DJI SDK correctly. Also, we declare the camera and USB hardwares which are used by the application.

Moreover, let's add the following elements as childs of element on top of the "MainActivity" activity element as shown below:

<!-- DJI SDK -->
<uses-library android:name="com.android.future.usb.accessory" />
<meta-data
android:name="com.dji.sdk.API_KEY"
android:value="Please enter your APP Key here." />
<activity
android:name="dji.sdk.sdkmanager.DJIAoaControllerActivity"
android:theme="@android:style/Theme.Translucent" >
<intent-filter>
<action android:name="android.hardware.usb.action.USB_ACCESSORY_ATTACHED" />
</intent-filter>
<meta-data
android:name="android.hardware.usb.action.USB_ACCESSORY_ATTACHED"
android:resource="@xml/accessory_filter" />
</activity>
<service android:name="dji.sdk.sdkmanager.DJIGlobalService" >
</service>
<!-- DJI SDK -->

In the code above, you should substitute your App Key of the application for "Please enter your App Key here." in the value attribute under the android:name="com.dji.sdk.API_KEY" attribute.

Lastly, update the "MainActivity" and "ConnectionActivity" activity elements as shown below:

<activity android:name=".ConnectionActivity"
android:screenOrientation="portrait">
<intent-filter>
<action android:name="android.intent.action.MAIN" />
<category android:name="android.intent.category.LAUNCHER" />
</intent-filter>
</activity>
<activity android:name=".MainActivity"
android:screenOrientation="landscape"></activity>

In the code above, we add the attributes of "android:screenOrientation" to set "ConnectionActivity" as portrait and set "MainActivity" as landscape.

2. After you finish the steps above, open the "FPVDemoApplication.java" file and replace the code with the same file in the Github Source Code, here we explain the important parts of it:

@Override
public void onCreate() {
super.onCreate();
mHandler = new Handler(Looper.getMainLooper());
//This is used to start SDK services and initiate SDK.
DJISDKManager.getInstance().initSDKManager(this, mDJISDKManagerCallback);
}
/**
* When starting SDK services, an instance of interface DJISDKManager.DJISDKManagerCallback will be used to listen to
* the SDK Registration result and the product changing.
*/
private DJISDKManager.DJISDKManagerCallback mDJISDKManagerCallback = new DJISDKManager.DJISDKManagerCallback() {
//Listens to the SDK registration result
@Override
public void onGetRegisteredResult(DJIError error) {
if(error == DJISDKError.REGISTRATION_SUCCESS) {
Handler handler = new Handler(Looper.getMainLooper());
handler.post(new Runnable() {
@Override
public void run() {
Toast.makeText(getApplicationContext(), "Register Success", Toast.LENGTH_LONG).show();
}
});
DJISDKManager.getInstance().startConnectionToProduct();
} else {
Handler handler = new Handler(Looper.getMainLooper());
handler.post(new Runnable() {
@Override
public void run() {
Toast.makeText(getApplicationContext(), "Register sdk fails, check network is available", Toast.LENGTH_LONG).show();
}
});
}
Log.e("TAG", error.toString());
}
//Listens to the connected product changing, including two parts, component changing or product connection changing.
@Override
public void onProductChanged(DJIBaseProduct oldProduct, DJIBaseProduct newProduct) {
mProduct = newProduct;
if(mProduct != null) {
mProduct.setDJIBaseProductListener(mDJIBaseProductListener);
}
notifyStatusChange();
}
};
private DJIBaseProductListener mDJIBaseProductListener = new DJIBaseProductListener() {
@Override
public void onComponentChange(DJIComponentKey key, DJIBaseComponent oldComponent, DJIBaseComponent newComponent) {
if(newComponent != null) {
newComponent.setDJIComponentListener(mDJIComponentListener);
}
notifyStatusChange();
}
@Override
public void onProductConnectivityChanged(boolean isConnected) {
notifyStatusChange();
}
};

Here, we implement several features:

  1. We override the onCreate() method to initialize the DJISDKManager.
  2. Implement the two interface methods of DJISDKManagerCallback. You can use the onGetRegisteredResult() method to check the Application registration status and show text message here. Using the onProductChanged() method, we can check the product connection status and invoke the notifyStatusChange() method to notify status changes.
  3. Implement the two interface methods of DJIBaseProductListener. You can use the onComponentChange() method to check the product component change status and invoke the notifyStatusChange() method to notify status changes. Also, you can use the onProductConnectivityChanged() method to notify the product connectivity changes.

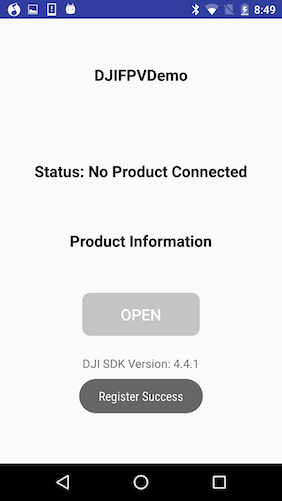
Now let's build and run the project and install it to your Android device. If everything goes well, you should see the "Register Success" textView like the following screenshot when you register the app successfully.

registerSuccess

Important: Please check if the "armeabi-v7a", "arm64-v8a" and "x86" lib folders has been added to your jnLibs folder in dJISDKLib successfully before testing resgistering the app.

armeabi

For more details of registering your application, please check this tutorial: Importing and Activating DJI SDK in Android Studio Project.

Working on the ConnectionActivity

Once you finish the steps above, let's open the "ConnectionActivity.java" file and add the following code at the bottom of onCreate() method:

// Register the broadcast receiver for receiving the device connection's changes.
IntentFilter filter = new IntentFilter();
filter.addAction(FPVDemoApplication.FLAG_CONNECTION_CHANGE);
registerReceiver(mReceiver, filter);

In the code above, we register the broadcast receiver for receiving the device connection's changes.

Next, add the following methods below the initUI() method:

protected BroadcastReceiver mReceiver = new BroadcastReceiver() {
@Override
public void onReceive(Context context, Intent intent) {
refreshSDKRelativeUI();
}
};
@Override
protected void onDestroy() {
Log.e(TAG, "onDestroy");
unregisterReceiver(mReceiver);
super.onDestroy();
}
private void refreshSDKRelativeUI() {
DJIBaseProduct mProduct = FPVDemoApplication.getProductInstance();
if (null != mProduct && mProduct.isConnected()) {
Log.v(TAG, "refreshSDK: True");
mBtnOpen.setEnabled(true);
String str = mProduct instanceof DJIAircraft ? "DJIAircraft" : "DJIHandHeld";
mTextConnectionStatus.setText("Status: " + str + " connected");
mProduct.setDJIVersionCallback(this);
if (null != mProduct.getModel()) {
mTextProduct.setText("" + mProduct.getModel().getDisplayName());
} else {
mTextProduct.setText(R.string.product_information);
}
} else {
Log.v(TAG, "refreshSDK: False");
mBtnOpen.setEnabled(false);
mTextProduct.setText(R.string.product_information);
mTextConnectionStatus.setText(R.string.connection_loose);
}
}

In the code above, we implement the following features:

  1. Create the "BroadcastReceiver" and override its onReceive() method to invoke the refreshSDKRelativeUI() method to refresh the UI elements.

  2. We override the onDestroy() method and invoke the unregisterReceiver() method by passing the mReceiver variable to unregister the broadcast receiver.

  3. In the refreshSDKRelativeUI() method, we check the DJIBaseProduct's connection status by invoking isConnected() method. If the product is connected, we enable the mBtnOpen button, update the mTextConnectionStatus's text content and update the mTextProduct's content with product name. Otherwise, if the product is disconnected, we disable the mBtnOpen button and update the mTextProduct and mTextConnectionStatus textViews' content.

Finally, let's implement the onClick() method of mBtnOpen button as shown below:

@Override
public void onClick(View v) {
switch (v.getId()) {
case R.id.btn_open: {
Intent intent = new Intent(this, MainActivity.class);
startActivity(intent);
break;
}
default:
break;
}
}

Here, we create an Intent object with the class of MainActivity and invoke the startActivity() method by passing intent object to start the MainActivity.

Implementing the First Person View

Now, let's open the "MainActivity.java" file and declare the TAG and mReceivedVideoDataCallBack variables as shown below:

private static final String TAG = MainActivity.class.getName();
protected DJICamera.CameraReceivedVideoDataCallback mReceivedVideoDataCallBack = null;

Then update the onCreate() method as shown below:

@Override
protected void onCreate(Bundle savedInstanceState) {
super.onCreate(savedInstanceState);
setContentView(R.layout.activity_main);
initUI();
// The callback for receiving the raw H264 video data for camera live view
mReceivedVideoDataCallBack = new DJICamera.CameraReceivedVideoDataCallback() {
@Override
public void onResult(byte[] videoBuffer, int size) {
if(mCodecManager != null){
// Send the raw H264 video data to codec manager for decoding
mCodecManager.sendDataToDecoder(videoBuffer, size);
}else {
Log.e(TAG, "mCodecManager is null");
}
}
};
}

In the code above, we initialize the mReceivedVideoDataCallBack variable using DJICamera's CameraReceivedVideoDataCallback(). Inside the callback, we override its onResult() method to get the raw H264 video data and send them to mCodecManager for decoding.

Next, let's implement the onProductChange() method invoke it in the onResume() method as shown below:

protected void onProductChange() {
initPreviewer();
}
@Override
public void onResume() {
Log.e(TAG, "onResume");
super.onResume();
initPreviewer();
onProductChange();
if(mVideoSurface == null) {
Log.e(TAG, "mVideoSurface is null");
}
}

Furthermore, let's implement two important methods to show and reset the live video stream on our mVideoSurface TextureView:

private void initPreviewer() {
DJIBaseProduct product = FPVDemoApplication.getProductInstance();
if (product == null || !product.isConnected()) {
showToast(getString(R.string.disconnected));
} else {
if (null != mVideoSurface) {
mVideoSurface.setSurfaceTextureListener(this);
}
if (!product.getModel().equals(DJIBaseProduct.Model.UnknownAircraft))
{
DJICamera camera = product.getCamera();
if (camera != null){
// Set the callback
camera.setDJICameraReceivedVideoDataCallback(mReceivedVideoDataCallBack);
}
}
}
}
private void uninitPreviewer() {
DJICamera camera = FPVDemoApplication.getCameraInstance();
if (camera != null){
// Reset the callback
FPVDemoApplication.getCameraInstance().setDJICameraReceivedVideoDataCallback(null);
}
}

In the initPreviewer() method, firstly, we check the product connection status and invoke the setSurfaceTextureListener() method of TextureView to set texture listener to MainActivity. Then get the DJICamera variable by invoking the getCamera() method of DJIBaseProduct and set mReceivedVideoDataCallBack as its "DJICameraReceivedVideoDataCallback". So once the camera is connected and receive video data, it will show on the mVideoSurface TextureView.

Moreover, we implement the uninitPreviewer() method to reset DJICamera's "DJICameraReceivedVideoDataCallback" to null.

Now, let's override the four SurfaceTextureListener interface methods as shown below:

@Override
public void onSurfaceTextureAvailable(SurfaceTexture surface, int width, int height) {
Log.e(TAG, "onSurfaceTextureAvailable");
if (mCodecManager == null) {
mCodecManager = new DJICodecManager(this, surface, width, height);
}
}
@Override
public void onSurfaceTextureSizeChanged(SurfaceTexture surface, int width, int height) {
Log.e(TAG, "onSurfaceTextureSizeChanged");
}
@Override
public boolean onSurfaceTextureDestroyed(SurfaceTexture surface) {
Log.e(TAG,"onSurfaceTextureDestroyed");
if (mCodecManager != null) {
mCodecManager.cleanSurface();
mCodecManager = null;
}
return false;
}
@Override
public void onSurfaceTextureUpdated(SurfaceTexture surface) {
}

We init the mCodecManager variable in the onSurfaceTextureAvailable() method, then reset the mCodecManager and invoke its cleanSurface() method to reset the surface data.

For more detail implementations, please check the Github source code of this tutorial.

Connecting to the Aircraft or Handheld Device

After you finish the steps above, you can now connect your mobile device to your DJI Aircraft to use the application, like checking the FPV View. Here are the guidelines:

  • In order to connect to a DJI Phantom 4, Inspire 1, Phantom 3 Professional, etc:

    1. First, turn on your remote controller.

    2. Then, turn on the power of the DJI aircraft.

    3. Connect your Android device to the remote controller using the USB cable.

    4. Run the application and wait for a few seconds, you will be able to view the live video stream from your aircraft's camera based on what we've finished of the application so far!

  • In order to connect to Phantom 3 Standard, Phantom 3 4K, or OSMO:

    1. First, turn on your remote controller or OSMO.

    2. Then, turn on the power of the DJI aircraft. (If you are using Phantom 3 Standard or Phantom 3 4K)

    3. Search for the WiFi of the aircraft's remote controller or OSMO and connect your android device to it.

    4. Run the application and wait for a few seconds, you will be able to view the live video stream from your aircraft or OSMO's camera based on what we've finished of the application so far!

Enjoying the First Person View

If you can see the live video stream in the application, congratulations! Let's move forward.

fpv

Implementing the Capture function

Now, let's override the onClick() method to implement the capture button click action:

@Override
public void onClick(View v) {
switch (v.getId()) {
case R.id.btn_capture:{
captureAction();
break;
}
default:
break;
}
}

Then implement the captureAction() method as shown below:

// Method for taking photo
private void captureAction(){
DJICameraSettingsDef.CameraMode cameraMode = DJICameraSettingsDef.CameraMode.ShootPhoto;
final DJICamera camera = FPVDemoApplication.getCameraInstance();
if (camera != null) {
DJICameraSettingsDef.CameraShootPhotoMode photoMode = DJICameraSettingsDef.CameraShootPhotoMode.Single; // Set the camera capture mode as Single mode
camera.startShootPhoto(photoMode, new DJICommonCallbacks.DJICompletionCallback() {
@Override
public void onResult(DJIError error) {
if (error == null) {
showToast("take photo: success");
} else {
showToast(error.getDescription());
}
}
}); // Execute the startShootPhoto API
}
}

In the code above, we firstly create a "CameraMode" variable and assign CameraMode.ShootPhoto to it. Next, create a "CameraShootPhotoMode" variable and assign "CameraShootPhotoMode.Single" to it. The camera work mode for ShootPhoto has several modes within its definition. You can use "AEBCapture", "Burst", "HDR", etc for "CameraShootPhotoMode", for more details, please check DJICameraSettingsDef.CameraShootPhotoMode.

Next, implement the startShootPhoto() method of DJICamera to control the camera to shoot photo. We override its onResult() method to get the result and show related text to users.

Build and run your project and then try the shoot photo function. If the screen flashes after your press the Capture button, your capture function should work now.

Implementing the Record function

Switching Camera Mode

Before we go ahead to implement the record action method, let's implement the switch Camera Mode feature. Improve the onClick() method by adding button click actions for mShootPhotoModeBtn and mRecordVideoModeBtn as follows:

@Override
public void onClick(View v) {
switch (v.getId()) {
case R.id.btn_capture:{
captureAction();
break;
}
case R.id.btn_shoot_photo_mode:{
switchCameraMode(DJICameraSettingsDef.CameraMode.ShootPhoto);
break;
}
case R.id.btn_record_video_mode:{
switchCameraMode(DJICameraSettingsDef.CameraMode.RecordVideo);
break;
}
default:
break;
}
}

Next, implement the switchCameraMode() method:

private void switchCameraMode(DJICameraSettingsDef.CameraMode cameraMode){
DJICamera camera = FPVDemoApplication.getCameraInstance();
if (camera != null) {
camera.setCameraMode(cameraMode, new DJICommonCallbacks.DJICompletionCallback() {
@Override
public void onResult(DJIError error) {
if (error == null) {
showToast("Switch Camera Mode Succeeded");
} else {
showToast(error.getDescription());
}
}
});
}
}

In the code above, we invoke the setCameraMode() method of DJICamera and assign the CameraMode parameter to it. Then override the onResult() method to show the change camera mode result to the users.

Working on the Record Action

Once we finish the switch camera mode feature, we can now implement the record feature. Let's improve the initUI() method by add the following code at the bottom of it:

mRecordBtn.setOnCheckedChangeListener(new CompoundButton.OnCheckedChangeListener() {
@Override
public void onCheckedChanged(CompoundButton buttonView, boolean isChecked) {
if (isChecked) {
recordingTime.setVisibility(View.VISIBLE);
startRecord();
} else {
recordingTime.setVisibility(View.INVISIBLE);
stopRecord();
}
}
});

Here, we implement the setOnCheckedChangeListener() method of ToggleButton mRecordBtn and override its onCheckedChanged() method to check the isChecked variable value, which means the toggle state of the button, and invoke the startRecord() and stopRecord() methods relatively.

Next, implement the startRecord() and stopRecord() methods as shown below:

// Method for starting recording
private void startRecord(){
DJICameraSettingsDef.CameraMode cameraMode = DJICameraSettingsDef.CameraMode.RecordVideo;
final DJICamera camera = FPVDemoApplication.getCameraInstance();
if (camera != null) {
camera.startRecordVideo(new DJICommonCallbacks.DJICompletionCallback(){
@Override
public void onResult(DJIError error)
{
if (error == null) {
showToast("Record video: success");
}else {
showToast(error.getDescription());
}
}
}); // Execute the startRecordVideo API
}
}
// Method for stopping recording
private void stopRecord(){
DJICamera camera = FPVDemoApplication.getCameraInstance();
if (camera != null) {
camera.stopRecordVideo(new DJICommonCallbacks.DJICompletionCallback(){
@Override
public void onResult(DJIError error)
{
if(error == null) {
showToast("Stop recording: success");
}else {
showToast(error.getDescription());
}
}
}); // Execute the stopRecordVideo API
}
}

In the code above, we invoke the startRecordVideo() and stopRecordVideo() methods of DJICamera to implement the start record and stop record features. And show the result messages to our user by override the onResult() methods.

Lastly, when the video starts recording, we should show the recording time info to our users. So let's add the following code to the bottom of onCreate() method as follows:

DJICamera camera = FPVDemoApplication.getCameraInstance();
if (camera != null) {
camera.setDJICameraUpdatedSystemStateCallback(new DJICamera.CameraUpdatedSystemStateCallback() {
@Override
public void onResult(CameraSystemState cameraSystemState) {
if (null != cameraSystemState) {
int recordTime = cameraSystemState.getCurrentVideoRecordingTimeInSeconds();
int minutes = (recordTime % 3600) / 60;
int seconds = recordTime % 60;
final String timeString = String.format("%02d:%02d", minutes, seconds);
final boolean isVideoRecording = cameraSystemState.isRecording();
MainActivity.this.runOnUiThread(new Runnable() {
@Override
public void run() {
recordingTime.setText(timeString);
/*
* Update recordingTime TextView visibility and mRecordBtn's check state
*/
if (isVideoRecording){
recordingTime.setVisibility(View.VISIBLE);
}else
{
recordingTime.setVisibility(View.INVISIBLE);
}
}
});
}
}
});
}

Here, we implement the setDJICameraUpdatedSystemStateCallback() of DJICamera and override the onResult() method to get the current camera system state, we can call the getCurrentVideoRecordingTimeInSeconds() method of "DJICamera.CameraSystemState" to get the record time info. Before we show the record time info to our users, we should convert it from seconds to "00:00" format including minutes and seconds. Lastly, we update the TextView recordingTime variable's text value with the latest record time info and update the visibility of recordingTime TextView in UI Thread.

For more details, please check the Github source code of this tutorial.

Now, let's build and run the project and check the functions. Here we use Phantom 4 as an example. You can try to play with the Capture, Record and Switch Camera WorkMode functions, here is a gif animation to demo these three functions:

demoAni

Congratulations! Your Aerial FPV android app is complete, you can now use this app to control the camera of your DJI Product now.

Summary

In this tutorial, you’ve learned how to use DJI Mobile SDK to show the FPV View from the aircraft's camera and control the camera of DJI's Aircraft to shoot photo and record video. These are the most basic and common features in a typical drone mobile app: Capture and Record. However, if you want to create a drone app which is more fancy, you still have a long way to go. More advanced features should be implemented, including previewing the photo and video in the SD Card, showing the OSD data of the aircraft and so on. Hope you enjoy this tutorial, and stay tuned for our next one!