Creating a Photo and Video Playback Application

2020-05-10v4.12Github

If you come across any mistakes or bugs in this tutorial, please let us know by sending emails to dev@dji.com. Please feel free to send us Github pull request and help us fix any issues.


In this tutorial, you will learn how to use DJI Mobile SDK to access the media resources in the SD card of the aircraft's camera. By the end of this tutorial you will have an app that you can use to preview photos, play videos, download or delete files and so on.

In order for our app to manage photos and videos, however, it must first be able to take and record them. Fortunately, by using DJI iOS SDK SDK, you can implement shooting photos and recording videos functionalities easily with standard DJI Go UIs.

You can download the tutorial's final sample project from this Github Page.

We use Phantom 4 and iPad Air as an example to make this demo. For more details of customizing the layouts for iPhone devices, please check the tutorial's Github Sample Project. Let's get started!

Application Activation and Aircraft Binding in China

For DJI SDK mobile application used in China, it's required to activate the application and bind the aircraft to the user's DJI account.

If an application is not activated, the aircraft not bound (if required), or a legacy version of the SDK (< 4.1) is being used, all camera live streams will be disabled, and flight will be limited to a zone of 100m diameter and 30m height to ensure the aircraft stays within line of sight.

To learn how to implement this feature, please check this tutorial Application Activation and Aircraft Binding.

Implementing DJI Go Style Default Layout

Importing DJI SDK and UX SDK with CocoaPods

Now, let's create a new project in Xcode, choose Single View Application template for your project and press "Next", then enter "PlaybackDemo" in the Product Name field and keep the other default settings. Once the project is created, let's import the DJI SDK and DJI UX SDK.

You can check Getting Started with DJI UX SDK tutorial to learn how to import the DJISDK.framework and DJIUXSDK.framework into your Xcode project.

Importing the DJIWidget

You can check Creating a Camera Application tutorial to learn how to download and import the DJIWidget into your Xcode project.

Working on the MainViewController and DefaultlayoutViewController

You can check this tutorial's Github Sample Code to learn how to implement the MainViewController to do SDK registration and update UIs and show alert views to inform users when DJI product is connected and disconnected. Also, you can learn how to implement shooting photos and recording videos functionalities with standard DJI Go UIs by using DUXDefaultLayoutViewcontroller of DJI UX SDK from the Getting Started with DJI UX SDK tutorial.

If everything goes well, you can see the live video feed and test the shoot photo and record video features like this:

freeform

Congratulations! Let's move forward.

Implementing Playback Features

In order to preview, edit or download the photos or videos files from the DJICamera, you need to use the DJIPlaybackManager or DJIMediaManager of DJICamera. Here, we use DJIPlaybackManager to demonstrate how to implement it.

Switching to Playback Mode

Now, let's create a new file, choose the "Cocoa Touch Class" template and choose UIViewController as its subclass, name it as "PlaybackViewController". We will use it to implement the camera playback features.

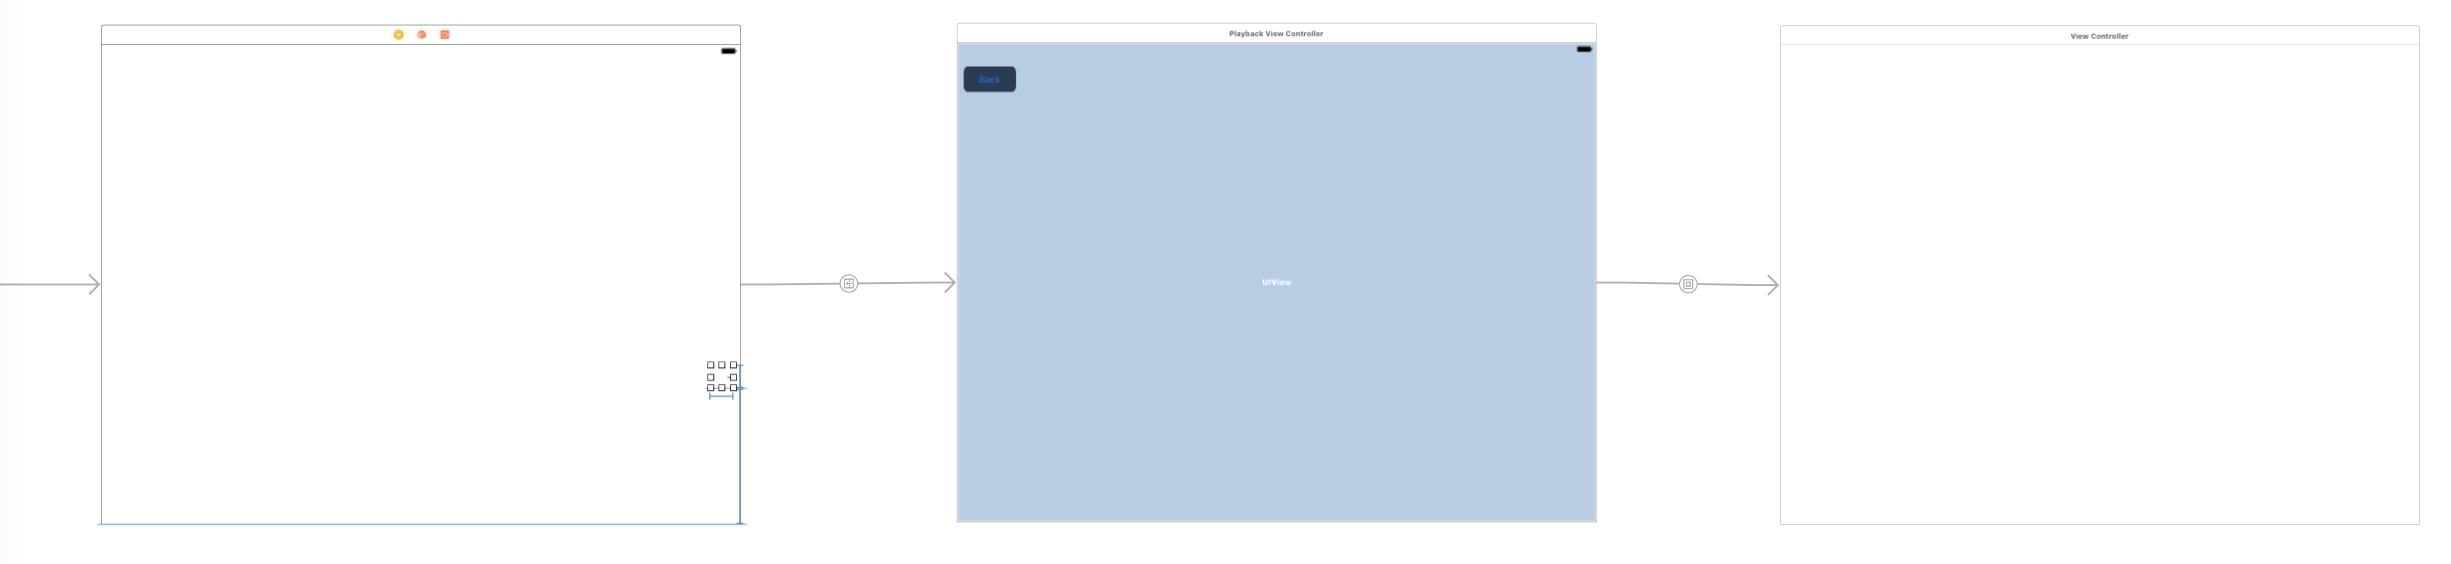
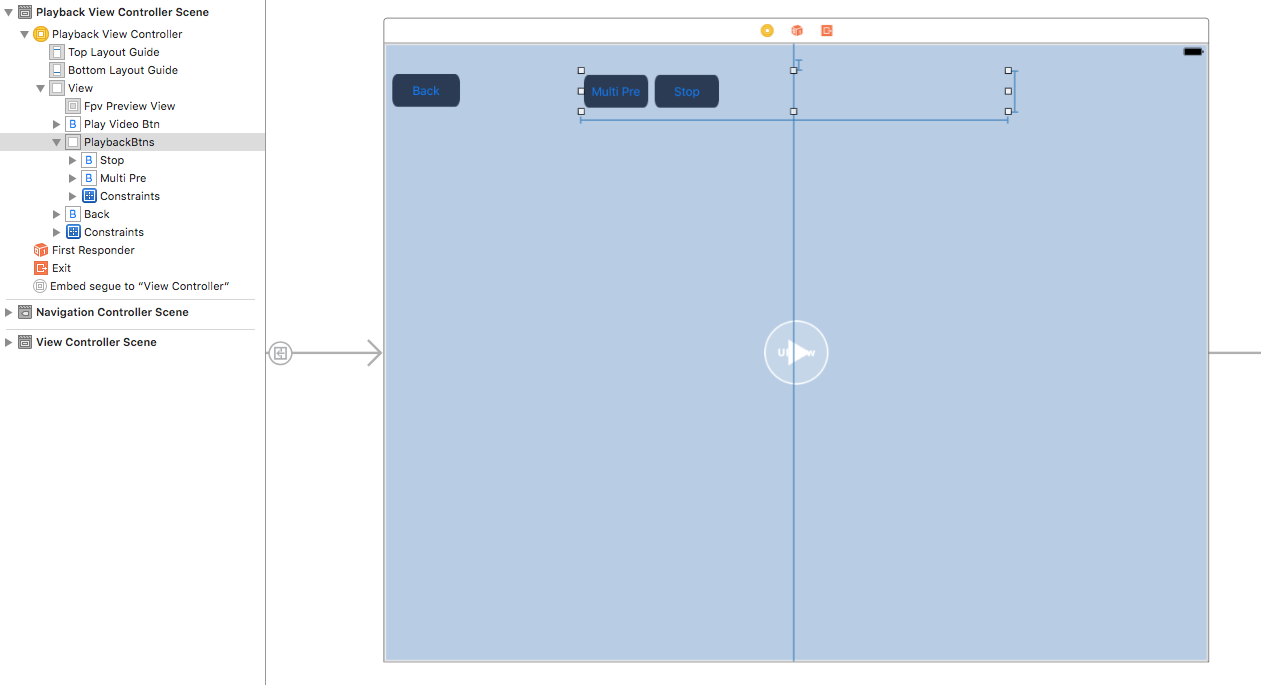
Next, open the Main.storyboard file and drag and drop a new "View Controller" object from the Object Library and set its "Class" value as PlaybackViewController. Moreover, drag and drop a new "Container View" object in the PlaybackViewController and set its ViewController's "Class" value as DUXFPVViewController, which contains a DUXFPVView and will show the live video feed directly. Furthermore, drag and drop a UIButton on the upper left corner and edit its text to "Back".

Lastly, let's drag and place a UIButton on the bottom right corner of the DefaultLayoutViewController view and create a segue to show the PlaybackViewController when the user press the button.

If everything goes well, you should see the storyboard layout like this:

freeform

Once you finish the above steps, let's open the "DefaultLayoutViewController.m" file and replace the content with the followings:

#import "DefaultLayoutViewController.h"
#import "DemoUtility.h"

@interface DefaultLayoutViewController ()
@property (weak, nonatomic) IBOutlet UIButton *playbackBtn;

@end

@implementation DefaultLayoutViewController

- (void)viewDidLoad
{
[super viewDidLoad];

[self.playbackBtn setImage:[UIImage imageNamed:@"playback_icon_iPad"] forState:UIControlStateNormal];

}

@end

In the code above, we create an IBOutlet property for the playbackBtn and set its image in the viewDidLoad method. You can get the "playback_icon_iPad.png" file from this tutorial's Github Sample Project.

Next, open the "PlaybackViewController.m" file and replace the content with the followings:

#import "PlaybackViewController.h"
#import "DemoUtility.h"

@interface PlaybackViewController ()
@property (weak, nonatomic) IBOutlet UIView *fpvPreviewView;
- (IBAction)backBtnClickAction:(id)sender;

@end

@implementation PlaybackViewController

- (void)viewWillAppear:(BOOL)animated
{
[super viewWillAppear:animated];
DJICamera *camera = [DemoUtility fetchCamera];

if (camera != nil) {
[camera setMode:DJICameraModePlayback withCompletion:^(NSError * _Nullable error) {
if (error) {
ShowResult(@"Set CameraWorkModePlayback Failed, %@", error.description);
}
}];
}
}

- (void)viewWillDisappear:(BOOL)animated
{
[super viewWillDisappear:animated];

DJICamera *camera = [DemoUtility fetchCamera];
[camera setMode:DJICameraModeShootPhoto withCompletion:^(NSError * _Nullable error) {
if (error) {
ShowResult(@"Set CameraWorkModeShootPhoto Failed, %@", error.description);
}
}];
}

- (void)viewDidLoad {
[super viewDidLoad];
// Do any additional setup after loading the view.

}

- (void)didReceiveMemoryWarning {
[super didReceiveMemoryWarning];
// Dispose of any resources that can be recreated.
}

#pragma mark - IBAction Methods

- (IBAction)backBtnClickAction:(id)sender {
[self.navigationController popViewControllerAnimated:YES];
}

In the code above, we implement the following things:

  1. In the viewWillAppear method, we firstly invoke the fetchCamera method of DemoUtility class to fetch the DJICamera object. Then invoke the setMode:withCompletion: method of DJICamera and pass the DJICameraModePlayback param to switch the camera mode to playback.

  2. Similarly, in the viewWillDisappear method, we also invoke the setMode:withCompletion: method of DJICamera and pass the DJICameraModeShootPhoto param to switch the camera mode to shoot photo mode.

So when the user enter the PlaybackViewController, the DJICamera will switch to playback mode automatically, when user exit back to the DefaultLayoutViewController, the DJICamera will switch to shoot photo mode.

Previewing Single Files

Since we can switch to the Playback mode now, let's add two UISwipeGestureRecognizers to preview the previous and the next media files in the SD Card.

Open the PlaybackViewController.m file, implement the DJICameraDelegate and DJIPlaybackDelegate protocols and create two properties of UISwipeGestureRecognizer and name them swipeLeftGesture and swipeRightGesture in the class extension. Then initialize them in the initData method as follows:


- (void)viewDidLoad {
[super viewDidLoad];
[self initData];
}

- (void)initData
{

self.swipeLeftGesture = [[UISwipeGestureRecognizer alloc] initWithTarget:self action:@selector(swipeLeftGestureAction:)];
self.swipeLeftGesture.direction = UISwipeGestureRecognizerDirectionLeft;
self.swipeRightGesture = [[UISwipeGestureRecognizer alloc] initWithTarget:self action:@selector(swipeRightGestureAction:)];
self.swipeRightGesture.direction = UISwipeGestureRecognizerDirectionRight;

[self.view addGestureRecognizer:self.swipeLeftGesture];
[self.view addGestureRecognizer:self.swipeRightGesture];
}

Implement the gesture action selector methods:

- (void)swipeLeftGestureAction:(UISwipeGestureRecognizer *)gesture
{
__weak DJICamera* camera = [DemoUtility fetchCamera];
[camera.playbackManager goToNextSinglePreviewPage];
}

- (void)swipeRightGestureAction:(UISwipeGestureRecognizer *)gesture
{
__weak DJICamera* camera = [DemoUtility fetchCamera];
[camera.playbackManager goToPreviousSinglePreviewPage];
}

The above code uses the goToNextSinglePreviewPage and goToPreviousSinglePreviewPage methods of DJICamera's playbackManager to preview the next and previous files. Since there are two types of the media files in the SD Card, Photo and Video, we'll have to implement video playback feature as well.

Open the Main.storyboard, drag a UIView object and position it on top of the viewController, then drag a UIButton to the view you just added as a subview and named "Stop". Next, drag a UIButton object to the center of the viewController, set its image as "playVideo"(You can get this image file from the project source code, in the Images.xcassets folder).

playbackButtons

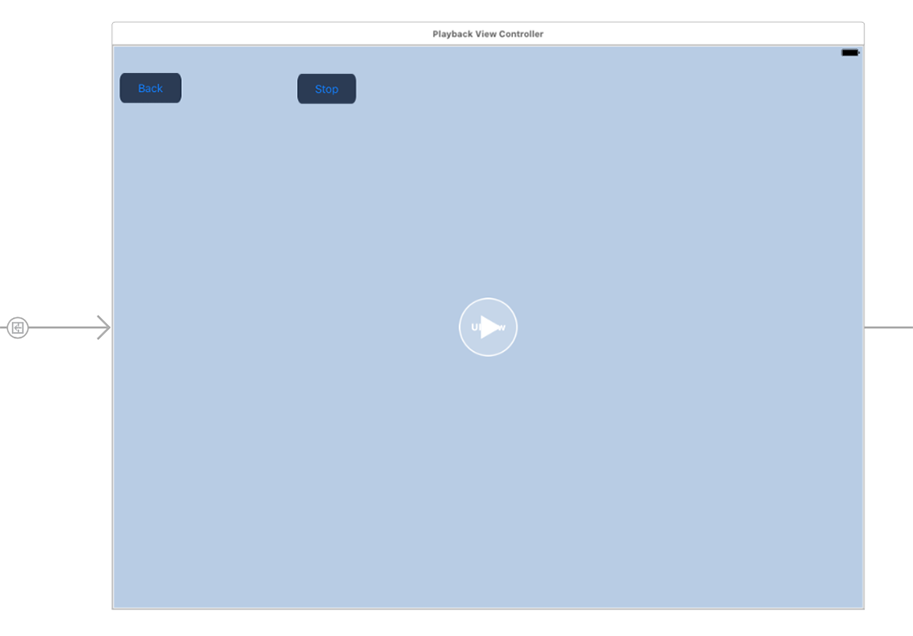
Here we hide the Stop and the playVideo buttons. Now let's go to PlaybackViewController.m file and create IBOutlets and IBActions for the newly added UIs:

@property (nonatomic, strong) IBOutlet UIView* playbackBtnsView;
@property (weak, nonatomic) IBOutlet UIButton *playVideoBtn;

- (IBAction)playVideoBtnAction:(id)sender;
- (IBAction)stopVideoBtnAction:(id)sender;

Moreover, before implementing the IBAction methods, we'll add two new properties of the DJICameraSystemState class and the DJICameraPlaybackState class and named them as cameraSystemState and cameraPlaybackState respectively in the class extension as shown below:

@property (strong, nonatomic) DJICameraSystemState* cameraSystemState;
@property (strong, nonatomic) DJICameraPlaybackState* cameraPlaybackState;

These properties are used to save the current camera system state and the playback state. Now let's set the delegates of the DJICamera and DJIPlaybackManager at the bottoms of viewWillAppear and viewWillDisappear methods:

- (void)viewWillAppear:(BOOL)animated
{
[super viewWillAppear:animated];
DJICamera *camera = [DemoUtility fetchCamera];

if (camera != nil) {
[camera setMode:DJICameraModePlayback withCompletion:^(NSError * _Nullable error) {
if (error) {
ShowResult(@"Set CameraWorkModePlayback Failed, %@", error.description);
}
}];
camera.delegate = self;
camera.playbackManager.delegate = self;
}

}

- (void)viewWillDisappear:(BOOL)animated
{
[super viewWillDisappear:animated];

DJICamera *camera = [DemoUtility fetchCamera];
[camera setMode:DJICameraModeShootPhoto withCompletion:^(NSError * _Nullable error) {
if (error) {
ShowResult(@"Set CameraWorkModeShootPhoto Failed, %@", error.description);
}
}];

if (camera && camera.delegate == self) {
[camera setDelegate:nil];
}

if (camera && camera.playbackManager.delegate == self) {
[camera.playbackManager setDelegate:nil];
}
}

Next update the cameraSystemState property value and hide the playbackBtnsView based on DJICameraSystemState's mode in the - (void)camera:(DJICamera *)camera didUpdateSystemState:(DJICameraSystemState *)systemState delegate method:

-(void) camera:(DJICamera*)camera didUpdateSystemState:(DJICameraSystemState*)systemState
{
self.cameraSystemState = systemState; //Update camera system state

//Update playbackBtnsView state
BOOL isPlayback = (systemState.mode == DJICameraModePlayback) || (systemState.mode == DJICameraModeMediaDownload);
self.playbackBtnsView.hidden = !isPlayback;

}

Additionally, implement the - (void)playbackManager:(DJIPlaybackManager *)playbackManager didUpdatePlaybackState:(DJICameraPlaybackState *)playbackState delegate method as shown below:

- (void)playbackManager:(DJIPlaybackManager *)playbackManager didUpdatePlaybackState:(DJICameraPlaybackState *)playbackState
{
self.cameraPlaybackState = playbackState;
[self updateUIWithPlaybackState:playbackState];
}

- (void)updateUIWithPlaybackState:(DJICameraPlaybackState *)playbackState
{
if (playbackState.playbackMode == DJICameraPlaybackModeSingleFilePreview) {
if (playbackState.fileType == DJICameraPlaybackFileTypeJPEG || playbackState.fileType == DJICameraPlaybackFileTypeRAWDNG) { //Photo Type
if (!self.playVideoBtn.hidden) {
[self.playVideoBtn setHidden:YES];
}
}else if (playbackState.fileType == DJICameraPlaybackFileTypeVIDEO) //Video Type
{
if (self.playVideoBtn.hidden) {
[self.playVideoBtn setHidden:NO];
}
}
}else if (playbackState.playbackMode == DJICameraPlaybackModeSingleVideoPlaybackStart)
{ //Playing Video
[self.playVideoBtn setHidden:YES];
}else if (playbackState.playbackMode == DJICameraPlaybackModeMultipleFilesPreview){
[self.playVideoBtn setHidden:YES];
}
}

As you can see, we have updated the cameraPlaybackState property's value in the - (void)playbackManager:(DJIPlaybackManager *)playbackManager didUpdatePlaybackState:(DJICameraPlaybackState *)playbackState delegate method, and have also updated the playVideoBtn's hidden state based on the DJICameraSystemState's mode and the DJICameraPlaybackState's playbackMode.

Finally, we can implement the IBAction methods as follows:

- (IBAction)playVideoBtnAction:(id)sender {
__weak DJICamera *camera = [DemoUtility fetchCamera];
if (self.cameraPlaybackState.fileType == DJICameraPlaybackFileTypeVIDEO) {
[camera.playbackManager playVideo];
}
}

- (IBAction)stopVideoBtnAction:(id)sender {
__weak DJICamera *camera = [DemoUtility fetchCamera];
if (self.cameraPlaybackState.fileType == DJICameraPlaybackFileTypeVIDEO) {
if (self.cameraPlaybackState.videoPlayProgress > 0) {
[camera.playbackManager stopVideo];
}
}
}

In the playVideoBtnAction and stopVideoBtnAction methods, we check if the fileType is video, then call the playVideo and the stopVideo methods of the DJICamera's playbackManager to start and stop playing the video. For more details of the implementations, please check the tutorial's Github Sample Project.

Once it's done, build and run the project. Try swiping left and right in the PlaybackViewController to navigate through your photos and videos. If you see the play button at the center of the screen, press it to play the video. You can check the following gif animation to get the idea of how to use it:

playVideo

Previewing Multiple Files

Before we move forward, let's explain the Playback mode. There are multiple playback modes in the camera, and we can check the DJICameraPlaybackMode enum type in the DJICameraPlaybackState.h file as follows:

/**
* A playback mode represents a task that the Playback manager is executing.
*/
typedef NS_ENUM (uint8_t, DJICameraPlaybackMode){
/**
* Single file preview mode.
*/
DJICameraPlaybackModeSingleFilePreview = 0,
/**
* Single video playback start.
*/
DJICameraPlaybackModeSingleVideoPlaybackStart = 2,
/**
* Single video playback pause.
*/
DJICameraPlaybackModeSingleVideoPlaybackPause = 3,
/**
* Multiple file edit.
*/
DJICameraPlaybackModeMultipleFilesEdit = 4,
/**
* Multiple media file preview.
*/
DJICameraPlaybackModeMultipleFilesPreview = 5,
/**
* Download media files.
*/
DJICameraPlaybackModeDownload = 6,
/**
* Unknown playback mode.
*/
DJICameraPlaybackModeUnknown = 0xFF,
};

As shown in the code above, we can preview files in two ways: Single Preview and Multiple Preview. We can also play videos, delete photos and videos and even download them.

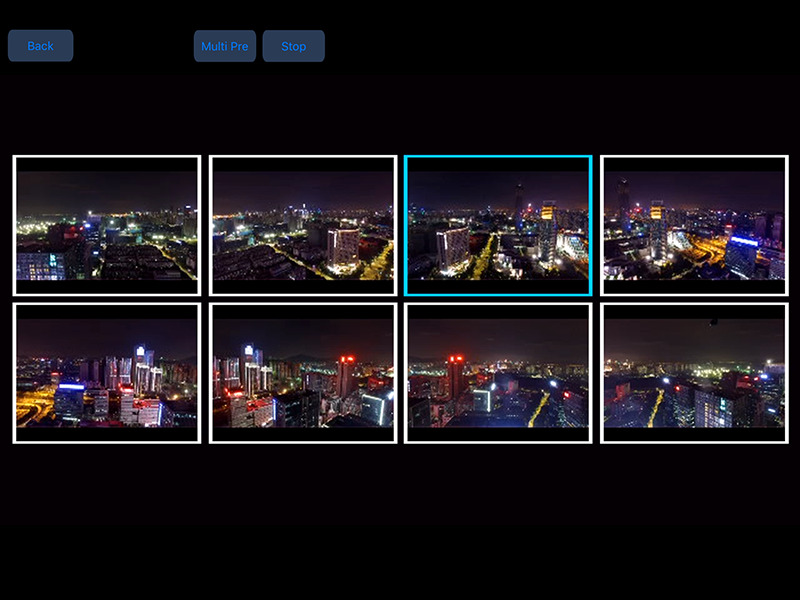
We will learn how to preview multiple files here. Here is what Multiple Preview looks like:

multiplePreview

You can preview at most eight files at the same time. Since the preview images are shown in the fpvPreviewView, you cannot interact with them yet. Let's add buttons and swipe gestures to interact with them.

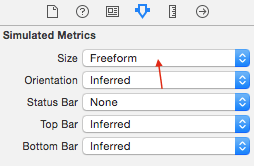
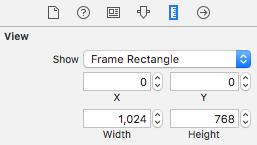
First, we will create a new file named "DJIPlaybackMultiSelectViewController", which will be a subclass of UIViewController. Make sure the check box for Also create XIB file is selected when creating the file. Then open the "DJIPlaybackMultiSelectViewController.xib" file and, under the Size dropdown in the Simulated Metrics section, set its size to Freeform . In the view section, change the width to "1024" and height to "768". Take a look at the changes made below:

freeform changeSize

Then drag a UIView object to the viewController as subview and set its name to "Buttons View". Next set its frame as follows:

buttonsViewFrame

Moreover, drag eight UIButton objects to the "Buttons View" as subviews and position them as follows(You can check the demo project's DJIPlaybackMultiSelectViewController_iPad.xib file to get the details on how to setup these buttons's frame):

buttonsView

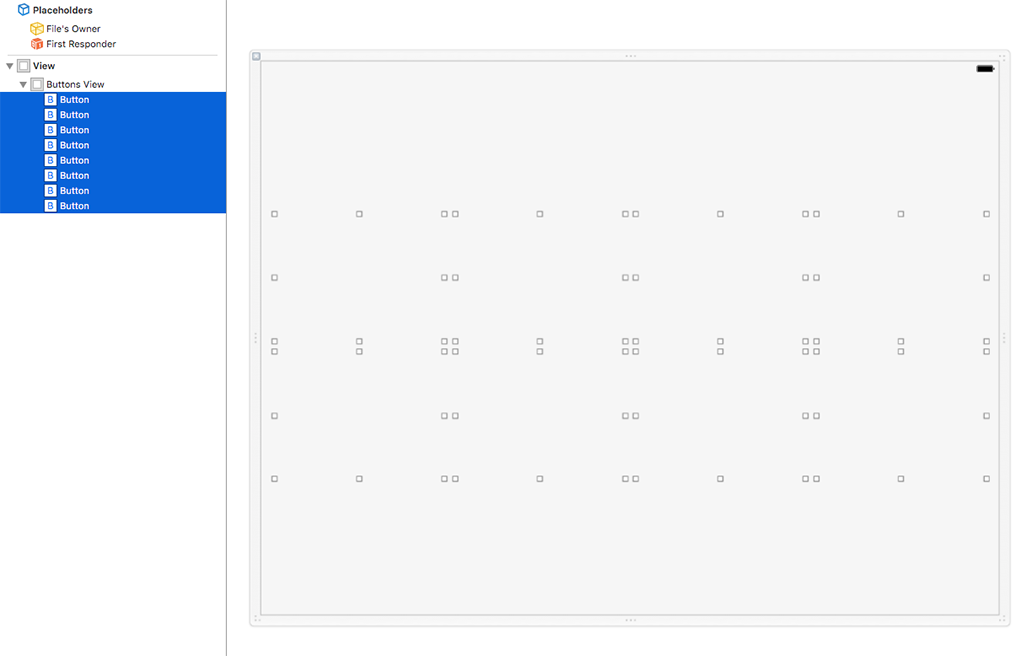
These buttons represent eight media files when you are in the Multiple Preview Mode. Pressing any of these buttons will enter Single Preview Mode.

Now let's open the DJIPlaybackMultiSelectViewController.h file and create two block properties as follows:

#import <UIKit/UIKit.h>

@interface DJIPlaybackMultiSelectViewController : UIViewController

@property (copy, nonatomic) void (^selectItemBtnAction)(int index);
@property (copy, nonatomic) void (^swipeGestureAction)(UISwipeGestureRecognizerDirection direction);

@end

The first block is used to check the selected button action with index, the second one is used to check the swipe gesture action.

Then go to "DJIPlaybackMultiSelectViewController.m" file and create four UISwipeGestureRecognizer properties to represent the left, right, up and down swipe gestures. Additionally, create eight IBAction methods and link them to the UIButton objects in the "DJIPlaybackMultiSelectViewController.xib" file:

#import "DJIPlaybackMultiSelectViewController.h"

@interface DJIPlaybackMultiSelectViewController()

@property(nonatomic, strong) UISwipeGestureRecognizer *swipeLeftGesture;
@property(nonatomic, strong) UISwipeGestureRecognizer *swipeRightGesture;
@property(nonatomic, strong) UISwipeGestureRecognizer *swipeUpGesture;
@property(nonatomic, strong) UISwipeGestureRecognizer *swipeDownGesture;

- (IBAction)selectFirstItemBtnAction:(id)sender;
- (IBAction)selectSecondItemBtnAction:(id)sender;
- (IBAction)selectThirdItemBtnAction:(id)sender;
- (IBAction)selectFourthItemBtnAction:(id)sender;
- (IBAction)selectFifthItemBtnAction:(id)sender;
- (IBAction)selectSixthItemBtnAction:(id)sender;
- (IBAction)selectSeventhItemBtnAction:(id)sender;
- (IBAction)selectEighthItemBtnAction:(id)sender;

@end

Init the swipe gestures properties in the viewDidLoad method and implement the action methods as shown below:

- (void)viewDidLoad {
[super viewDidLoad];

self.swipeLeftGesture = [[UISwipeGestureRecognizer alloc] initWithTarget:self action:@selector(swipeLeftGestureAction:)];
self.swipeLeftGesture.direction = UISwipeGestureRecognizerDirectionLeft;
self.swipeRightGesture = [[UISwipeGestureRecognizer alloc] initWithTarget:self action:@selector(swipeRightGestureAction:)];
self.swipeRightGesture.direction = UISwipeGestureRecognizerDirectionRight;
self.swipeUpGesture = [[UISwipeGestureRecognizer alloc] initWithTarget:self action:@selector(swipeUpGestureAction:)];
self.swipeUpGesture.direction = UISwipeGestureRecognizerDirectionUp;
self.swipeDownGesture = [[UISwipeGestureRecognizer alloc] initWithTarget:self action:@selector(swipeDownGestureAction:)];
self.swipeDownGesture.direction = UISwipeGestureRecognizerDirectionDown;

[self.view addGestureRecognizer:self.swipeLeftGesture];
[self.view addGestureRecognizer:self.swipeRightGesture];
[self.view addGestureRecognizer:self.swipeUpGesture];
[self.view addGestureRecognizer:self.swipeDownGesture];

}

#pragma mark UIGestureAction Methods
- (void)swipeLeftGestureAction:(UISwipeGestureRecognizer *)gesture
{
if (self.swipeGestureAction) {
self.swipeGestureAction(UISwipeGestureRecognizerDirectionLeft);
}
}

- (void)swipeRightGestureAction:(UISwipeGestureRecognizer *)gesture
{
if (self.swipeGestureAction) {
self.swipeGestureAction(UISwipeGestureRecognizerDirectionRight);
}
}

- (void)swipeUpGestureAction:(UISwipeGestureRecognizer *)gesture
{
if (self.swipeGestureAction) {
self.swipeGestureAction(UISwipeGestureRecognizerDirectionUp);
}
}

- (void)swipeDownGestureAction:(UISwipeGestureRecognizer *)gesture
{
if (self.swipeGestureAction) {
self.swipeGestureAction(UISwipeGestureRecognizerDirectionDown);
}
}

These four swipe gestures are for single and multiple files preview. Swipe left or right to preview files in Single Preview Mode, swipe up or down to preview files in Multiple Preview Mode. We invoke the swipeGestureAction block inside the swipe action method with a UISwipeGestureRecognizerDirection value.

Next, implement the IBAction methods for the eight UIButtons as follows:

#pragma mark UIButton Action Methods
- (IBAction)selectFirstItemBtnAction:(id)sender {
if (self.selectItemBtnAction) {
self.selectItemBtnAction(0);
}
}

- (IBAction)selectSecondItemBtnAction:(id)sender {
if (self.selectItemBtnAction) {
self.selectItemBtnAction(1);
}
}

- (IBAction)selectThirdItemBtnAction:(id)sender {
if (self.selectItemBtnAction) {
self.selectItemBtnAction(2);
}
}

- (IBAction)selectFourthItemBtnAction:(id)sender {
if (self.selectItemBtnAction) {
self.selectItemBtnAction(3);
}
}

- (IBAction)selectFifthItemBtnAction:(id)sender {
if (self.selectItemBtnAction) {
self.selectItemBtnAction(4);
}
}

- (IBAction)selectSixthItemBtnAction:(id)sender {
if (self.selectItemBtnAction) {
self.selectItemBtnAction(5);
}
}

- (IBAction)selectSeventhItemBtnAction:(id)sender {
if (self.selectItemBtnAction) {
self.selectItemBtnAction(6);
}
}

- (IBAction)selectEighthItemBtnAction:(id)sender {
if (self.selectItemBtnAction) {
self.selectItemBtnAction(7);
}
}

We invoke the selectItemBtnAction block inside the IBAction methods with related button index. The index starts from 0 here because the file index counted in Playback Multiple Preview Mode starts from 0.

Now, go back to "PlaybackViewController.m" file. Since we have added the swipe left and swipe right gestures in the "DJIPlaybackMultiSelectViewController.m" file, let's delete the swipeLeftGesture and swipeRightGesture properties and their related codes in the "PlaybackViewController.m" file to refactor the code structure.

Then import the "DJIPlaybackMultiSelectViewController.h" header file and create a property of DJIPlaybackMultiSelectViewController named playbackMultiSelectVC. Next, we create a new method named initPlaybackMultiSelectVC and implement it in the viewDidLoad method:

- (void)viewDidLoad {
[super viewDidLoad];

[self initData];
[self initPlaybackMultiSelectVC];

}

- (void)initPlaybackMultiSelectVC
{
self.playbackMultiSelectVC = [[DJIPlaybackMultiSelectViewController alloc] initWithNibName:@"DJIPlaybackMultiSelectViewController" bundle:[NSBundle mainBundle]];
[self.playbackMultiSelectVC.view setFrame:self.view.frame];
[self.view insertSubview:self.playbackMultiSelectVC.view aboveSubview:self.fpvPreviewView];

WeakRef(target);
[self.playbackMultiSelectVC setSelectItemBtnAction:^(int index) {

WeakReturn(target);
__weak DJICamera* camera = [DemoUtility fetchCamera];
if (target.cameraPlaybackState.playbackMode == DJICameraPlaybackModeMultipleFilesPreview) {
[camera.playbackManager enterSinglePreviewModeWithIndex:index];
}else if (target.cameraPlaybackState.playbackMode == DJICameraPlaybackModeMultipleFilesEdit){
[camera.playbackManager toggleFileSelectionAtIndex:index];
}
}];

[self.playbackMultiSelectVC setSwipeGestureAction:^(UISwipeGestureRecognizerDirection direction) {

WeakReturn(target);
__weak DJICamera* camera = [DemoUtility fetchCamera];

if (target.cameraPlaybackState.playbackMode == DJICameraPlaybackModeSingleFilePreview) {

if (direction == UISwipeGestureRecognizerDirectionLeft) {
[camera.playbackManager goToNextSinglePreviewPage];
}else if (direction == UISwipeGestureRecognizerDirectionRight){
[camera.playbackManager goToPreviousSinglePreviewPage];
}

}else if(target.cameraPlaybackState.playbackMode == DJICameraPlaybackModeMultipleFilesPreview){

if (direction == UISwipeGestureRecognizerDirectionUp) {
[camera.playbackManager goToNextMultiplePreviewPage];
}else if (direction == UISwipeGestureRecognizerDirectionDown){
[camera.playbackManager goToPreviousMultiplePreviewPage];
}
}
}];
}

So in the initPlaybackMultiSelectVC method, we init the playbackMultiSelectVC property first, and then we invoke the selectItemBtnAction block's setter method and implement the toggleFileSelectionAtIndex method of the DJICamera's playbackManager with selected index. This way, we can switch to Single Preview Mode from Multiple Preview Mode.

Furthermore, we invoke the swipeGestureAction block's setter method and implement the preview files feature based on the UISwipeGestureRecognizerDirection value.

Once this is done, go to Main.storyboard and drag a UIButton object to the playbackBtnsView as subView, naming it as Multi Pre and positioning it as follows:

multiPreBtn

Finally, create an IBAction method named multiPreviewButtonClicked and link it to the above UIButton in the Main.storyboard. Implement the method as shown below to enter Multiple Preview Mode:

- (IBAction)multiPreviewButtonClicked:(id)sender {

__weak DJICamera *camera = [DemoUtility fetchCamera];
[camera.playbackManager enterMultiplePreviewMode];

}

Let's build and run the project and try to enter Multiple Preview Mode. Use the swipe up and down gestures to preview files. Switch to the Single Preview Mode by pressing any of the eight preview images. Here is a screenshot:

multiPre

Deleting Photos and Videos

You can now preview photos and videos in Single Preview Mode and Multiple Preview Mode. But what if you want to delete a file you don't like? Let's implement the delete files feature!

Go to Main.storyboard and drag three UIButtons to the playbackBtnsView as subviews and named them Select, Select All and Delete. We hide the selectBtn and selectAllBtn buttons here. Then go to the PlaybackViewController.m file and create two IBOutlets for the "Select" and "Select All" buttons, and also the three IBAction methods for the three buttons as follows:

@property (weak, nonatomic) IBOutlet UIButton *selectBtn;
@property (weak, nonatomic) IBOutlet UIButton *selectAllBtn;

- (IBAction)selectButtonAction:(id)sender;
- (IBAction)deleteButtonAction:(id)sender;
- (IBAction)selectAllBtnAction:(id)sender;

Next, implement the IBAction methods as shown below:

- (IBAction)selectButtonAction:(id)sender {
__weak DJICamera *camera = [DemoUtility fetchCamera];
if (self.cameraPlaybackState.playbackMode == DJICameraPlaybackModeMultipleFilesEdit) {
[camera.playbackManager exitMultipleEditMode];
}else
{
[camera.playbackManager enterMultipleEditMode];
}
}

- (IBAction)selectAllBtnAction:(id)sender {
__weak DJICamera *camera = [DemoUtility fetchCamera];
if (self.cameraPlaybackState.isAllFilesInPageSelected) {
[camera.playbackManager unselectAllFilesInPage];
}
else
{
[camera.playbackManager selectAllFilesInPage];
}
}

The above code implements the selectButtonAction method to enter and exit MultipleEditMode by calling the exitMultipleEditMode and enterMultipleEditMode methods of DJICamera's playbackManager. Then in selectAllBtnAction IBAction method, we use an if statement to check if all the files in the page are selected and invoke the selectAllFilesInPage and unselectAllFilesInPage methods of DJICamera's playbackManager.

Moreover, update the selectBtn and selectAllBtn buttons' hidden values in the following method:


- (void)updateUIWithPlaybackState:(DJICameraPlaybackState *)playbackState
{
if (playbackState.playbackMode == DJICameraPlaybackModeSingleFilePreview) {

[self.selectBtn setHidden:YES];
[self.selectAllBtn setHidden:YES];

if (playbackState.fileType == DJICameraPlaybackFileTypeJPEG || playbackState.fileType == DJICameraPlaybackFileTypeRAWDNG) { //Photo Type

if (!self.playVideoBtn.hidden) {
[self.playVideoBtn setHidden:YES];
}

}else if (playbackState.fileType == DJICameraPlaybackFileTypeVIDEO) //Video Type {
if (self.playVideoBtn.hidden) {
[self.playVideoBtn setHidden:NO];
}
}

}else if (playbackState.playbackMode == DJICameraPlaybackModeSingleVideoPlaybackStart){ //Playing Video

[self.selectBtn setHidden:YES];
[self.selectAllBtn setHidden:YES];
[self.playVideoBtn setHidden:YES];

}else if (playbackState.playbackMode == DJICameraPlaybackModeMultipleFilesPreview){

[self.selectBtn setHidden:NO];
[self.selectBtn setTitle:@"Select" forState:UIControlStateNormal];
[self.selectAllBtn setHidden:NO];
[self.playVideoBtn setHidden:YES];

}else if (playbackState.playbackMode == DJICameraPlaybackModeMultipleFilesEdit){

[self.selectBtn setHidden:NO];
[self.selectBtn setTitle:@"Cancel" forState:UIControlStateNormal];
[self.selectAllBtn setHidden:NO];
[self.playVideoBtn setHidden:YES];

}
}

Before implementing the deleteButtonAction method, let's create two new properties in the class extension as follows:

@property (strong, nonatomic) UIAlertView* statusAlertView;
@property (assign, nonatomic) int selectedFileCount;

Here, we create an int property named selectedFileCount to count the number of files currently selected in the Multiple Preview Mode. We also create a UIAlertView property named as statusAlertView to show alerts when deleting files.

Create the following three methods to show, dismiss and update the alertView:

-(void) showStatusAlertView
{
if (self.statusAlertView == nil) {
self.statusAlertView = [[UIAlertView alloc] initWithTitle:@"" message:@"" delegate:nil cancelButtonTitle:nil otherButtonTitles:nil];
[self.statusAlertView show];
}
}

-(void) dismissStatusAlertView
{
if (self.statusAlertView) {
[self.statusAlertView dismissWithClickedButtonIndex:0 animated:YES];
self.statusAlertView = nil;
}
}

- (void)updateStatusAlertContentWithTitle:(NSString *)title message:(NSString *)message shouldDismissAfterDelay:(BOOL)dismiss
{
if (self.statusAlertView) {
[self.statusAlertView setTitle:title];
[self.statusAlertView setMessage:message];

if (dismiss) {
[self performSelector:@selector(dismissStatusAlertView) withObject:nil afterDelay:2.0];
}
}
}

Furthermore, implement the showAlertViewWithTitle:message:okActionHandler:cancelActionhandler: and deleteButtonAction methods as shown below:


- (void)showAlertViewWithTitle:(NSString *)title message:(NSString *)message okActionHandler:(void (^ __nullable)(UIAlertAction *action))handler1 cancelActionhandler:(void (^ __nullable)(UIAlertAction *action))handler2
{
UIAlertController* alertViewController = [UIAlertController alertControllerWithTitle:title message:message preferredStyle:UIAlertControllerStyleAlert];
UIAlertAction* okAction = [UIAlertAction actionWithTitle:@"YES" style:UIAlertActionStyleDefault handler:handler1];
UIAlertAction* cancelAction = [UIAlertAction actionWithTitle:@"NO" style:UIAlertActionStyleDefault handler:handler2];
[alertViewController addAction:cancelAction];
[alertViewController addAction:okAction];
UINavigationController* navController = (UINavigationController*)[[UIApplication sharedApplication] keyWindow].rootViewController;
[navController presentViewController:alertViewController animated:YES completion:nil];
}

- (IBAction)deleteButtonAction:(id)sender {

self.selectedFileCount = self.cameraPlaybackState.selectedFileCount;

if (self.cameraPlaybackState.playbackMode == DJICameraPlaybackModeMultipleFilesEdit) {

if (self.selectedFileCount == 0) {
[self showStatusAlertView];
[self updateStatusAlertContentWithTitle:@"Please select files to delete!" message:@"" shouldDismissAfterDelay:YES];
return;
}else
{
NSString *title;
if (self.selectedFileCount == 1) {
title = @"Delete Selected File?";
}else
{
title = @"Delete Selected Files?";
}

WeakRef(target);
[self showAlertViewWithTitle:title message:nil okActionHandler:^(UIAlertAction *action) {
WeakReturn(target);
DJICamera* camera = [DemoUtility fetchCamera];
[camera.playbackManager deleteAllSelectedFiles];
[target.selectBtn setTitle:@"Select" forState:UIControlStateNormal];
} cancelActionhandler:nil];
}

}else if (self.cameraPlaybackState.playbackMode == DJICameraPlaybackModeSingleFilePreview){

WeakRef(target);
[self showAlertViewWithTitle:@"Delete The Current File?" message:nil okActionHandler:^(UIAlertAction *action) {
WeakReturn(target);
DJICamera* camera = [DemoUtility fetchCamera];
[camera.playbackManager deleteCurrentPreviewFile];
[target.selectBtn setTitle:@"Select" forState:UIControlStateNormal];

} cancelActionhandler:nil];

}

}

The deleteButtonAction action method updates the selectedFileCount property value with cameraPlaybackState's selectedFileCount value. It then checks the playbackMode value of cameraPlaybackState to show alertViews in the DJICameraPlaybackModeMultipleFilesEdit and DJICameraPlaybackModeSingleFilePreview mode, then in the action handler, we invoke the deleteAllSelectedFiles and deleteCurrentPreviewFile methods of DJICamera's playbackManager to delete files and update selectBtn's title.

Build and run the project, and try the select multiple files, delete single and multiple files features. Here's what it should look like:

  • Deleting a Single File:

deleteSingleFile

  • Deleting Multiple Files:

deleteMultiFiles

Downloading And Saving Photos

1. Downloading Photos

Let's implement the download photo feature now. First, go to the Main.storyboard file and drag a UIButton object to the playbackBtnsView and name it "Download". Then position it on the right of "Delete" button.

Next, go to PlaybackViewController.m file and create the following property objects and IBAction method in the class extension:

@property (strong, nonatomic) NSMutableData *downloadedImageData;
@property (strong, nonatomic) NSTimer *updateImageDownloadTimer;
@property (strong, nonatomic) NSError *downloadImageError;
@property (strong, nonatomic) NSString* targetFileName;
@property (assign, nonatomic) long totalFileSize;
@property (assign, nonatomic) long currentDownloadSize;
@property (assign, nonatomic) int downloadedFileCount;

- (IBAction)downloadButtonAction:(id)sender;

Lets briefly explain what each of these properties is for.

  • downloadedImageData is used to store the downloaded image's NSData
  • updateImageDownloadTimer is used to update the download progress status
  • downloadImageError is for NSError storage
  • targetFileName is used to store the current downloaded image file name
  • totalFileSize is for storing the total file size of each downloading image
  • currentDownloadSize is used to store the downloaded size of the image
  • downloadedFileCount is used to store the downloaded file count

Let's init the downloadedImageData property in the initData method as follows:

- (void)initData
{
self.downloadedImageData = [NSMutableData data];
}

Before moving forward, we need to first explain the following method in DJIPlaybackManager class:

/**
* Downloads the currently selected media files.
* Precondition:
* The camera must enter multiple preview mode.
*
* @param prepareBlock Callback to prepare each file for download.
* @param dataBlock Callback while a file is downloading. The dataBlock can be called multiple times for a file. The error argument in <code>DJIFileDownloadingBlock</code> is not used and should be ignored.
* @param fileCompletionBlock Callback after each file have been downloaded.
* @param finishBlock Callback after the downloading is finished.
*/
- (void)downloadSelectedFilesWithPreparation:(nullable DJIFileDownloadPreparingBlock)prepareBlock
process:(nullable DJIFileDownloadingBlock)dataBlock
fileCompletion:(nullable DJIFileDownloadCompletionBlock)fileCompletionBlock
overallCompletion:(nullable DJICompletionBlock)finishBlock;

This method has three params, the first param prepareBlock is a file download preparing block. You can do some download initialization work here like showing an alertView to clarify the download file's file name, file size, etc. The second param dataBlock is a download data update block, you can append the downloaded data here and increase the downloaded size data. The third param fileCompletionBlock is a file download completion block, you can save the currently downloaded image to the Photo Album here. The last param finishBlock is a download completion block.

Important: We cannot update the download file status UI in the dataBlock block, since it will slow down the file download speed. So we should use the downloadedImageData property to append downloaded data and use the updateImageDownloadTimer to update the UI.

So let's create three new methods here to set up the updateImageDownloadTimer:

- (void)updateDownloadProgress:(NSTimer *)updatedTimer
{
if (self.downloadImageError) {

[self stopTimer];
[self.selectBtn setTitle:@"Select" forState:UIControlStateNormal];
[self updateStatusAlertContentWithTitle:@"Download Error" message:[NSString stringWithFormat:@"%@", self.downloadImageError] shouldDismissAfterDelay:YES];

}
else
{
NSString *title = [NSString stringWithFormat:@"Download (%d/%d)", self.downloadedFileCount + 1, self.selectedFileCount];
NSString *message = [NSString stringWithFormat:@"FileName:%@, FileSize:%0.1fKB, Downloaded:%0.1fKB", self.targetFileName, self.totalFileSize / 1024.0, self.currentDownloadSize / 1024.0];
[self updateStatusAlertContentWithTitle:title message:message shouldDismissAfterDelay:NO];
}

}

- (void)startUpdateTimer
{
if (self.updateImageDownloadTimer == nil) {
self.updateImageDownloadTimer = [NSTimer scheduledTimerWithTimeInterval:0.5 target:self selector:@selector(updateDownloadProgress:) userInfo:nil repeats:YES];
}
}

- (void)stopTimer
{
if (self.updateImageDownloadTimer != nil) {
[self.updateImageDownloadTimer invalidate];
self.updateImageDownloadTimer = nil;
}
}

As you can see, we use the startUpdateTimer and stopTimer methods to start and stop the updateImageDownloadTimer. Then we implement the updateDownloadProgress selector method to update the statusAlertView's title and message value.

Next, create a new method name resetDownloadData to reset all the download related property values:

- (void)resetDownloadData
{
self.downloadImageError = nil;
self.totalFileSize = 0;
self.currentDownloadSize = 0;
self.downloadedFileCount = 0;

[self.downloadedImageData setData:[NSData dataWithBytes:NULL length:0]];
}

Furthermore, implement the downloadButtonAction method and improve the UIAlertView Delegate Method with the following code:


- (IBAction)downloadButtonAction:(id)sender {

self.selectedFileCount = self.cameraPlaybackState.selectedFileCount;

if (self.cameraPlaybackState.playbackMode == DJICameraPlaybackModeMultipleFilesEdit) {

if (self.selectedFileCount == 0) {
[self showStatusAlertView];
[self updateStatusAlertContentWithTitle:@"Please select files to Download!" message:@"" shouldDismissAfterDelay:YES];
return;
}else
{
NSString *title;
if (self.selectedFileCount == 1) {
title = @"Download Selected File?";
}else
{
title = @"Download Selected Files?";
}

WeakRef(target);
[self showAlertViewWithTitle:title message:nil okActionHandler:^(UIAlertAction *action) {
WeakReturn(target);
[target downloadFiles];
} cancelActionhandler:nil];
}

}else if (self.cameraPlaybackState.playbackMode == DJICameraPlaybackModeSingleFilePreview){

WeakRef(target);
[self showAlertViewWithTitle:@"Download The Current File?" message:nil okActionHandler:^(UIAlertAction *action) {
WeakReturn(target);
[target downloadFiles];
} cancelActionhandler:nil];
}

}

In downloadButtonAction method, we update the statusAlertView's title and message. And create two new UIAlertControllers to ask users for permission to download files based on the cameraPlaybackState's playbackMode value. Also, in the action handler method, we invoke the downloadFiles method once the OK button of the alertView is pressed.

Lastly, implement the downloadFiles method as shown below:


-(void) downloadFiles
{
if (self.cameraPlaybackState.playbackMode == DJICameraPlaybackModeSingleFilePreview) {
self.selectedFileCount = 1;
}

WeakRef(target);
DJICamera *camera = [DemoUtility fetchCamera];

[camera.playbackManager downloadSelectedFilesWithPreparation:^(NSString * _Nullable fileName, DJIDownloadFileType fileType, NSUInteger fileSize, BOOL * _Nonnull skip) {

WeakReturn(target);
[target startUpdateTimer];
target.totalFileSize = (long)fileSize;
target.targetFileName = fileName;

[target showStatusAlertView];
NSString *title = [NSString stringWithFormat:@"Download (%d/%d)", target.downloadedFileCount + 1, target.selectedFileCount];
NSString *message = [NSString stringWithFormat:@"FileName:%@, FileSize:%0.1fKB, Downloaded:0.0KB", fileName, target.totalFileSize / 1024.0];
[target updateStatusAlertContentWithTitle:title message:message shouldDismissAfterDelay:NO];

} process:^(NSData * _Nullable data, NSError * _Nullable error) {

WeakReturn(target);

/**
* Important: Don't update Download Progress UI here, it will slow down the download file speed.
*/

if (data) {
[target.downloadedImageData appendData:data];
target.currentDownloadSize += data.length;
}
target.downloadImageError = error;

} fileCompletion:^{

WeakReturn(target);
NSLog(@"Completed Download");
target.downloadedFileCount++;

[target.downloadedImageData setData:[NSData dataWithBytes:NULL length:0]]; //Reset DownloadedImageData when download one file finished
target.currentDownloadSize = 0.0f; //Reset currentDownloadSize when download one file finished

NSString *title = [NSString stringWithFormat:@"Download (%d/%d)", target.downloadedFileCount, target.selectedFileCount];
[target updateStatusAlertContentWithTitle:title message:@"Completed" shouldDismissAfterDelay:YES];

} overallCompletion:^(NSError * _Nullable error) {

NSLog(@"DownloadFiles Error %@", error.description);
}];

}

In this method, we call the resetDownloadData method to reset data first. We check if the playbackMode is DJICameraPlaybackModeSingleFilePreview and update the selectedFileCount variable's value. Then we call the following method of the DJICamera's playbackManager:

- (void)downloadSelectedFilesWithPreparation:(nullable DJIFileDownloadPreparingBlock)prepareBlock
process:(nullable DJIFileDownloadingBlock)dataBlock
fileCompletion:(nullable DJIFileDownloadCompletionBlock)fileCompletionBlock
overallCompletion:(nullable DJICompletionBlock)finishBlock;

In the first block prepareBlock, we call the startUpdateTimer method to start updateImageDownloadTimer. Then, we update the totalFileSize and targetFileName variables. Next, we show statusAlertView and update its title and message with the download image info.

In the second block dataBlock, we append the downloadedImageData with the downloaded image data and update the currentDownloadSize and downloadImageError variables' values.

In the third block completion, we increase the downloadedFileCount variable. We then create an UIImage object with downloadedImageData. Next, we reset downloadedImageData's data and currentDownloadSize's value. Moreover, we update statusAlertView with the image download info.

2. Saving Downloaded Photos to Photo Album

Now, we have implemented the download photos features, but if we want to save the downloaded photos to the iOS Photo Album?

To do this, we will create a new property of NSMutableArray class and name it "downloadedImageArray" and initialize it in the initData method, also resetting it in the resetDownloadData method as follows:

- (void)initData
{
self.downloadedImageData = [NSMutableData data];
self.downloadedImageArray = [NSMutableArray array];
}

- (void)resetDownloadData
{
self.downloadImageError = nil;
self.totalFileSize = 0;
self.currentDownloadSize = 0;
self.downloadedFileCount = 0;

[self.downloadedImageData setData:[NSData dataWithBytes:NULL length:0]];
[self.downloadedImageArray removeAllObjects];
}

Once that's done, invoke the resetDownloadData method on top of the downloadFiles method and then implement the two new methods as shown below:

- (void)saveDownloadImage
{
if (self.downloadedImageArray && self.downloadedImageArray.count > 0)
{
UIImage *image = [self.downloadedImageArray lastObject];
UIImageWriteToSavedPhotosAlbum(image, self, @selector(image:didFinishSavingWithError:contextInfo:), nil);
[self.downloadedImageArray removeLastObject];
}
}

- (void)image:(UIImage *)image didFinishSavingWithError:(NSError *)error contextInfo:(void *)contextInfo
{

if (error != NULL)
{
// Show message when image saved failed
[self updateStatusAlertContentWithTitle:@"Save Image Failed!" message:[NSString stringWithFormat:@"%@", error] shouldDismissAfterDelay:NO];
}
else
{
// Show message when image successfully saved
if (self.downloadedImageArray)
{
[self saveDownloadImage];

if (self.downloadedImageArray.count == 0)
{
[self showStatusAlertView];
[self updateStatusAlertContentWithTitle:@"Stored to Photos Album" message:@"" shouldDismissAfterDelay:YES];
}

}
}

}

In the saveDownloadImage method, we check if the downloadedImageArray is empty and get its last UIImage, assigning it to the image variable. Then we use the UIImageWriteToSavedPhotosAlbum() method to save the image to the Photo Album and remove the last object from the downloadedImageArray.

Next, in the selector method, we check if an error has occurred and invoke the saveDownloadImage method until the downloadedImageArray is empty. At the same time, we update the statusAlertView with related titles and messages.

At the end, add the downloaded image object to downloadedImageArray, and call the stopTimer method and the saveDownloadImage method in the fileCompletionBlock block of the downloadFiles method:


fileCompletion:^{

WeakReturn(target);
NSLog(@"Completed Download");
target.downloadedFileCount++;

UIImage *downloadImage = [[UIImage alloc] initWithData:target.downloadedImageData];
if (downloadImage) {
[target.downloadedImageArray addObject:downloadImage];
}

[target.downloadedImageData setData:[NSData dataWithBytes:NULL length:0]]; //Reset DownloadedImageData when download one file finished
target.currentDownloadSize = 0.0f; //Reset currentDownloadSize when download one file finished

NSString *title = [NSString stringWithFormat:@"Download (%d/%d)", target.downloadedFileCount, target.selectedFileCount];
[target updateStatusAlertContentWithTitle:title message:@"Completed" shouldDismissAfterDelay:YES];

if (target.downloadedFileCount == target.selectedFileCount) { //Downloaded all the selected files
[target stopTimer];
[target.selectBtn setTitle:@"Select" forState:UIControlStateNormal];
[target saveDownloadImage];
}

} overallCompletion:^(NSError * _Nullable error) {

NSLog(@"DownloadFiles Error %@", error.description);
}];

Let's build and run the project. Try to download photos in Single Preview Mode and Multiple Preview Mode. Once it's finished, go to the Photo Album to check if the downloaded photos exist:

  • Selecting files and downloading them:

downloadFiles1

  • Download completion and photos being saved to the Photo Album:

downloadFiles2

Summary

In this tutorial, you have learned how to use DJI iOS SDK to preview photos and videos in Single Preview Mode and Multiple Preview Mode, how to enter multiple edit mode and select files for deleting. You also learned how to download and save photos to the iOS Photo Album. Hope you enjoy it!