DJI Simulator Tutorial
If you come across any mistakes or bugs in this tutorial, please let us know by sending emails to dev@dji.com. Please feel free to send us Github pull request and help us fix any issues.
In this tutorial, you will learn how to use the DJISimulator in your Android Studio project using DJI Mobile SDK. With the help of Virtual Stick control, you can input Virtual Stick flight control data and check the changes of simulator state in real time.
You can download the tutorial's final sample project from this Github Page.
We use Mavic Pro as an example to make this demo.
Let's get started!
Introduction
DJISimulator is used to control the aircraft in a simulated environment based on the virtual stick input. The simulated aircraft state information will also be displayed on the screen.
You can use the Simulator class in FlightController to control the simulation. It allows both manual and automated flights to be simulated without actually flying the aircraft.
Additionally, simulator initialization, monitoring and termination can be controlled directly through the SDK allowing for application development in continuous integration environments.
Application Activation and Aircraft Binding in China
For DJI SDK mobile application used in China, it's required to activate the application and bind the aircraft to the user's DJI account.
If an application is not activated, the aircraft not bound (if required), or a legacy version of the SDK (< 4.1) is being used, all camera live streams will be disabled, and flight will be limited to a zone of 100m diameter and 30m height to ensure the aircraft stays within line of sight.
To learn how to implement this feature, please check this tutorial Application Activation and Aircraft Binding.
Implementing the UI of Application
Importing Maven Dependency
Open Android Studio and select File -> New -> New Project to create a new project, named "DJISimulatorDemo". Enter the company domain and package name (Here we use "com.dji.simulatorDemo") you want and press Next. Set the minimum SDK version as API 19: Android 4.4 (KitKat) for "Phone and Tablet" and press Next. Then select "Empty Activity" and press Next. Lastly, leave the Activity Name as "MainActivity", and the Layout Name as "activity_main", press "Finish" to create the project.
In our previous tutorial Importing and Activating DJI SDK in Android Studio Project, you have learned how to import the Android SDK Maven Dependency and activate your application. If you haven't read that previously, please take a look at it and implement the related features. Once you've done that, continue to implement the next features.
Building the Layouts of Activity
1. Implementing the Joystick Control
In order to input some simulated data, like pitch, roll, yaw and verticalThrottle, you may need a joystick control. Let's work on the implementation of it.
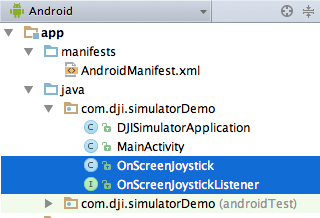
We implement the joystick control base on an open source Github project OnScreenJoystick . You can download the Github project to get the OnScreenJoystick.java and OnScreenJoystickListener.java files or get them from this tutorial's Github Sample project. Now, copy and paste these two java files to the folder of "com.dji.simulatorDemo" on the left navigator as shown below:
When you touch on the OnScreenJoystick view, the onTouch method in OnScreenJoystickListener will be called and you can get the "OnScreenJoystick" joystick object, and the x and y coordinate of the knob parameters from this method as shown below:
/** Called when the joystick is touched. |
Note: The values for x coordinate of the knob are between -1 (left) and 1 (right), the values for y coordinate of the knob are between -1 (down) and 1 (up).
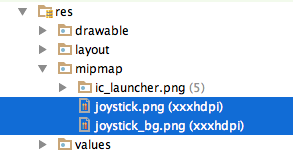
Next, copy and paste the joystick.png and joystick_bg.png files from this tutorial's Github sample project to the mipmap folder on the left navigator as shown below:
2. Implementing the UI Elements in MainActivity Class
Now, let's open the MainActivity.java file and replace the code with the followings:
public class MainActivity extends Activity implements View.OnClickListener { |
In the code above, we implement the following features:
1. Create the layout UI elements variables, including two TextView mConnectStatusTextView, mTextView, four buttons mBtnEnableVirtualStick, mBtnDisableVirtualStick, mBtnTakeOff, mBtnLand, one Toggle Button mBtnSimulator and two OnScreenJoystick control mScreenJoystickRight and mScreenJoystickLeft.
2. In the onCreate() method, we request several permissions at runtime to ensure the SDK works well when the compile and target SDK version is higher than 22(Like Android Marshmallow 6.0 device and API 23). Then invoke the initUI() method to initialize UI variables and their listeners.
3. In the initUI() method, we first initialize the UI elements variables, then set the click listener of the four buttons to "this". Moreover, implement the onCheckedChanged() method of toggle button mBtnSimulator's "setOnCheckedChangeListener". Finally, implement the onTouch() method of the two OnScreenJoystick objects' "setJoystickListener".
4. Override the onClick() method to implement the four buttons' click actions.
3. Implementing the MainActivity Layout
Open the activity_main.xml layout file and replace the code with the following:
|
In the xml file, first, we implement the RelativeLayout element. We declare an ImageButton(id: ReturnBtnCamera) element to exit the application, and a TextView(id: ConnectStatusTextView) element to show the connection status text.
Next, create a TextureView(id: textview_simulator) element to show the simulator state infos. Moreover, create the "Enable Virtual Stick" button(id: btn_enable_virtual_stick), "Disable Virtual Stick" button(id: btn_disable_virtual_stick), "Take Off" button(id: btn_take_off), "Land" button(id: btn_land). Moreover, create the "Start Simulator" toggle button(id: btn_start_simulator) and set its textOn and textOff params to "Start Simulator" and "Stop Simulator".
Lastly, we create two OnScreenJoystick elements (id: directionJoystickRight) and (id:directionJoystickLeft) for joystick control.
4. Configuring the Resources
Once you finish the above steps, let's add some resources files to the res folder on the left navigator of Android Studio.
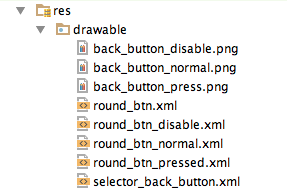
Copy the following image and xml files from the tutorial Github Sample project's drawable folder to your project, they are used for the button's UI:
Next, open the "colors.xml" file and add the following code at the bottom to declare the black overlay color:
<color name="black_overlay">#66000000</color> |
Moreover, open the "strings.xml" file and add the "success" string:
<string name="success">Success</string> |
Lastly, open the "styles.xml" file and add the following code to declare the "common_button" style:
<!-- Common button style --> |
Implementing Registration in DJISimulatorApplication and MainActivity
Once you finish the above steps, let's register the application on DJI Developer Website and get the App Key. If you are not familiar with the App Key, please check Generate an App Key for details.
Moreover, please check the Creating an Camera Application tutorial and the sample project of this tutorial for the detailed implementations of the MApplication, DJISimulatorApplication and MainActivity.
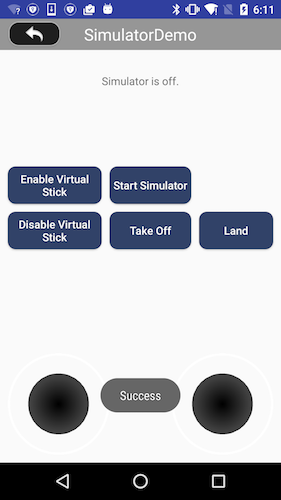
Now let's build and run the project and install it to your Android device. If everything goes well, you should see the "success" textView like the following screenshot when you register the app successfully.
Working on MainActivity class
Update Product Connection Status
Please check the sample project of this tutorial for the detailed implementations.
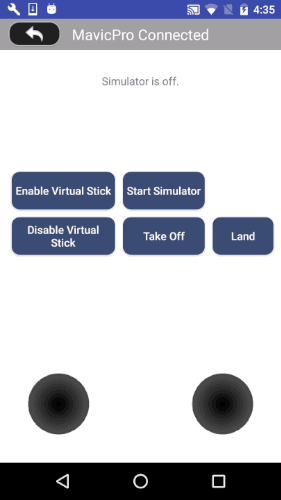
Now let's build and run the project and install it to your Android device. Then connect the demo application to your Mavic Pro (Please check Run Application for more details), if everything goes well, you should see the title textView content updates to "MavicPro Connected" as shown below:

Implementing Virtual Stick Control
Since we have implemented the Joystick control, now let's continue to work on sending virtual stick flight control data to the aircraft. First, we create a FlightController variable mFlightController, a Timer variable mSendVirtualStickDataTimer, a SendVirtualStickDataTask(extends from TimerTask class) variable mSendVirtualStickDataTask and four float variables on top of onCreate() method as shown below:
private FlightController mFlightController; |
We may use the mPitch, mRoll, mYaw and mThrottle variables to store the pitch, roll, yaw and vertical throttle virtual stick flight control data.
Next, create the initFlightController() method, invoke it in the onResume() method and implement the SendVirtualStickDataTask class as shown below:
private void initFlightController() { |
In the code above, we implement the following features:
1. In the initFlightController() method, we first check if the aircraft is not null and is connected, then invoke the getFlightController() method of Aircraft to get the mFlightController variable.
2. Next, extends from TimerTask class to create the SendVirtualStickDataTask class. Inside the class, override the run() method to invoke the sendVirtualStickFlightControlData() method of FlightController to send virtual stick flight control data. Here, we create the FlightControlData object from the four float variables declared before: mPitch, mRoll, mYaw and mThrottle.
Once you finish the above steps, let's implement the setJoystickListener() methods of mScreenJoystickLeft and mScreenJoystickRight variables at the bottom of initUI() method as shown below:
mScreenJoystickLeft.setJoystickListener(new OnScreenJoystickListener(){ |
Here, we implement the following features:
1. Override the onTouch() method of setJoystickListener and filter the pX and pY variables' value by checking if they are less than 0.02. We should not send the virtual stick data to flight controller too frequently if the value is too small.
2. Get the maximum velocity of pitch and roll control, then store them to pitchJoyControlMaxSpeed and rollJoyControlMaxSpeed variables. Since the value of pX is between -1 (left) and 1 (right), the value of pY is between -1 (down) and 1 (up), we multiply by using the pitchJoyControlMaxSpeed and rollJoyControlMaxSpeed values to update the mPitch and mRoll data. Here we take Mode 2(American mode) of remote controller as example.
3. Lastly, we check if mSendVirtualStickDataTimer is null, and create it by invoking the SendVirtualStickDataTask() method. Then, create the mSendVirtualStickDataTimer and invoke its schedule() method to trigger the timer by passing mSendVirtualStickDataTask variable, 0 milliseconds of delay and 200 milliseconds between subsequent executions.
4. Similarly, implement the setJoystickListener() method of mScreenJoystickRight variable to update the mYaw and mThrottle values and trigger the timer to send virtual stick data to the aircraft's flight controller.
Now, when you control the left and right joysticks, they will send the simulated virtual stick data (Including Yaw, Pitch, Roll and Vertical Throttle) to the flight controller of aircraft.
Lastly, override the onClick() method to implement the enable and disable virtual stick control buttons click actions as shown below:
|
This invoke the enableVirtualStickControlMode() and disableVirtualStickControlMode() methods of FlightController to enable and disable the virtual stick control mode.
Implementing DJISimulator
Let's implement the DJISimulator feature now. In order to update the simulator state data in mTextView, we may need to implement the setStateCallback() method of DJISimulator in the initFlightController() method as shown below:
private void initFlightController() { |
In the code above, we override the onUpdate() method to get the lastest simulator state data, then invoke the getYaw(), getPitch(), getRoll(), getPositionX(), getPositionY() and getPositionZ() methods of SimulatorState to get the updated yaw, pitch, roll, positionX, positionY and positionZ values and show them in mTextView.
Next, override the onCheckedChanged() method of mBtnSimulator toggleButton's setOnCheckedChangeListener() method as shown below:
mBtnSimulator.setOnCheckedChangeListener(new CompoundButton.OnCheckedChangeListener() { |
In the code above, we implement the following features:
1. If the mBtnSimulator toggle button is checked, then show the mTextView. Next, if the mFlightController is not null, we invoke the start() method of DJISimulator by passing a InitializationData with LocationCoordinate2D struct (lattitude 23 and longitude 113), updateFrequency 10 and satelliteCount 10 parameters to it. For more details of DJISimulatorInitializationData, please check the Android API Reference.
2. Next, overide the onResult() method of start(), invoke showToast() method to show the start simulator result to the user.
3. Similarly, if the mBtnSimulator toggle button is not checked, then invoke the stop() method of DJISimulator to stop the simulator. Furthermore, override the onResult() method and invoke the showToast() method to show the stop simulator result to the user.
Working on Takeoff and AutoLanding features
Finally, let's add the following code at the bottom of onClick() method to implement the Take off and Land buttons' click actions as shown below:
case R.id.btn_take_off: |
For the case of "R.id.btn_take_off", we invoke the startTakeoff() method of FlightController to send the take off command to the aircraft. Similiarly, for the case of "R.id.btn_land", we invoke the startLanding() method to send the auto landing command. It's just that simple and easy.
We have gone through a long way in this tutorial, now let's build and run the project, connect the demo application to your Mavic Pro (Please check Run Application for more details) and check all the features we have implemented so far.
If everything goes well, you should see something similiar to the following gif animations like this:
-
If the demo application is connected with Mavic Pro successfully, you should see the title textView content updates to "MavicPro Connected".
-
Press Enable Virtual Stick button to enable virtual stick control, then press Start Simulator to start the simulator.
-
Moreover, press the Take Off button to send take off command to the aircraft, if the command executes successfully, you should see the PosZ value start to change, means that the aircraft is rising.
-
Now you can drag the left and right virtual stick controls to simulate the flight behavious.
-
Lastly, press the Land button to make the aircraft start auto landing, once it finish, you may notice the PosZ value becomes "0.00". Press the Stop Simulator button to stop the simulator and then press Disable Virtual Stick to disable the virtual stick control.
Summary
In this tutorial, you've learned how to use the DJISimulator feature to simulate aircraft's flight behaviour in a simulated environment based on the virtual stick control input and show the changes of simulator state(Yaw,Pitch,Roll,PosX,PosY and PosZ) in real time. Also you've learned how to use Virtual Stick control to send virtual stick flight control data to the aircraft.
This demo is a simple demonstration of using DJISimulator, to have a better user experience, you can create a 3D simulated environment using 3D game engine like Unity3D to show the simulated data and aircraft flight behavious inside your mobile application (Like the Flight Simulator in DJI Go app)!
Furthermore, the DJISimulator allows for automated testing in continous integration environment(Like Jenkins), it would help your DJI-SDK based application testing process. Good luck, and hope you enjoyed this tutorial!