Integrate DJIVideoParser Project into DJI Windows SDK Application
If you come across any mistakes or bugs in this tutorial, please let us know by sending emails to dev@dji.com. Please feel free to send us Github pull request and help us fix any issues.
This tutorial is designed for you to gain a basic understanding of using DJI Windows SDK. It will implement the FPV view and basic control of DJI Phantom 4 Pro V2.0's camera.
You can download the tutorial's final sample project from this Github Page.
We use DJI Phantom 4 Pro V2.0 as an example to make this demo.
Importing DJIVideoParser Project
If you are not familiar with the process of integrating and activating DJI Windows SDK to your project, please check the Github source code and this tutorial: Integrate WSDK into Application for details. Now we start to import the DJIVideoParser project.
- Firstly, copy DJIVideoParser project to the root folder of DJIWSDKDemo project. You can find DJIVideoParser project here.

- Secondly, add DJIVideoParser project.
- a. Open DJIWSDKDemo solution, right-click on the solution, select Add->Existing Project.
- b. Locate to the folder where DJIVideoParser.vcxproj exists, select it and click Open.
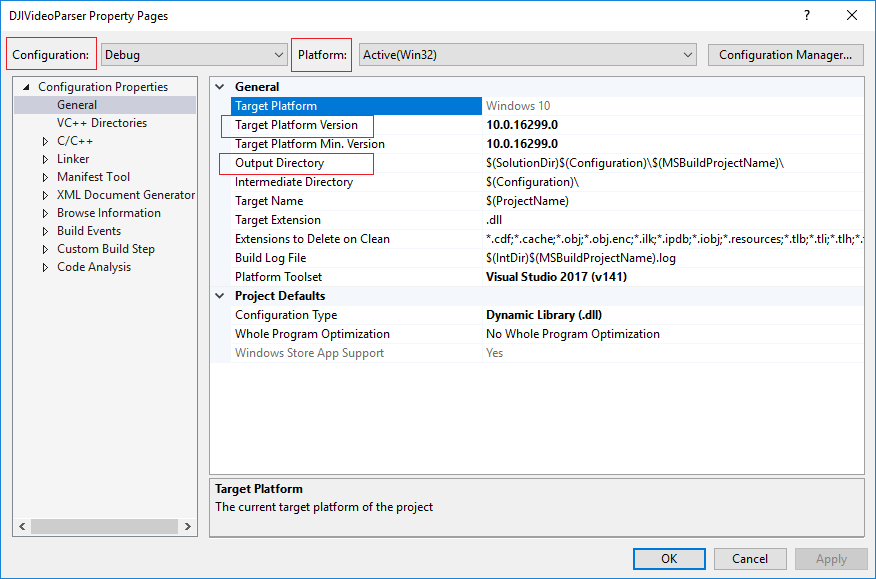
- Thirdly, configure DJIVideoParser project.
- a. Right-click on the DJIVideoParser project, select Properties.
- b. Double check and follow the following settings: Configuration, Platform, Target Platform Version and Output Directory.
- c. Right-click on the DJIVideoParser project, select "Build" to build the project so that you can use the API directly in the code after adding the related reference.
- Fourthly, add reference to DJIWSDKDemo.
- a. Right-click on DJIWSDKDemo project, and select Add Reference, and then click Projects.
- b. Click the checkbox of the DJIVideoParser project to add it.
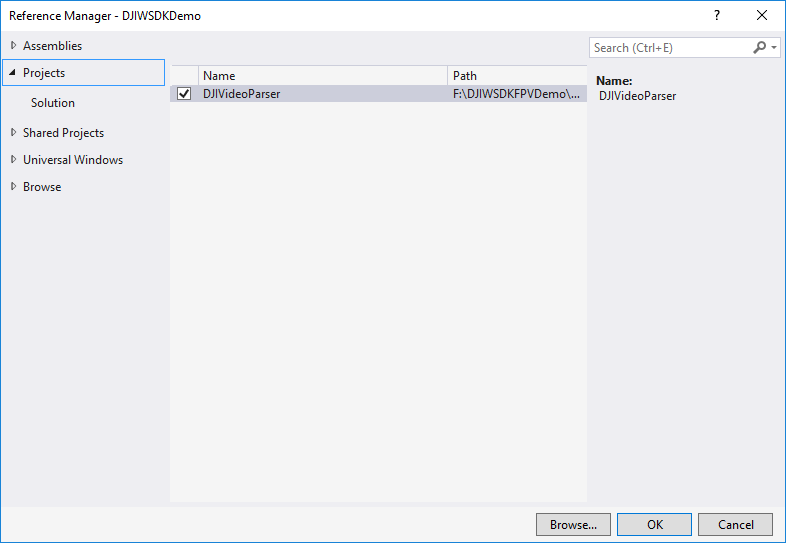
- Click OK.
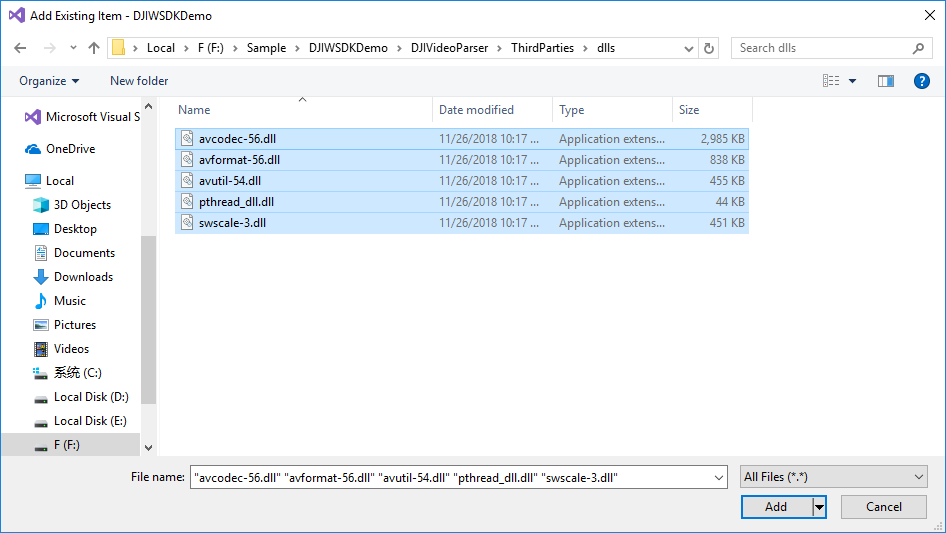
- Finally, copy FFMpeg dlls to DJIWSDKDemo project.
- a. Right-click on the DJIWSDKDemo project. Select Add->Existing Item.
- b. Locate to the path of FFmpeg dll files(under the folder of /DJIVideoParser/ThirdParties/dlls).
- c. Select all of them, and then click Add.


Implementing the First Person View
- 1. Add FPV view. Double-click on the MainPage.xaml to open it. We can see there is a Grid declaration. Add an SwapChainPanel element named "swapChainPanel" inside it.
<Grid x:Name="MainGrid" Background="{ThemeResource ApplicationPageBackgroundThemeBrush}"> |
- 2. Add video data parser and container. Double-click on the MainPage.xaml.cs to open it. Add the following elements in the MainPage class file.
//use videoParser to decode raw data. |
- 3. Add video raw data callback, decoded data callback and camera type callback. Add the following methods in the MainPage class file.
//raw data |
- 4. Add raw data and decoded data listener after the code of registering app successfully.
//Callback of SDKRegistrationEvent |
Enjoying the First Person View
Run the demo now and connect your PC to the Remote Controller of the aircraft. If everything goes well, you should be able to see the live video stream in the application, congratulations!

Shoot Photo And Record Video
Camera Work Mode
Before we start to implement the features of shooting photo or recording video, we need to understand the work mode of DJI camera firstly. There are serval types of camera work mode. We can shoot photo and start recording video when the camera work modes are set to SHOOT_PHOTO and RECORD_VIDEO, respectively.
Display and Switch Camera Mode
-
Display Camera Mode
When we set a work mode to camera, we can add camera work mode change event to constantly display the current camera mode. We can add a TextBlock named "ModeTB" to display the camera work mode.
DJISDKManager.Instance.ComponentManager.GetCameraHandler(0, 0).CameraWorkModeChanged += async delegate (object sender, CameraWorkModeMsg? value) |
-
Switch camera mode
Before shooting photo or recording video, we need to switch camera mode to a proper work mode. Add methods named
SetCameraWorkModeToShootPhoto_Click(),SetCameraModeToRecord_Click()andSetCameraWorkMode()to implement camera mode settings and switching, the implementation of the methods are shown below:
|
Shoot Photo and Record Video
Now we start to implement the features of shooting photo or recording video.
-
Shoot Photo
Add a button named "StartShootPhoto", and implement the
StartRecordVideo_Click()method of it as shown below:
private async void StartRecordVideo_Click(object sender, RoutedEventArgs e) |
-
Get Video Record Time
When we record videos, we need to know the recording time of the video. The following code can help you get the record time constantly.
//Get updated video record time |
-
Record Video
Add a button named "StartRecordVideo" and "StopRecordVideo", and implement the
StartRecordVideo_Click()andStopRecordVideo_Click()methods of it as shown below:
private async void StartRecordVideo_Click(object sender, RoutedEventArgs e)
{
    if (DJISDKManager.Instance.ComponentManager != null)
    {
        var retCode = await DJISDKManager.Instance.ComponentManager.GetCameraHandler(0, 0).StartRecordAsync();
        if (retCode != SDKError.NO_ERROR)
        {
            OutputTB.Text = "Failed to record video, result code is " + retCode.ToString();
        }
        else
        {
            OutputTB.Text = "Start Recording video successfully";
        }
    }
    else
    {
        OutputTB.Text = "The application hasn't been registered successfully yet.";
    }
}

private async void StopRecordVideo_Click(object sender, RoutedEventArgs e)
{
    if (DJISDKManager.Instance.ComponentManager != null)
    {
        var retCode = await DJISDKManager.Instance.ComponentManager.GetCameraHandler(0, 0).StopRecordAsync();
        if (retCode != SDKError.NO_ERROR)
        {
            OutputTB.Text = "Failed to stop record video, result code is " + retCode.ToString();
        }
        else
        {
            OutputTB.Text = "Stop record video successfully";
        }
    }
    else
    {
        OutputTB.Text = "The application hasn't been registered successfully yet.";
    }
}
- Display Result

Summary
In this tutorial, you’ve learned how to use DJI Windows SDK to show the FPV View from the aircraft's camera and control the camera to shoot photo and record video. These are the most basic and common features in a typical drone app. However, if you want to create a drone app which is more fancy, you still have a long way to go. More advanced features should be implemented, including previewing the photo and video in the SD Card, showing the OSD data of the aircraft and so on. Hope you enjoy this tutorial, and stay tuned for our next one!