Run Sample Application
To have a better experience of learning how to get started with the DJI iOS Mobile SDK, please check this Getting Started Video.
Register as a DJI Developer
Register for a DJI Developer account here.
During the registration process, email information and a credit card or phone number will need to be supplied to verify registration. Any credit card information given will only be used for verification and will not be charged.
Generate an App Key
Every application needs a unique App Key to initialize the SDK.
To create an App Key for an application:
Go to the DJI developer Developer Center
-
Select the "Apps" tab on the left.
-
Select the "Create App" button on the right.
-
Enter the name, platform, package identifier, category and description of the application.
- For iOS, the package identifier is the Bundle Identifier.
- For Android, the package identifier is the Package Name.
-
An application activation email will be sent to complete App Key generation.
-
The App Key will appear in the developer center, and can be copied and pasted into the application.
iOS Sample App
iOS Sample Code Setup
Download or clone the iOS Sample Github Project from: https://github.com/dji-sdk/Mobile-SDK-iOS.
The sample code includes both an Objective C sample project and a Swift Sample project.
The sample project is integrated with DJI iOS SDK CocoaPods - after you have downloaded the project please follow the the below steps to install DJISDK.framework using CocoaPods:
1. Install CocoaPods
Open Terminal and change to the download project's directory, enter the following command to install it:
sudo gem install cocoapods |
The process may take a long time, please wait. For further installation instructions, please check this guide.
2. Install SDK with CocoaPods in the Project
Run the following command in the ObjcSampleCode and SwiftSampleCode paths:
pod install |
If you install it successfully, you should get the messages similar to the following:
Analyzing dependencies |
Note: If you saw "Unable to satisfy the following requirements" issue during pod install, please run the following commands to update your pod repo and install the pod again:
pod repo update |
Objective C App Key Setup
Navigate to the ObjcSampleCode folder and open the DJISdkDemo.xcworkspace project in Xcode.
-
Change the Bundle Identifier to a unique identifier and use it to generate an App Key.
-
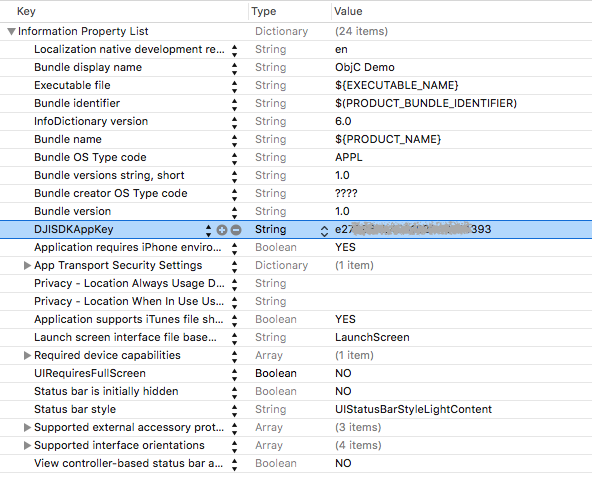
Paste the generated App Key string into the
DJISDKAppKeystring value of the info.plist file of the Xcode project:
Swift App Key Setup
Navigate to the DJISDKSwiftDemo folder and open the DJISDKSwiftDemo.xcodeproj project in Xcode.
-
Change the Bundle Identifier to a unique identifier and use it to generate an App Key.
-
Paste the generated App Key string into the
DJISDKAppKeystring value of the info.plist file of the Xcode project the same as the Objective C App Key Setup.
Android Sample App
The SDK doesn't need to be downloaded to run the Android sample application as it's already included in the project.
Android Sample Code Setup
Download or clone the Android Sample Github Project from: https://github.com/dji-sdk/Mobile-SDK-Android.
Open the project in Android Studio and paste the generated App Key string into android:value in the "com.dji.sdk.API_KEY" meda-data element in the "AndroidManifest.xml" file.
<!-- |
Run the Sample App
Compile the sample application to the Android or iOS Mobile Device. Then the Mobile Device can be connected to the DJI product to run the Sample App.
For Aircraft that use Lightbridge as the wireless link between the Remote Controller and the Aircraft, the Mobile Device is connected to the product by USB.
For Aircraft or products that use WiFi as a wireless link, the Mobile Device is connected to the product by WiFi.
USB Connection Procedure
Mavic Pro, Phantom 4, Phantom 4 Professional, Inspire series, Phantom 3 Professional, Phantom 3 Advanced, M100, M600, M600 Pro:
Turn on the Remote Controller.
- Turn on the Aircraft and wait until the Remote Controller has connected with the Aircraft.
- Connect iOS/Android Mobile Device to the Remote Controller using a Lightning (iOS) or USB (Android) cable.
- Run Sample App on the Mobile Device.
Notes:
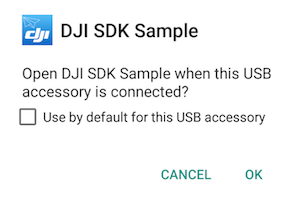
If you are using an Android Device, please make sure your DJI Remote Controller supports AOA before you test the Sample app. You can upgrade your DJI Remote Controller to the latest firmware and check if there is a dialog pops up when you connect the app to it like this:
To learn how to change the default app for USB accessory, please check these two FAQs: Android Device, Samsung Device.
WiFi Connection Procedure
Phantom 3 Standard, Phantom 3 4K, Spark:
Turn on the Remote Controller.
- Connect Mobile Device to the WiFi network created by the Remote Controller.
- Turn on the Aircraft and wait until the Remote Controller has connected with the Aircraft.
- Run Sample App on the Mobile Device.
Osmo Series, Mavic Pro, Spark:
Turn on the product (Osmo or aircraft).
- Connect Mobile Device to the WiFi network created by the product.
- Run Sample App on Mobile Device.